
How to get there
- Choose the Selection tool
 , and select a region of measures.
 - Choose Utilities > Change > Articulations.
What it does
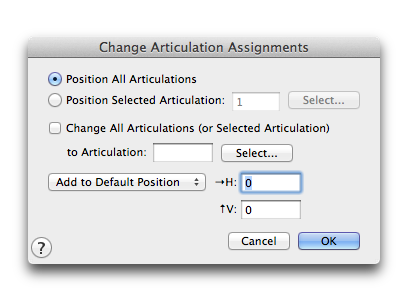
Using the Change Articulation Assignments command, you can swap one articulation marking for another, adjust the positions of all accent marks at once (for example), or clean up the positioning of all articulations in a region.
- Position All Articulations. Select this option if you want Finale to adjust the position of every articulation in the selected region. How it moves them depends on your setting from the Add to…
- Position Selected Articulation • Select. If you only want to move all occurrences of a specific marking, enter its number into the text box. (Finale numbers its articulations from left to right, top to bottom, in the Articulation Selection dialog box.) It may be more convenient, of course, to click Select; Finale displays a palette of all articulations created in (or loaded into) the current document. Double-click the one you want to move; you return to this dialog box, where the correct number appears in the text box.
Once again, how Finale moves the articulation type you’ve selected depends on your setting in the Add to…
- Change All Articulations (or Selected Articulation) to Articulation ___ • Select. Click this check box if, instead of moving all articulations (or the selected articulation marking, depending on your choice of the top two options), you want to replace them with a different articulation marking. You could replace all > accent marks with ^ accent marks, for example. To do so, enter the replacement symbol’s number in the text box, or click Select, and double-click your selection in the Articulation Selection dialog box that appears. Of course, if you enter numbers into the H: and V: text boxes, you can move the articulations as you replace them.
- Add to Default Position • Add to Current Position. If you decide to adjust the positions of articulations, use this
- H: • V:. Type numbers into these text boxes to specify how far Finale should move the specified markings. A positive or negative H: value moves them to the right or left. When an articulation is positioned On notehead side, or On stem side, a positive V: value moves the marking away from the staff; a negative V: value moves the marking in toward the staff. Because they can flip from one side to another, Finale does not track their actual positions, but instead places them closer to or further away from the staff. When an articulation is positioned Manually, Above Note, or Below Note, a positive V: value moves the articulation up; a negative V: value moves the articulation down. It doesn’t matter whether the articulation is above or below a note.
- OK • Cancel. Click OK to proceed with the articulation transformation; click Cancel to return to the score without changing anything.
See also:
Leave feedback on this topic
Finale 2014 for
Copyright and trademarks

