
T ool dialog box
How to get there
- Choose the MIDI tool
 .
. - Click to select one measure, SHIFT+click to select additional measures, drag-enclose to select several on-screen measures, or click to the left of the staff to select the entire staff. Double-click the selected region.
What it does
The MIDI
Furthermore, the MIDI
There are several ways to select specific notes in the MIDI
The six icons at the left side of the screen correspond to the different MIDI types you can select in the MIDI tool menu; instead of choosing a data type (such as Key Velocities) from the menu, simply click an icon.

If you’ve entered music with the Simple or Speedy Entry tools, the velocity of every note is 64. (64 is Finale’s default note velocity setting, which you can change by
To edit the velocity of a particular note, double-click its handle. The Set To - Key Velocities dialog box appears, in which you can enter a new velocity value. To edit the velocities of several notes, select them with any of the methods described above, then choose the appropriate command in the MIDI tool menu. To restore selected notes to their default velocity values, press
Finale stores the captured velocity values as the difference between the actual velocity with which you struck the notes and the default velocity, as determined by the Base Key Velocity text box in the Playback Controls. If you increase or decrease this Base Key Velocity value, therefore, you instantly increase or decrease the playback velocity of every note in the piece, even though their velocity values remain the same in proportion to one another.

If you’ve entered music with the Simple or Speedy Entry tools, the Start and Stop Times of every note are zero, because the definitions of Start and Stop Times are the differences between the notated attack and release points of the notes and the actual (performed) attack and release points. The graph of a note whose Start Time is zero is perfectly flush with the vertical grid line representing its notated attack point, and that of a note whose Stop Time is zero stops neatly at the grid line representing its notated release point:

The notes displayed in the MIDI
If you’ve captured the Start and Stop Time (performance) data from a real-time HyperScribe performance, however, you’ll see horizontal lines that don’t begin and end nearly so precisely at the vertical grid lines. For example, the graph of a note you held down slightly beyond the beginning of the next beat appears to extend just to the right of the vertical grid line (and has a positive Stop Time). The graph of a note you struck a fraction of a second early begins just before a vertical grid line (and has a negative Start Time).
To edit the Start and Stop Time of a particular note, double-click its handle; the Set To - Note Durations dialog box appears, in which you can enter a new value. To edit the Start and Stop Times of several notes, select them with any of the methods described above, then choose the appropriate command in the MIDI tool menu. To set the Start and Stop Times of selected notes to zero (so that they play back with "quantized" rhythmic perfection), press BACKSPACE or use the Selection tool to clear Continuous Data.

When you return to the MIDI
To edit the controller setting for a particular region, drag through the region so that it’s highlighted (black areas become white, and vice versa). Choose the appropriate command in the MIDI tool menu to add to, subtract from, or otherwise change the controller’s setting during the selected region (see MIDI Tool menu for a list of the available commands). To set the controller to its default value or "at rest" position in the selected region, press BACKSPACE or use the Selection tool to clear Continuous Data.
Continuous data is independent of the notes themselves. Therefore, no handles appear on the notes in the MIDI

When you return to the MIDI

When you’re editing patch changes in the MIDI
To insert a patch change, click in the "graph area" at the location where you want it to occur, and drag to the right. It doesn’t matter whether you select a large region by dragging or only a tiny vertical sliver—all Finale needs to know is where the beginning of the selection falls, because that’s where it will insert the patch change. Choose MIDI tool > Set To, and enter the patch number you want to change to. (You can also use the other commands in the MIDI Tool menu to change the patch numbers in a selected region, although most of these other commands [Scale, Limit, and so on] have little musical relevance to patch numbers.) To remove patch changes from a selected region, press
If a bank change is part of a patch setting, Finale displays a "B" in the MIDI

When you return to the MIDI
To edit the channel pressure value for a particular region, drag through the region so that it’s highlighted. Choose the appropriate command in the MIDI tool menu to add, subtract, or otherwise change the aftertouch value during the selected region (see MIDI Tool menu for a list of the available commands). To set the aftertouch values to zero for the entire selected region, press

When you return to the MIDI
To edit the pitch wheel setting for a particular region, drag through the region so that it’s highlighted (black areas become white, and vice versa). Choose the appropriate command in the MIDI tool menu to add to, subtract from, or otherwise change the pitch wheel setting during the selected region (see MIDI tool menu for a list of the available commands). You may find the Scale command to be the most useful for creating pitch bends, because it creates smooth gradations from one pitch wheel setting to another. Be sure to use one of the MIDI tool menu commands again later in the music to return the pitch wheel to its "at rest" position, however, or your synthesizer will believe that the pitch wheel is "stuck" in its transposed position for the remainder of the piece
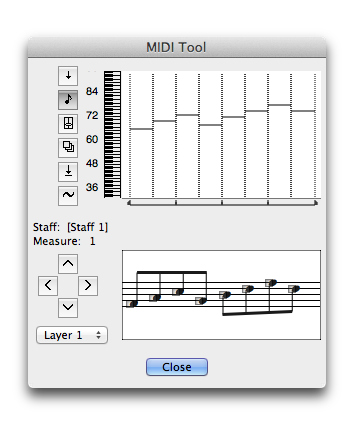
When Note Durations is selected in the MIDI tool menu, the vertical "ruler," which appears on the left side of the screen, displays pitches according to the pitch representation setting in Preferences-View. Pitches are either represented as MIDI note numbers (60 = middle C), or as pitches where C4 (or C3 or C5) indicates middle C. Handles appear for each note in the current staff, and a horizontal line indicates the duration (Start and Stop Time) of each note.
When Continuous Data is selected in the MIDI tool menu, the vertical "ruler," which appears on the left side of the screen, displays values between 1-128. Many controllers (a type of continuous data) are either on (128) or off (1). Handles do not appear on notes, because continuous data is assigned to measures. A program change is also a type of continuous data. If a bank change is part of the program change message, a B appears above the program change display.
- staff: (#) • meas: (#). These indicators identify the leftmost (first) measure displayed in the window (by staff number and measure number).
- [Directional arrows]. Click these directional arrows (up, down, left, or right) to scroll the music displayed in the MIDI tool dialog box. Click the left or right arrows to move one measure forward or backward in the score; click the UP or DOWN ARROW to move to the staff above or below.
- Layer: 1 • 2 • 3 • 4. This pop-up menu identifies the layer whose notes you’re editing. To switch layers (if you’ve entered music on both layers), choose another layer from the pop-up menu.
Leave feedback on this topic
Finale 2014 for
Copyright and trademarks

