
How to get there
- Choose MIDI/Audio >
- From the Effects
What it does
Much in the same way as the acoustical space adds a great deal to a live musical performance, reverberation effects can impart a three-dimensional ambient sound to an instrument or group of instruments in Finale. Reverb can also improve the blend of an ensemble by providing a sense of space and effectively smoothing the sonic edges. Reverb is perhaps the most widely used audio effect; for example, the instrument patches contained in each Garritan sample library rely on reverb for a realistic sound.
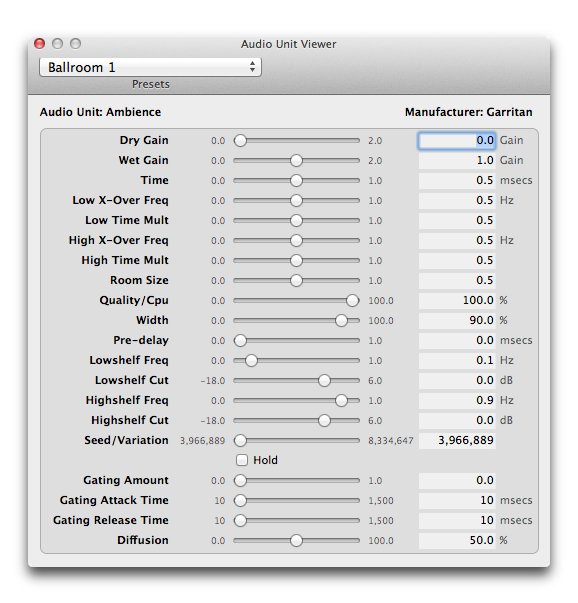
Just as hardware synthesizers and softsynth plug-ins are designed to simulate musical instruments, Ambience allows you to simulate the reverberation of a cathedral, concert hall, and many other spaces. Ambience has a number of performing space presets from which to choose. These presets have been custom-made and it is recommended that you begin with these presets. You can also edit these presets or experiment with the various settings to customize the acoustical environment as needed.
- Presets menu. Ambience has a number of performing space presets to choose from. These presets have been custom-made for Garritan Personal Orchestra and it is recommended you first try out these presets. You can also edit these presets or create your own spaces.
- Dry Gain. The dry knob controls the volume of direct (unprocessed) sound. When using Ambience as a send effect, set this parameter to -inf.
- Wet Gain. This knob controls the volume of the processed reverberant sound.
- Time. This controls the time it takes for the reverb reflections to fade away into silence.
- Low X-Over Freq. • Low Time Mult. • High X-Over Freq. • High Time Mult. These controls allow you to put equalizer effects on the reverb. They can be useful for cutting away bass that can otherwise make the reverb sound muddy. They can also help to simulate the roll-off in response at high frequencies characteristic of most concert halls.
- Room Size. This controls the size of the room. Note that long reverb time and small room sizes do not mix well. For natural sounds, a large room size, such as a concert hall, should be accompanied by a long reverb time, and vice versa.
- Quality/CPU. This knob allows you to trade off reverb quality for CPU usage. High quality = high CPU usage. If there is too much CPU demand on your machine, try turning down the quality. You can make fun effects if you set it very low (try it).
- Width. This controls the stereo spread from mono (0%) all the way to a wide stereo (100%). It is recommended this be set close to 100%.
- Pre-delay. This controls the amount of time between the direct sound and the first of the reverb reflections. It is pre-delay that defines our perception of the size of the room.
- Lowshelf Freq. • Lowshelf Cut. • Highshelf Freq. • Highshelf Cut. These commands affect how the character of the reverb develops over time as it decays. Use it to control the decay time of bass and treble.
- Speed/Variation. The Variation dial can create a new variant of the same room. If there is some annoying echo or ringing in the reverb that bugs you, adjust this control until you find a desirable variation.
- Gating Amount • Gating Attack Time • Gating Release Time. These controls affect how the reverb follows the dynamics of the audio input and can generate some interesting effects. These effects aren’t suitable for naturally sounding reverb, although they can be useful for experimental music.
- Diffusion. This control has a subtle effect on the sound, especially noticeable with small room sizes.
See also:
Leave feedback on this topic
Finale 2014 for
Copyright and trademarks

