
How to get there
- Choose the Expression tool
 , and double-click a note or measure. The Expression Selection dialog box appears.
 - Click Create, or click an expression and then click Edit.
What it does
There are two kinds of expressions: Text Expressions, composed of words or symbols you can type (Allegro, ritard, dynamic markings, and so on), and Shape Expressions, composed of shapes you’ve created in the Shape Designer. Either can be defined for playback.
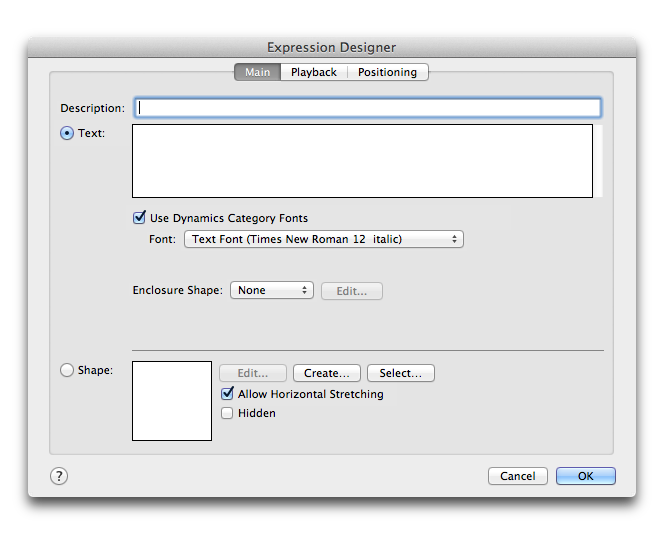
In this dialog box, you can create a new Expression or edit an existing one. This dialog box is separated into three tabs, each responsible for different attributes of the expression. Use options under the Main tab to edit the spelling, font, or description, options under the Playback tab to edit how the expression affects playback, such as volume or tempo, and options under the Positioning tab to specify precise positioning of the expression relative to its corresponding note or measure.
To apply playback settings to the expression, click the Playback tab. See Expression Designer-Playback. To set the default positioning, click the Positioning tab. See Expression Designer-Positioning.
- Description. You can use this text box to label each expression for reference later. The description entered here displays near the bottom of the expression in the Expression Selection dialog box. The description can be particularly helpful if you have a number of expressions that do not contain any text, such as expressions defined only to modify the playback.
- Text • Shape. Choose Text to define or edit a Text Expression or Shape to define or edit a Shape Expression.
Note that slurs, phrase markings, and hairpin crescendos should be entered with the Smart Shape tool.
- [Text box]. This text box is where you type the expression text itself.
- Use _ Category Fonts. Check this box to use the font, size, and style defined for this category. Fonts for each category can be defined in the Category Designer dialog box. Uncheck this box to display additional font, size, and style options that allow you to define these settings for this specific expression only (see Expression Designer-Positioning).
- Insert Note. Click this button and choose an option from the list to add the note character of a metronome marking. The note character is added in the Number Font. Note that you can automatically assign metronome markings for playback by checking Match Playback to Metronome Marking Text under the Expression Designer-Playback tab.
- Font. Use this
- Hidden. Select this check box to prevent the expression from printing. Hidden expressions will continue to display on-screen at the Hidden Object Shading percentage specified in Preferences-View.
- Enclosure: Shape • Edit. If you want your expression framed by a geometric enclosure, click this drop-down menu to choose the desired shape. Click Edit to open the Enclosure Designer dialog box, where you can specify the shape, size, and line thickness of the enclosure. You might use this feature, for example, when creating rehearsal marks—you can enclose each letter in a neat rectangle.
- Use Auto-Sequencing Style • A, B, C…Measure Number. [Available for rehearsal marks only]. Check this box and choose a rehearsal mark style from the adjacent
If auto-sequenced rehearsal marks are already in the score and this option is unchecked, Finale leaves the existing rehearsal mark expressions intact, but removes each auto-sequenced number or letter, leaving empty placeholders. If you wish to remove auto-sequenced rehearsal mark expressions you can delete them individually in the score (see To erase expressions from a region), or delete the definition directly from the Expression Designer dialog box (by selecting the expression's box, clicking Delete, and choosing "Delete element from both selection palette and score").
- Hide Measure numbers. [Available for rehearsal marks only]. With this box checked, rehearsal marks automatically take the place of measure numbers on the measures added. In other words, measure numbers are hidden in favor of rehearsal marks. If the rehearsal mark is subsequently deleted or moved to a different measure, the measure number reappears automatically (if assigned to show in the Measure Number dialog box).
- Edit • Create • Select. Click Edit or Create to open the Shape Designer where you can edit the selected shape expression or create a new one. Click Select to choose an existing Shape Expression.
- Allow Horizontal Stretching. When Finale creates the image of a page of your score in Page View, it tends to stretch each measure by a small amount in order to justify each system neatly to the page margins. In many cases you’ll want any Shape Expressions to stretch along with the measures in which they occur. In such cases, select this item. Deselect this check box if you don’t want to permit a shape to be stretched horizontally—for example, you might prefer that a harp pedaling diagram retain its original dimensions.
- Hidden. Select this check box to prevent the shape expression from printing. Hidden expressions will continue to display on-screen at the Hidden Object Shading percentage specified in Preferences-View.
Tip: Set an opaque enclosure to have the Text Expression cut away other items underneath it in the score.
Leave feedback on this topic
Finale 2014 for
Copyright and trademarks

