

How to get there
Choose Plug-ins > Scoring and Arranging > Check Range. If you prefer to apply Check Range to a specific region, select the region using the Selection tool before using the plug-in.
What it does
The Check Range plug-in allows you to verify that the staff you have selected is within the range of the specified instrument or voice. It will operate on the current selection, or the entire document if there is no region selected (using the staff name attribute to identify an instrument). In either case, the plug-in will go through the document (or selected region) on a staff by staff basis, comparing the notes to check if they are within the range of the instrument specified for each particular staff. For every note that is outside the specified range, you may either change the note, erase it, or simply leave it alone.
There are three predefined ranges for each instrument the Check Range plug-in knows about: Beginner, Intermediate, and Advanced. If the predefined ranges do not suit your needs you may specify other values for the highest and lowest pitches of the range the Check Range plug-in will use.
The Check Range plug-in will suggest an instrument based on the Full Staff Name attribute of the staff currently under examination. If there is no Full Staff Name, the plug-in will try the Abbreviated Staff Name attribute of the staff, then the Full Group Name and Abbreviated Group Name attributes of the group to which the staff belongs. If, for some reason, the suggestion does not suit your needs, you can choose another instrument from the list of available instruments.
- Staff Name. Check Range suggests an instrument and range based on the Full Staff Name attribute of the staff under examination. (If the Full Staff Name attribute is not set, the plug-in will try to find an instrument name by examining the staff’s Abbreviated Staff Name attribute, then the Full Group Name and Abbreviated Group Name attributes of the group to which the staff belongs.) If the instrument suggested does not suit your needs, you can select another instrument from the list.
- Range Class. You can specify one of three predefined ranges for the selected instrument by choosing an item in the Range Class
- High Note • Low Note. You can also modify the extent of the instrument range by editing the values in the High Note and Low Note fields directly. Use the arrows next to the text fields to change the values a half-step at a time, or click on the Listen… buttons to enter pitches from a MIDI instrument.
- Display at Concert Pitch. If the current staff is a transposing staff, the Display at Concert Pitch check box under the Low Note field is active and you can use it to alternate between displaying pitches at concert pitch or at the staff’s transposition.
- Skip Staff. If you decide you want to skip the current staff and have the Check Range plug-in continue its operation with the next staff, click on the Skip Staff Button.
- Check • Cancel. Click Cancel to cancel the Check Range operation immediately. Click Check to check notes on the current staff against the range you have specified.
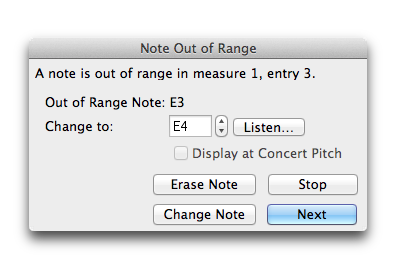
- Out of Range Note. If a note is found that is too high or too low for the range specified, Finale scrolls to the measure and staff where the offending note was found and you will be presented with a dialog box in which you can modify the pitch. (In this example, the Beginner’s range for Flute was selected, so the B natural below middle C was out of range; the Advanced Range for Flute includes the B natural.)
- Change To • Listen. The dialog suggests a pitch within the specified range as an alternative to what is written in the document. You can override this suggestion by typing in a different value in the Change To text field. You can also use the arrows next to the text field to change the value a half-step at a time, or click on the Listen button to specify a pitch from a MIDI instrument.
- Display at Concert Pitch. If the current staff is a transposing staff, the Display at Concert Pitch check box under the Low Note field is active and you can use it to alternate between displaying pitches at concert pitch or at the staff’s transposition.
- Change Note • Erase Note. Click Change Note to change the pitch to the value you’ve specified. Click Erase Note to delete the note. In most cases, the entry will consist of a single note, erasing it will replace it with a rest. If the entry was a chord, the note will simply be deleted.
- Next. Click Next to leave the offending note unchanged, the Check Range plug-in will then continue checking the staff at the next note. The plug-in will continue looking for out of range notes until it reaches the end of the current staff. Then the Check Range dialog will be displayed for the following staff and you can continue the range checking operation.
- Stop. Click the Stop Button to stop the range checking process immediately.
Notes:
- The Check Range dialogs always use the notational conventions you specified in the Pitch Representation section of Preferences-View (under the Edit menu).
- The Check Range dialog uses some simple methods to guess the name of the instrument you want even if the Full Staff Name is slightly different. Most plural forms are recognized correctly, as are numbers before or after the instrument name (“Violin II” is matched to the violin and “2 Flutes” is matched to the flute). If the Check Range dialog does not match the instrument you intended, simply select the instrument you want.
- The list of instruments recognized in the Check Range dialog is quite extensive, and should cover most needs. But, if an instrument you need is not found in the list, try an instrument with a similar range; you can always adjust the values of the range to suit your needs.
Leave feedback on this topic
Finale 2014 for
Copyright and trademarks

