
How to get there
The Text menu appears when the Text tool  is selected for editing text blocks directly on-screen, or when the Edit Text window appears for editing staff and group names. An abbreviated text menu is also available in the Lyrics window, Edit Staff Name, and Text Expression Designer dialog boxes. See Creating or editing a staff name; Creating or editing a group name; Creating expressions; Text menu (Lyrics tool).
What it does
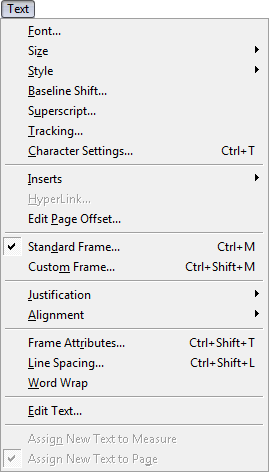
The Text menu contains options for editing text fonts, sizes, styles, justification and so on, displaying the text as it will appear on the screen and on your printed music.
- Font.
- Size. Choose an option from this submenu for the font size for your text. See Size submenu.
- Style. Choose an option from this submenu for the font style for your text. See Style submenu.
- Baseline Shift. Choose this command to display the Baseline Shift dialog box, where you can adjust the vertical position of the selected text without affecting the spacing between lines.
- Superscript. Choose this command to display the Superscript dialog box, where you can adjust the vertical position of the selected text. If necessary, the spacing between lines adjusts by the same amount.
- Tracking. Choose this command to display the Tracking dialog box, where you control the amount of horizontal space, in em’s, that Finale should leave between characters for the selected text. One em is equivalent to 1/1000 of the point size.
- Character Settings. Choose this command to display the Character Settings dialog box, where you can specify all the settings for the selected text. Change one or more of the following: font, style, size, effects, baselineAn imaginary line used to align the bottom edge of font characters. Finale displays arrows that control the baseline positioning for lyrics and chords. shift, superscript, and tracking.
- Inserts. Use this submenu to place preset text information into a text block in your score. See Inserts submenu.
- Hyperlink. Choose this command to display the Hyperlink dialog box, where you can define the display text and URL for a hyperlink.
- Edit Page Offset. Select a page number insert and then choose this command to display the Page Offset dialog box, where you can change the page number displayed in the insert.
- Standard Frame • Custom Frame. These commands specify the type of frame to be used around your text block. Choose Standard Frame (selected by default) to display the Standard Frame dialog box, where you specify whether a border appears around the frame, the line thickness of the border, and the amount to inset the text from the frame. Choose Custom Frame to display the Custom Frame dialog box, where you select the positioning of text within or around a custom frame that you can create in the Shape Designer, and set the amount to indent the text from the frame. A checkmark by this command indicates that you’ve created a custom frame to surround the text. Note that if you choose Custom Frame but leave Shape = 0 (no shape is selected) and H: and V:= 0, Standard Frame will be selected when you dismiss the dialog box.
- Justification. Use this submenu to specify how text should be justified within its frame. See Justification submenu.
- Alignment. Use this submenu to specify how you want the text block positioned on the page. See Alignment submenu.
- Frame Attributes. Choose this command to display the Frame Attributes dialog box, where you can change the placement of the currently selected page-assigned or measure-assigned text block in your score, its placement on the page (left, right or centered), and what pages, if applicable, the text block appears on. This command is available when a single text block is selected.
- Line Spacing. Choose this command to display the Line Spacing dialog box, where you specify the exact line spacing (single-spaced, double-spaced, or some other spacing) that you want applied to all lines of text in the text block.
- Word Wrap. Choose this command (enabled by default) to enable word wrapping in text blocks.
- Edit Text. Choose this command to display the Edit Text dialog box for the currently selected text block. Or, choose this command when no text block handleA small square which appears on currently "selectable" elements in the score. Handles allow you to select, edit and adjust musical elements in the score. is selected to cycle through and edit all text blocks in your score, including staff and group names.
- Assign
Note that these commands are only available while in Page View. In Scroll View, text blocks are always assigned to measures. Also, these commands only affect future text blocks. To change the assignment of an existing text block, see Frame Attributes dialog box.
Leave feedback on this topic
Finale 2014 for
Copyright and trademarks

