
How to get there
The Smart Line Designer can be accessed either through the Smart Shape menu or the Smart Shape tool palette:
- Click the Smart Shape tool
 . The Smart Shape menu appears.
 - Choose Smart Shape > Smart Shape Options.
- Click Select next to Smart Line Style.
- Click Edit or Create.
Or,
- Choose the Smart Shape tool .
-
- Select Create or Edit.
What it does
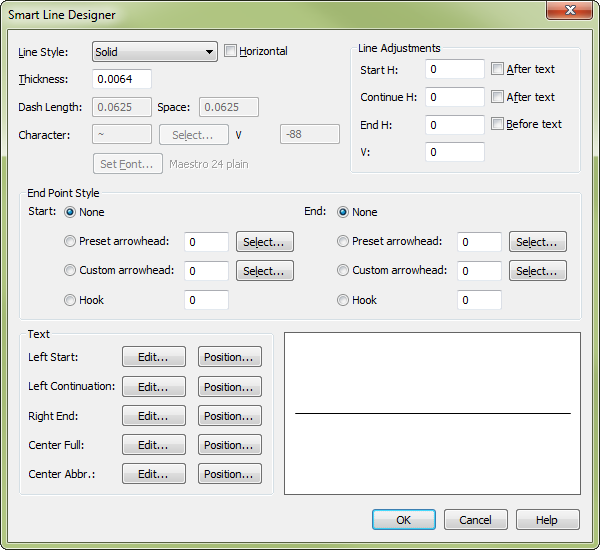
The Smart Line Style dialog box allows you to create or edit the Smart Line Style you would like to use.
- Line Style: Solid • Dashed • Character. Select the line style to be used for this item.
- Horizontal. Select this option to ensure that the Smart Shape you are defining can only be placed horizontally, not diagonally.
- Line Adjustments: Start H • After Text • Cont H • After Text • End H • Before Text • V. Use these settings to adjust where your lines start, continue and end, how high above or below your click point they appear, and whether the lines start, continue and end before or after any starting or ending text.
- Thickness. Use this setting to modify the thickness of the dashed or solid line. This option is only available when Solid or Dashed is select from the Line Style
- Dash Length • Space. Use these options to modify the type of dashed line being used. These options are only available when Dashed is selected from the Line Style
- Character • Select • V(EMs) • Set Font. Set the character and the font for the item. Click Set Font to display the Font dialog box where you can select the font type, size and style. Set the vertical positioning of the baseline in Em’s (these are point size independent units). Click Select to select the actual character to use from the specified font. See Font dialog box and Symbol Selection dialog box. These options are only available when Character is selected from the Line Style
- End Point Style: Start • End: None • Preset Arrowhead; Select • Custom Arrowhead; Select • Hook. Set the starting and ending style of the line using an arrowhead or a hook of specified length if desired.
- Text: Left Start • Left Continuation • Right End • Center Full • Center Abbr.; Edit • Position. Use these items to set up text combinations for the left (start and after a system break), right, and center of your custom Smart Shape. Click Edit to display the Text Edit window where you can edit you text. Click Position to set the position of the text relative to the selected line style. See Edit Text window and Position dialog box.
- OK • Cancel. Click OK to confirm, or Cancel to discard, the changes you’ve made to the custom Smart Shapes. You return to the score.
See also:
Leave feedback on this topic
Finale 2014 for
Copyright and trademarks

