
How to get there
The Import MIDI File Options dialog box can be accessed in two ways:
- Choose MIDI/Audio > MIDI File Options > Import MIDI File Options (does not display Create Percussion Staves).
- Choose File > Open and choose MIDI fileA type of file written in a standardized format that can be understood by music programs from different manufacturers so that one file can be used in several different programs. For example, music created in any sequencer program can be opened by Finale and converted into written notation. from the File Type
What it does
When you tell Finale to "open" a MIDI file, you’re essentially telling it to transcribe the file. The options in this dialog box are very similar to those you encounter when you’re transcribing real-time performances in a Finale document quantizationA process of rounding off rhythmic values of notes played in a MIDI performance to the nearest selected duration, resulting in a cleaner transcription of the notes. and split point options, key and time signature settings, and commands to "capture" MIDI data (such as pedaling and key velocity information).
You also use this dialog box to tell Finale how you want the tracksA location where one records or plays back a musical message — usually a portion of the total arrangement. Tracks are for convenience; channels are required. of the sequencer file translated into Finale staves. For example, you can specify that each track simply become one staff, or that the contents of each MIDI channelMIDI channels are used to transmit and receive MIDI information such as note on and note off messages as well as controller and patch information to your MIDI device(s). become one staff. However, you can also enter other dialog boxes from within this one, where you can specify much more elaborate track-to-staff configurations.
Follow the instructions in your sequencer for creating a standard MIDI file.
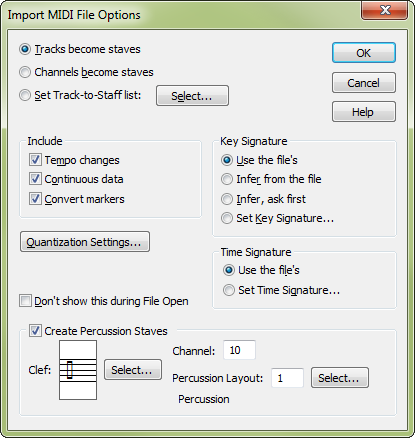
- Tracks Become Staves. Click this button if you want Finale simply to notate the contents of each sequencer track on one staff. Finale selects the treble or bass clef for each staff, based on the register of the music in each track. In fact, if the notes have such a wide range that it wouldn’t be appropriate to place them all on one staff, Finale splits the track into two staves with different clefs.
Technical note: Finale selects a clef as follows. If all the notes of the track are above MIDI key number 47 (that’s B a ninth below middle C), it selects the treble clef. If all notes are below key 72 (C above middle C), it selects the bass clef. If the notes in the track don’t fall into either category, Finale transcribes them onto two staves, splitting them into treble- and bass-clef staves using F below middle C as a split point.
- Channels Become Staves. Click this button if you want the contents of each MIDI channel (regardless of its track assignments) transcribed onto a single Finale staff. Once again, Finale attempts to make intelligent decisions regarding the selection of a clef for each staff.
- Set Track-to-Staff List; Select. Click this button to display the Track/Channel Mapping for Staves dialog box when you open a MIDI file, where you can specify a number of track, MIDI channel, and staff configurations. You can specify the top-to-bottom order of the resulting Finale staves, as well as staff transpositions, clefs, and the distance between staves in the resultant Finale document. The Select button is only displayed when you are importing a file and do not have Don’t show this during File Open selected. If you have selected Set Track-to-Staff List and Don’t show this during File Open while in the MIDI/Audio menu, the Track/Channel Mapping to Staves dialog box will appear when you open a MIDI file instead of the Import MIDI File Options dialog box. See Track/Channel Mapping to Staves dialog box for full details.
- Key Signature: Use the File’s. Click this button if you want Finale to notate the transcription with the key signature specified by the MIDI file (if it was created by a sequencer that lets you specify one).
- Key Signature: Infer from the File. Click this button if you want Finale to attempt to deduce the correct key signature by examining the notes in the sequencer file. Finale analyzes the music, measure by measure, placing key changes where it considers them necessary. You won’t see the results of Finale’s intelligent guesses until it’s finished transcribing the file into standard notation.
- Key Signature: Infer, Ask me first. Click this button if you want Finale to attempt to deduce the correct key signature by examining the notes in the sequencer file, but to let you confirm its guesses. When you click the OK button to begin the transcription, Finale displays the key signature dialog box at each measure in which it detects a key change, letting you confirm or cancel its decision.
- Key Signature: Set Key Signature. Click this button if you simply want to tell Finale what key the file is in. Finale displays the Key Signature dialog box, where you can scroll to the correct key signature and click OK.
- Time Signature: Use the File’s. Click this button if you want Finale to notate the transcription with the time signature specified by the MIDI file (if it was created by a sequencer that lets you specify one).
- Time Signature: Set the Time Signature. Click this button if you simply want to tell Finale what time signature the file is in. Finale displays the Time Signature dialog box, where you can set the correct time signature and click OK. (See Time Signature dialog box if you need help in setting the time signature.)
- Tempo Changes • Continuous Data • Convert Markers. These options tell Finale to remember the precise "feel" of the original sequence, and to keep this data handy for playback once it’s been transcribed. If you don’t choose these options, then when you play back the transcribed music from the score, Finale simply plays the "sheet music"—the notated version, which will be rhythmically precise but expressionless and "square"—instead of an exact re-creation of the original sequence. (Important note: To play back your music with these captured nuances, be sure you’ve selected all four data types for playback (see Playback/Record Options dialog box). Tempo Changes information describes changes in the actual tempo, such as ritardandi and accelerandi.
- Continuous Data is controller data (MIDI signals generated by pedals, patch changes, and so on) and wheels (like the pitch wheel).
- Convert Markers defaults to on. Click it if you do not want the sequencer markers converted to Finale bookmarks
- Quant Settings. Click this button to display the Quantization Settings dialog box where you can set more options regarding the type of quantization, smallest allowed value, whether to capture Key Velocities and Note Duration, etc. See Quantization Settings dialog box.
- Create Percussion Staves: Channel • Clef • Percussion Layout. Check this box to have Finale create and configure percussion staves from the MIDI file. Enter the playback channel in the Channel text box. Finale suggests channel 10, the default percussion channel for General MIDI. Next to Clef, Finale displays the selected clef for percussion staves; click Select to choose a different clef. The Percussion Layout text box indicates which Percussion Layout will be used to adjust the display of percussion noteheads and placement. Click the Select button to choose a different percussion layout. See Percussion.
- Don’t show this during File Open. Select this option if you wish to use the current settings in the Import MIDI File options next time you import a MIDI file. The Import MIDI File Options dialog box will not be displayed when you import a MIDI file, only when you choose MIDI/Audio > Import MIDI File Options. Deselect this check box to again display the Import MIDI File Options dialog box when importing MIDI files. If you have selected Set Track-to-Staff List and Don’t show this during File Open, Finale displays the Track/Channel Mapping to Staves dialog box without first going through the Import MIDI File Options dialog box. See Track/Channel Mapping to Staves dialog box.
- OK • Cancel. Click OK to proceed with the transcription. After a moment, Finale displays the transcribed score. If you discover that your settings weren’t quite right, you can close the new Finale document and try again—the original MIDI file is unaffected by Finale’s transcription efforts. Click Cancel if you decide not to transcribe the MIDI file.
See also:
Track/Channel Mapping to Staves
Leave feedback on this topic
Finale 2014 for
Copyright and trademarks

