
How to get there
Choose the Time Signature tool  , and double-click a measure.
What it does
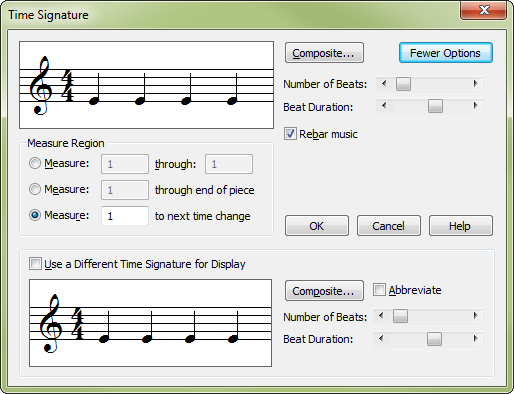
In this dialog box you can specify a new meter for the measure you clicked (and following measures), including composite meters. You can also create one time signature that controls beaming of eighth notes, and a separate one that appears in the score. In the few cases where Finale needs a default setting, it chooses a time signature of  .
.
- Composite. Click this button to display the Composite Time Signature dialog box, where you can create a composite (complex) time signature, such as
 .
. - More Options. Click this button to make the dialog box expand, revealing a lower portion containing display options. At that point, click More Options again to restore the dialog box to its compact form.
- Number of Beats • Beat Duration. Use the upper scroll bar to specify the upper number of the time signature—the number of beats in each measure. Use the lower scroll bar to specify the lower number of the time signature—the rhythmic value of each beat. For greatest control, click the right and left arrow buttons to change the number one increment at a time.
The way that you define your meter is very important, because it also governs beaming in the affected region. In the case of cut time, for example, you should set the scroll bars so that the display shows two half notes. This way, the eighth notes will be beamed together in groups of four.
Even if you want Finale to display a completely different time signature in the score (by using the options described below), you still need to create an appropriate time signature using these primary scroll bars to govern the beaming of your piece.
- Measure ___ Through ___. Click this option, and then specify the range of measures you want to be affected by this new time signature by entering their numbers in these text boxes. Finale displays the measures numbers for any region you have drag-selected in these text boxes.
- Measure ___ Through End of Piece. If you want the meter to be changed from the measure you clicked all the way to the end of the document, click this option. (In the text box, Finale proposes the measure you originally clicked.)
- Measure ___ To Next Time Change. If you want the meter to be changed from the measure you clicked until the next measure with a different time signature, click this option. (In the text box, Finale proposes the measure you originally clicked.)
- OK • Cancel. Click OK to exit this dialog box and change the time signature in the specified measures. Click Cancel to exit this dialog box without changing the meter.
- Use a Different Time Signature for Display. This option, which only appears after you click Options, gives you complete control over beaming. Here’s how it works:
Using the primary time signature scroll bars (described above), create a meter that will produce the beaming pattern you want. For example, suppose you want a time signature of 3/4, but you want eighth notes beamed together automatically in groups of three. In such a case, you could use the primary scroll bars to create a 6/8 time signature. But because you want 3/4 to appear in the printed score, click Use a Different Time Signature for Display, and set up the lower pair of scroll bars to display 3/4 time. See Document Options - Time Signatures.
- Composite • Number of Beats • Beat Duration. These elements, which only appear after you click Options, duplicate the functions of the Composite, Number of Beats, and Beat Duration controls in the unexpanded dialog box. These, however, only affect the time signature that will appear in the score, and don’t affect beaming.
- Rebar Music. Use the Rebar Music check box to control whether Finale rebars (rebeams) the music when changing the time signature. When selected, Finale rebars the music according to the time signature. When deselected, Finale leaves the beaming of the notes as it currently appears in the score.
- Abbreviate. Use the Abbreviate check box to specify whether to abbreviate (
 ) or not () in a particular occurrence of a time signature. The initial setting of the Abbreviate check box (checked if the time signature is abbreviated, unchecked if non-abbreviated) matches the global settings for Abbreviate common time and Abbreviate cut time in the Time Signature Options dialog box.
You can decide whether or not to use the symbols (
or  ) each time a cut or common time signature appears in your music. This capability lets you easily mix and (or and
  ) in one piece. You use a simple option, the Abbreviate check box in the expanded Time Signature dialog box.
For example, you might normally use the symbols for common and cut time in a piece, but you occasionally need to use
or in the same piece. First, make sure that you have chosen the Abbreviate cut time to and Abbreviate common time to options in the Document Options - Time Signatures dialog box. (These global settings control the appearance of the time signatures in your piece.) Next, edit the time signatures in the measure where you want to change their appearance, and choose the appropriate option in the expanded Time Signature dialog box.
See also:
Leave feedback on this topic
Finale 2014 for
Copyright and trademarks

