
How to get there
Choose the Clef tool  .
.
What it does
A mid-measure clef can be placed anywhere in a measure—you can even drag it back and forth among the notes of the measure to see which placement would be easiest for the player to sight-read. As you drag the clef, the notes before and after it re-notate themselves accordingly. You can have more than one mid-measure clef in a measure; in fact, another mid-measure clef appears each time you double-click a measure in which one already appears.
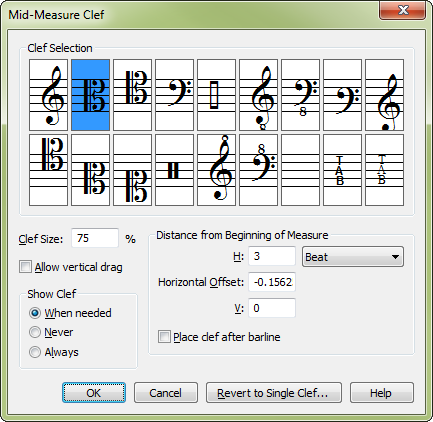
After placing a mid-measure clef, you can access this dialog box to change the clef, choose its size, and specify its placement.
Noteman says: To convert a mid-measure clef to a standard clef change (before the barline), click and drag it across the left barline.
- Clef Selection. The Clef display identifies which clef you want to appear. (Each Finale document offers eighteen clefs, which you can edit or rearrange with the Clef Designer.) To select a different clef click the one you want, or double-click to select the clef and exit the dialog box.
- Clef Size. It’s customary for any new clef within a piece to be sized slightly smaller than the original starting clef. In each Finale document, this reduced size (expressed as a percentage of full size) is set globally in the Document Options - Clefs dialog box.
If you want to specify a different degree of reduction to this particular clef, enter the desired reduction percentage in this text box. This new percentage you enter overrides the default percentage set in the Document Options.
- Allow Vertical Drag. Select this check box to allow the mid-measure clef to be moved vertically as well as horizontally.
- Show Clef: When Needed • Never • Always. Select When Needed to display the mid-measure clef as usual. Select Never to change the clef, but not display the clef in the music. Select Always to change the clef and force it to display.
Tip: Use Never at the end of a first ending repeat to set the clef for the second ending without displaying it.
- Distance from Beginning of Measure: H: • Horizontal Offset • V: • Beats • EDUs • Place After Barline. The numbers in the text boxes specify the position of the new clef’s handle in the measure. The H: (horizontal) number indicates the beat in which the clef appears. The V: (vertical) number measures the distance from the top line of the staff (a negative number moves the clef downward). Use the
Click on the Place Clef After Barline check box to display the clef immediately to the right of the barline when H is set to zero. Note: Horizontal clef positioning can also be governed by the Music Spacing Options. (To enable or disable automatic clef placement, from the Document menu, choose Document Options and then choose Music Spacing. Under Avoid Collision Of, check or uncheck Clefs.)
- Revert to Single Clef. If you decide not to place the clef in the middle of the measure, click this button to turn it back into a "single" clef (one that appears just before the barline and affects a full measure at a time). You return to the Change Clef dialog box.
- OK • Cancel. Click OK to save changes to the new clef and return to the score. The clef appears with a handle, which you can drag horizontally or vertically to position the clef. As you drag it horizontally, the notes before and after the new clef re-notate themselves accordingly, letting you experiment to find the most logical placement for sight-reading purposes. You can also experiment with your choice of the clef itself. Double-click its handle; on the second click, hold the button down and drag the clef left or right. The clef itself cycles through the eighteen available clefs as you drag it horizontally. Click Cancel to tell Finale not to save changes to the new clef. You return to the score.
Tip: Apply Note Spacing with the Selection tool to avoid collision of clef changes.
See also:
Leave feedback on this topic
Finale 2014 for
Copyright and trademarks

