
How to get there
The Setup Wizard can be accessed in two ways:
- Choose File > New > Document with Setup Wizard.
- In the Launch Window, select Setup Wizard.
What it does
The Setup Wizard will help you to setup a Finale project with your own custom instrumentation, a title, composer, and other file information. It also offers a selection of document styles that allow you to automatically begin with libraries of musical elements suited to a specific type of score.
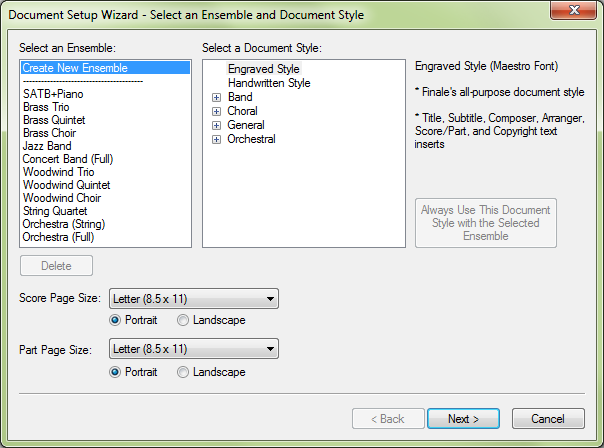
- Select an Ensemble List Box. If you would like to begin using a preset ensemble, choose one from this list. Note that if you choose one of these ensembles you will be able to edit the instrumentation later in this wizard. If you would like to begin with a either a single staff or define a custom ensemble from scratch, select None.
- Select a Document Style List Box. From this list select the desired Document StyleA Document Style is a model document with settings that can be inherited by new scores created with the Setup Wizard. Document Styles differ from templates in that you still need to specify which instruments appear in your score; you can also associate a Document Style with a particular Setup Wizard ensemble so that it is always used for that ensemble. Like templates, Document Styles can use the Finale Template File extension, .FTMX, or they can be regular MUSX files.. A Document Style includes elements such as articulations, expressions, chord symbols and other musical elements pertaining to a particular style of music. For example, the Jazz Band Document Style includes shakes and other jazz articulations you might see in a jazz band score. Document styles also include the default music font (e.g. Maestro or Jazz) and page size. An asterisk (*) next to a Document Style indicates the style is the default for the selected ensemble. You can click Always Use This Document Style with the Selected Ensemble to set the selected ensemble to the selected Document Style. When you select an ensemble, the default Document Style is selected automatically.
- Always Use This Document Style with the Selected Ensemble. Click this button to assign the currently selected document style as the default for the currently selected ensemble. The default Document Style for the selected ensemble is adorned with an asterisk (*). When an ensemble is chosen in the Ensemble List Box, its default Document Style is automatically selected. If you move or delete a Document Style the association is lost and an error message warns you accordingly when selecting the ensemble. The associations can be changed at any time.
- Score Page Size • Part Page Size; Portrait • Landscape. Use the Select Score Page Size
- Cancel • Next. Click Cancel to exit out of the Setup Wizard and return to Finale without creating a new document. Click Next to continue on to the next dialog box in the Setup Wizard.
.png)
- Families • Parts: Add • Remove. Select a certain instrumental family, and add the part selected from the Parts column. The parts that are selected will be displayed in the list on the right. Parts will be added in Score order. If you want to Remove a part from the list on the right, highlight the part and click remove.
- Add Vertical Space. Click this option to insert extra vertical space between instruments (above the currently selected instrument). A dashed line appears indicating extra space. These extra space indicators can be moved up and down using the Score Order arrows just like regular instruments. The amount of extra space is specified in the Document Options - Staves dialog box.
- Score Order • [Arrows]. You can choose to have your parts listed in Orchestral order or other standard order. If you prefer to have the parts in your score listed in a different order, use the arrows to move the highlighted part up or down in the list on the right.
- Save Current Ensemble • Save As New Ensemble. Click Save Current Ensemble to redefine the current ensemble to include the instrumentation selected. Click Save As New Ensemble to open the Save Ensemble dialog box where you can choose a name for the new ensemble. The Save Ensemble dialog box is displayed, where you can enter a name for the new ensemble based on the current instrumentation. (Ensembles are recorded in the ensembles.txt file located in the Finale 2014/Configuration Files folder. See Configuring Ensembles.txt. See Finale Installation Details for specific folder locations on your computer.)
- Cancel • Back • Next. Click Cancel to exit out of the Setup Wizard without creating a new document. Click Back to return to the first page of the Setup Wizard. Click Next to continue to the next page of the Setup Wizard.

- Title • Subtitle • Composer • Arranger • Lyricist • Copyright. Enter the Title, Subtitle, Composer, Arranger, Lyricist and Copyright information for your piece here; Finale automatically enters them into the document for you. Finale is using text inserts to accomplish this (a copyright symbol is added for you automatically). If you want to change any of this later, the information is kept in the File Info tab of the Score Manager. Note that all of these text inserts allow line breaks except the Title insert.
- Cancel • Back • Next. Click Cancel to exit out of the Setup Wizard without creating a new document. Click Back to return to the second page of the Setup Wizard. Click Next to continue to the last page of the Setup Wizard.
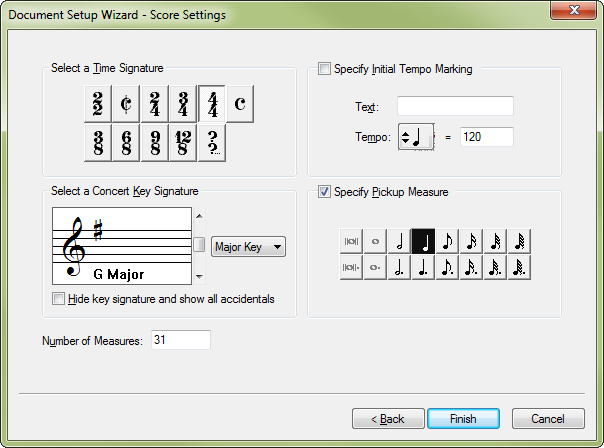
- Select a Time Signature. Select a time signature from several common time signatures. Click on the ?/? button to create more unusual time signatures.
- Select a Concert Key Signature. Use the scroll bar to select a key. Click the UP ARROW to add sharps or subtract flats; click the DOWN ARROW to add flats or subtract sharps. Use the
- Specify Initial Tempo Marking. Check this box to have Finale place a tempo marking on the first measure. Type any tempo indication in the text field, such as “Allegro”, “Vivace”, etc. This Expression will affect the playback tempo. Click the quarter note to change the main beat duration and type a number in the text box to specify the number of beats per minute. To edit the tempo marking later, see Expressions.
- Specify Pickup Measures. Check this box to have Finale create a pickup measure before measure 1. Click on the note corresponding to the sum of the pickup note or notes.
- Number of Measures. Here, specify the number of measures for the new score. You can specify up to 1000 measures here (not including pickup measures). New measures can be added or deleted at any time (See Edit menu).
- Cancel • Back • Finish. Click Cancel to exit the Setup Wizard without creating a new document. Click Back to return to the third page of the Wizard. Click Finish to create your document based on your choices and the default file.
Leave feedback on this topic
Finale 2014 for
Copyright and trademarks

