
How to get there
Choose the Measure tool  , and double-click the measure you want to edit. Some measure attributes require that you select more than one measure before double-clicking.
What it does
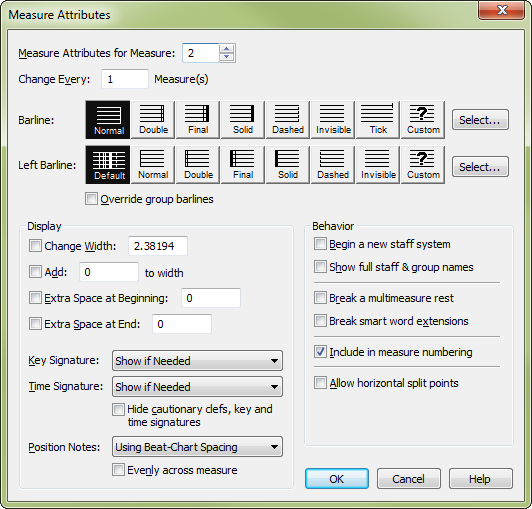
Each measure in Finale can have a number of specific attributes, including its barline type, barline-to-barline width, whether or not it should display the key and time signature, and so on. In this dialog box, you can specify all of these variables for the measure you clicked. Once you’ve specified this information, you can use the Selection tool to copy some of this information to other measures (namely, measure widths and positioning mode).
You’ll rarely need to use the Position Notes: options, which govern how the notes in the selected measure are positioned—particularly if you’re in the habit of using the Music Spacing command to neatly respace the notes in your scores.
- Measure Attributes for Measure __ (through __). You can enter the number of the measure you want to edit or use the arrows to select another measure. Or, if more than one measure is selected, you can specify a range of measures. Alternatively, if you have defined any bookmarksA particular position on the Page (Page View), or a measure (Scroll View) that can be saved and recalled. in your document, you can select one by right-clicking in this text box (see View/Bookmarks submenu).
- Change Every ___ Measures. This option is shown only when a range of measures is selected. You can enter the number to specify which measures change. For example, entering 8 would change every eighth barline to the specified type.
- Barlines • Left Barlines: Normal • Double • Final • Solid • Dashed • Invisible • Tick • Custom: Select. Click the barline icon you want for the right or left barline of the measure (in Finale, a left barline refers to the first bar line of a system.; in other words, only the first measure in a system has a left barline). Or, double-click to select the barline and exit the dialog box. Finale automatically updates the display options when you select a barline style. When you select the Dashed, Invisible, Tick, or Custom barline, Finale deselects Break a Multimeasure Rest and Override Group Barlines. When you select the Double, Solid or Final barline, Finale automatically selects Break a Multimeasure Rest and Override Group Barlines. When you select the Invisible barline icon to hide a measure’s barlines, Finale also hides repeat bars assigned to that measure. Select Custom to use a defined shape as a barline. Click on Select to select which shape is used.
- Override Group Barlines. Check this option if you want the barline selected in this dialog box to appear at the end of this measure (for all staves). When selected, this option overrides settings for Use Alternate Group Barlines defined in the Group Attributes dialog box. For more information, see Group Attributes dialog box.
- Extra Space At Beginning • Extra Space at End. Enter a value after Extra Space at Beginning to specify the amount of space before music in the measure (between the left barline and the first note). Enter a value after Extra Space at End to specify the amount of space after music in the measure (between the last note and the right barline).
- Key Signature: Show if Needed • Always Show • Always Hide. If you choose Always Show from this
- Time Signature: Show if Needed • Always Show • Always Hide. Choose Always Show from this
- Hide Cautionary Clefs, Key, and Time Signatures. Check this box to hide courtesy clefs, keys, and time signatures. These items are referred to as "Courtesy" items in Document Options - Clefs, Document Options - Key Signatures, and Document Options - Time Signatures.
- Position Notes: According to the Time Signature • Manually (by Dragging) • Using Beat-Chart Spacing. These options govern the way Finale spaces notes within the measure you’re editing. According to the Time Signature is the default mode; Finale uses proportional spacing to place the notes in the measure. In linear spacing, a whole note, for example, is allotted exactly as much width as four quarter notes. When music engravers prepare music for publication, however, they generally use non-proportional spacing, where longer values are allotted only as much space as they need, which gives the music a more compact, professional appearance. Select Manually (by Dragging) if you want to drag each note in the measure into place, one by one. When you exit this dialog box, Finale superimposes all of the notes at the left end of the measure; to drag them into place, click the Speedy Entry tool and click the measure. Drag the notes into place. The Use Beat-Chart Spacing positioning mode works much like According to the Time Signature. However, when you return to the score, you’ll notice a difference: when the Measure tool is selected, every barline of a measure whose positioning has been set in this way displays two handles at the bottom. (Measures in which you’ve respaced the music using the Music Spacing command also display two handles, because those commands automatically turn on Use Beat-Chart Spacing for the selected measures.) When you click the bottom of the two barline handles, a beat chart appears above the measure, displaying vertically aligned pairs of handles. The top row of handles indicates the positions of the beats according to linear spacing (where a whole note gets exactly as much space as four quarter notes). By dragging a handle on the bottom row, you can reposition a beat in all staves at once.
- Position Notes Evenly Across Measure. Select this option if the measure you’re editing contains more or fewer beats than are allowed by the time signature; Finale responds by spacing all notes evenly within the measure, no matter how few or how many. This is a useful option if, for example, you’re creating a cadenza whose note values add up to far more than the four beats specified by the measure’s 4/4 meter.
- Begin a New Staff System. Select this option if you want the measure you’re editing to appear at the beginning of a new system (a new line of music on the page). Note, however, that forcing such a system break may result in peculiar spacing of the measure or measures preceding the edited measure, depending on the measure layout. When Begin a New Staff System is checked, a
 symbol will appear in Page View to indicate that the measure must appear at the start of a system.
 - Show Full Staff & Group Names. Check this box to display the full staff and group name (instead of the abbreviated names) to the left of the staff system. This setting is most often used for multiple movements in the same document. Staff names are defined in the Score Manager. Group names are defined in the Group Attributes dialog box.
- Break a Multimeasure Rest. This check box has an important effect when you extract parts. If the measures surrounding the one you’re editing are empty, they’ll appear in the extracted part as multimeasure rests (or "block rests"). If Break a Multimeasure Rest is on, however, the right barline of this measure will break such a multimeasure rest into two block rests, one on each side of it. (Such block rests automatically break for key and time changes, clef changes, and so on.)
- Break Smart Word Extensions. Check this box to break Smart Word Extensions on the right barline of a highlighted measure. This option is particularly useful if you want to eliminate a word extension that extends through the first ending of a repeat.
- Include in Measure Numbering. Uncheck this box if you want Finale to disregard a measure or region of measures for numbering purposes. Selected measures will be skipped, and finale well resume numbering consecutively at the next measure.
- Allow Horizontal Split Points. If a measure is very long, you may want to split it, so that the second half of the measure appears at the beginning of a new system. If so, select this option. When you return to the score, you’ll notice a new small square handle at the bottom of the measure’s right barline. Click this handle; a long, thin, horizontal, rectangular strip appears above the measure. Wherever you double-click within this special strip, a small square handle appears. You can drag this handle horizontally (or delete by selecting it and pressing delete). This handle marks a permissible split point; add as many split points as you want by double-clicking in the split point strip. Finale splits the measure at one of them only if necessary for layout purposes. Note, too, that if you’ve specified permissible split points in this way, you can force Finale to split a measure using the Selection tool in Page View. Click the Selection tool, then click the measure to be split. If the measure begins a system, press the UP ARROW to move the first part of the measure up to the previous system. If the measure is at the end of a line, press the DOWN ARROW key to move all but the first part of the measure down to the next system.
- OK • Cancel. Click OK to confirm, or Cancel to discard, your measure attributes settings and return to the score.
See also:
Leave feedback on this topic
Finale 2014 for
Copyright and trademarks

