
How to get there
-
 and double-click an empty measure. The Tilting Mirror dialog box appears.
 - Compose a composite mirror as necessary.
- Click OK.
Or,
-
and select a region of measures.
- Drag the first selected source measure so that it's superimposed on the first destination measure.
Or,
- Any mirrored measure you’ve already created using either the Mirror tool or the Selection tool will display a Mirror icon the next time you select the Mirror tool. You can also access this dialog box by SHIFT+clicking any measure marked with this Mirror icon.
What it does
A mirror is an intelligent copy of an existing (or "source") measure in the score. When you edit the source measure in any way, all mirrors created from it are instantly updated to reflect the change. In this dialog box, you can specify certain ways in which you want the mirror to differ from the source measure. For example, you could specify that it be transposed up an octave (if, say, it’s doubling another instrument in the score). You can also specify stem direction, beaming, and whether or not you want various other elements (lyrics, chord symbols, and so on) to appear in the copy.
The advantage of all this control is that you can link the mirror to the source music, but the original and the copy need not be utterly identical. You copy only those elements you want to copy.
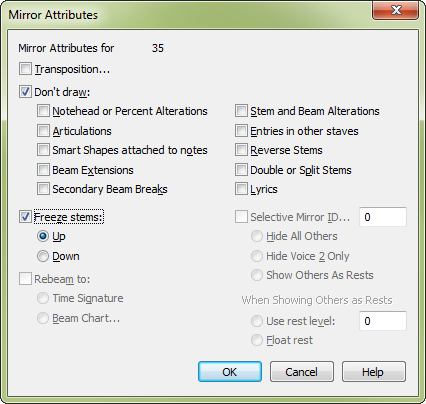
- Mirror Attributes for Frame (#). This indicator identifies, by number, the frame (a single measure on a single staff) in which the mirror occurs.
- Transposition. When you select this option, Finale displays the Transposition dialog box so that you can specify an interval by which you want the mirror transposed in relation to its source measure or measures. See Transposition dialog box.
- Don’t Draw:. The next group of check boxes let you specify elements of the source music you don’t want to appear in the copy. Select as many as you want.
Option name Musical elements affected Notehead and Percentage Alterations Changes to the note shape or size you’ve made with the Special Tools tool or the Resize tool Articulations and Expressions Note-attached marks created with the Articulation tool or the Expression tool Slurs Attached to Notes Note-attached slurs that start and end in the affected region. Lyrics Lyrics of any type Beam Extensions Extended beams created with the Special Tools Tool Secondary Beam Breaks Breaks in the beams of sixteenth notes (and smaller values) created with the Special Tools tool Stem and Beam Alterations Modifications to stem length and shape, or to beam angles, created with the Special Tools tool Entries in Other Staves Cross-staff notes (refers not to the notes themselves, but whether their cross-staff status should be preserved) Reverse Stems Reverse stemming created with the Special Tools Tool Double or Split Stems Double or split stemming created with the Special Tools tool Chords Chord symbols - Freeze Stems: up/down. If you want all the stems in the mirror to be frozen either up or down, click Freeze Stems and select up or down.
- Rebeam. When you build a composite mirror by choosing fragments of music from several different source measures, the result may not be beamed correctly (because you may have chosen a single eighth note from one measure, two from another, and so on). You can solve this problem (or even change the beaming pattern on a normal, full-measure mirror) by selecting Rebeam, which makes the following two rebeaming options available:
- Rebeam to Time Signature.Select this option to beam the notes in the mirror measure according to the current time signature, as though its music had been entered in the usual way.
- Rebeam to Beam Chart. Select this option to display the Beaming Chart dialog box. This graphic window displays a handle for each eighth note (or smaller value). You break a beam to a note (from the previous note) by clicking its handle. Any notes whose handles you haven’t selected will be beamed together. (If you want all notes beamed together, select the first handle in the measure.) When you return to the Mirror Attributes dialog box, this option is selected. (See Beaming Chart dialog box.)
- Selective Mirror ID. An intelligent copy of a full measure is called a mirror; a measure composed of selected notes from several measures is called a composite mirror. There may be times, however, when you want to display only selected notes from a mirror or composite mirror. For example, you might want to pick out a single melody line from a chordal right-hand piano part.
For this purpose, Finale offers you the ability to choose individual notes from a mirror or composite mirror; the result is a selective mirror. To create one, click the words Selective Mirror ID; Finale displays the Selective Mirror dialog box.
In this graphic window, you can click the handles of the notes you want include in the selective mirror. You can pick individual notes out of a chord or, by drag-enclosing several handles, you can select groups of notes within chords. If the selective mirror omits notes that fall on certain beats (when you choose only the first and third quarter notes of a melody, for example), Finale provides rests in place of the omitted notes.
Click Prev and Next to scroll through other selective mirrors you’ve created from the main mirror. When you’re finished, click OK; Finale automatically enters the number of the selective mirror in the text box.
- Hide Others. This option, and those below it, apply only to the selective mirror identified in the text box. Select it if you want the omitted notes to be hidden completely (instead of appearing as rests).
- Hide Voice 2. Select this option if you want Finale to hide any Voice 2 notes you omitted when creating your selective mirror. If you don’t select this option, Finale substitutes rests for these omitted notes.
- Show Others as Rests. With this button selected, when you create a selective mirror, Finale substitutes rests for any notes you didn’t select.
- Use Rest Level. If you want to specify where rests should appear in the selective mirror, select this option and enter a number in the text box. This number represents the distance between the center of the rest and the line or space of the root scale tone (which is numbered 0), measured in lines and spaces; a higher number moves the rest upward.
- Float Rest. Select this option if you want rests in the selective mirror positioned normally (usually on the middle staff line).
- OK • Cancel. Click OK to confirm the settings you’ve made in this dialog box. You return to the score, where the new or edited mirror appears. Click Cancel to return to the score without creating or editing any mirrors.
See also:
Leave feedback on this topic
Finale 2014 for
Copyright and trademarks

