
You can write to picture in Finale using either the integrated Movie Window or a SMPTE-compatible movie player or editor. If you would like to sync Finale to another software product, it must be capable of receiving MIDI Time Code, which is the SMPTE medium that can be sent from Finale for synchronization. If you decide to use Finale’s integrated Movie Window, videos need to be in MP4, QuickTime, or Windows Media format.
Finale offers performance tools designed specifically for writing to video. For example, the tempo of your Finale score, or portions of your score, can be modified to fit within a specific duration, so the music flows with the movie perfectly. Also, to help guide you, measure number “time” indicators can be used to show the elapsed time at any measure. In this section, you will learn how to synchronize Finale with video and use the tools necessary to successfully compose an accompanying sound track.
To prepare for this tutorial, do the following
- Choose File > Open and double-click the "Tutorials" shortcut.
If you have navigated away from the default "Finale Files" folder, a different folder may appear when you choose File > Open. If this is the case, access the Tutorial documents by navigating to the
- Open “ArnoldsPark.MUSX” and then choose Window > Movie Window. The Movie Window appears.
This file is located in the Finale 2014/Music Files/Tutorials folder. For the specific folder path for your system, see Finale Installation Details.
- Click Select and open the file “ArnoldsPark.mov”, located in the same folder as the document in step 2.
- Click the Speaker icon in the Movie Window (left of the Play button) and drag the volume all the way down. Now the movie’s sound will not interfere with our Finale arrangement.
- Make sure Sync is checked.
Notice the Time is displayed on the Movie Window and Finale’s Playback Controls. As long as the “Sync” box is checked, both the movie and music start, stop, rewind, and fast-forward together. Let’s try it now.
- Click the Play button in Finale’s Playback Controls. The movie and music begin. Continue watching the video until the carnival rides appear. Notice the entrance of the waltz-style piano motif begins a few seconds after the appearance of the carnival rides.
Let’s say we want to edit the music so that the piano and the carnival enter simultaneously—a common type of edit when writing alongside video. To do this, we will adjust the tempo slightly from the beginning of the score until measure 14.
-
 . The MIDI tool menu appears.
 - Click measure 13 in the top staff to select it. Hold SHIFT and press DOWN ARROW. Continue holding SHIFT and press LEFT ARROW. All measures from 1-13 are now selected.
- Choose MIDI tool > Edit Tempo and Fit to Time. The Fit to Time dialog box appears.
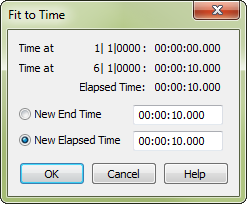
When you specify a duration for the selected region of music, Finale adjusts the tempo accordingly.
- For New Elapsed Time (or New End Time), replace 41.736 with 37.5.
New End Time refers to the point in time at the end of the selected region. New Elapsed Time refers to the duration of the selected region. Because all measures are selected from the beginning of the piece, both will have the same result.
- Click OK. Play the score to hear the piano enter at the same time as the carnival—37.5 seconds from the beginning.
Leave feedback on this topic
Finale 2014 for
Copyright and trademarks

