
How to get there
- Enter the Shape Designer.
- Choose Shape Designer > Line Style > Dashed.
What it does
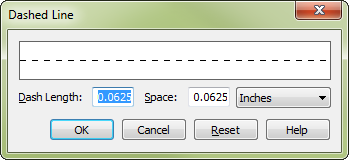
When you’re creating a shape in the Shape Designer, you can specify that a selected line (or one you’re about to draw, if no line is selected) is to be a dotted (dashed) line. Use this dialog box to specify the lengths of the dashes as well as the lengths of the gaps between them.
- Dash Length. The number in this text box specifies the length of each dash of the dashed line.
- Space. The number in this text box specifies the length of the gap between dashes of the dashed line.
- Inches [etc.]. From this
- Reset. Click Reset to restore Finale’s default dashed-line settings (.0625 inch dash, .0625 inch gap).
- OK • Cancel. Click OK to confirm your specifications for a dashed line. If a line or shape was already selected, it now appears dashed. If nothing was selected, the next line you create (with the Line, Rectangle, Curve, Multiline, or Polygon Tools) will be a dashed line. All lines you draw will now be dashed, until you choose Solid from the Line Style submenu of the Shape Designer menu. Click Cancel to return to the Shape Designer without selecting a dashed line style.
See also:
Leave feedback on this topic
Finale 2014 for
Copyright and trademarks

