
How to get there
This window can be accessed in two ways, either with the Resize tool or the Page Layout tool:
- Choose the Resize tool
 .
. - In Page View, click between two staves that are part of the same system.
Or,
- Click on the Page Layout tool
 . The Page Layout menu appears.
 - Choose Page Layout > Resize Staff Systems.
What it does
This dialog box lets you specify the percentage of enlargement or reduction you want applied to a staff system.
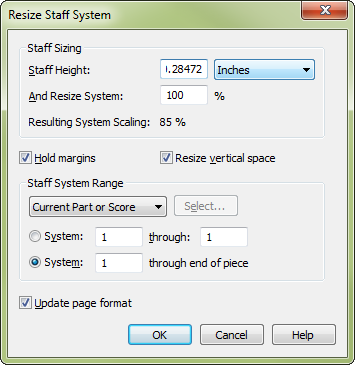
- Staff Sizing: Staff Height • Units • And Resize System • Resulting System Scaling. Set the staff height, then apply a percentage to the value. The Resulting System Scaling is the cumulative effect for all staves in the system.
Tip: The absolute staff height is 96 EVPUs (.3333 inches or .8467 cm). Select the measurement unit for the values in this dialog box only.
- Hold Margins. This item offers you the chance to resize the system without actually resizing its image on the page proportionally—in other words, to maintain the current margins. The result is that the music is resized, so a different amount of it fits on a line. (Be sure to choose Utilities > Update Layout when you’re finished, so you can see the effects of your resizing on the number of measures that fit on a line.)
If you reduce a system with Hold Margins and Resize Vertical Space selected, the music gets smaller, but the system still stretches from margin to margin, and the space between it and the following system is reduced proportionally (left). If neither option is selected, the system shrinks in every direction, including horizontally, but the space between it and the next system doesn’t change (right).
- Resize Vertical Space. This item lets you proportionally resize the space between the system you’re changing and the next system. If you didn’t select this option before reducing a system, you may discover that there’s too much space between the reduced system and the next; and if you’ve enlarged a system, you might find that there’s too little space between the enlarged system and the next.
- Current Part or Score • Selected Parts/Score • All Parts • All Parts and Score; Select. Choose Current Part or Score to apply changes to the score or part that is currently active in the document window. Choose Selected Parts/Score and click Select to open the Select Parts/Score dialog box where you can choose to apply changes to any combination of the score and/or parts. Choose All parts to apply changes to all parts and All Parts and Score to apply changes to the full project - all parts and the score.
- System ___ Through ___ • System ___ Through End of Piece. These options let you specify what range of systems you want to resize. To resize only the system you clicked, leave the numbers (that Finale proposes) alone.
- Update Page Format. When selected, Finale automatically updates the staff sizing in the Page Format for Score dialog box (Document menu) to the current setting in the Resize Staff System dialog box.
- OK • Cancel. Click OK to confirm your reduction or enlargement specifications. You return to the score. Be sure to choose Utilities > Update Layout to correct any uneven measure spacing introduced by the resizing. Click Cancel if you decide not to resize anything. You return to the score.
Tip: Numbers greater than 100 enlarge it, and numbers less than 100 reduce it.
See also:
Leave feedback on this topic
Finale 2014 for
Copyright and trademarks

