
How to get there
Choose File > Compile PostScript Listing.
What it does
When you choose File > Print and have a PostScript printer, Finale performs two steps. First it generates a PostScript listing (a coded description of every element on the page, its size and position, and so on). Then it downloads this code to the PostScript printer, which translates it into a printed image.
You can, if you prefer, break up these two steps into separate procedures by using the Compile PostScript command, which creates the PostScript listing without sending it to the printer. You’ll be asked to give the listing a title, and it will be saved on your hard disk. Because different printers handle color differently, we recommend deselecting Use Colors in the Preferences-Display Colors dialog box before Compiling.
In order to print this listing, you may need a downloading program capable of sending it to the printer just as Finale does automatically when you choose Print.
Why would you want to create a compiled PostScript listing in this way? There are several advantages. First, a document prepared and printed this way takes less total time to print than if you use the Print command. Second, you can transport the listing file on a disk to print elsewhere without having to bring the Finale program itself. Third, the Compile PostScript command permits you to prepare and print full-size scores (11 by 17, or as large as you like).
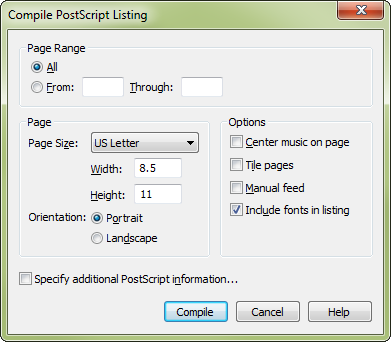
- Page Range: All • From __ To __. Click All if you want the listing to include all the pages in the score (or parts). If you want to include only a range of pages, enter numbers in the From and To boxes. These numbers are inclusive; if you enter From 1 To 3, three pages will be compiled. (Enter From 1 to 1, for example, to specify a single page.)
- Orientation: Portrait • Landscape. Click one of these two options to specify the orientation of the printed image on the page—either Portrait (the standard upright orientation) or Landscape (sideways). The same applies if you’re tiling pages—use these buttons to tell Finale the orientation of the pages you’ll be taping together.
- Page Size: Letter • Legal • A4 • A5 • B5 • Tabloid. Use the Page Size
- Width • Height. The numbers you enter in these text boxes tell Finale how much of each page to cover with music when printing pages for tiling (the image size). You’ll note that Finale fills in these boxes automatically when you select your paper size, because Finale assumes you’ll want to print on as much of each sheet as possible. If, however, you want Finale to print on a smaller portion of each sheet (in effect creating a larger margin), you can enter smaller values in these boxes. The units are whatever you've selected under
- Center Music on Page. Select this check box if you want the printed image of the music to be centered on the page. If you’re creating one large tiled page by taping several standard pages together, this option will center the printed music on the composite page. If you don’t select this option, Finale places the printed image in the upper-left part of the page.
- Tile pages. If the printed image is larger than one standard page, Finale normally attempts to print it on a single page anyway (and the right and bottom portions of the page will be chopped off). If you select this check box, however, Finale knows to print as many pages as it needs to fit the entire printed image, printing a portion of the full printed image on each sheet, so that you can later tape them together to form large score pages. This technique, called tiling pages, is described more fully under Tiling Pages for printing in the User Manual.
- Include Fonts in Listing. Select this check box to include the fonts used in the document in the Compiled PostScript Listing.
- Manual Feed. Select this check box if you want your printer to take paper from the manual feed hopper of your PostScript printer.
- Specify Additional PostScript Information. Click this check box to bring up the Additional PostScript Information dialog box, where you can enter a date and title in the nonprinting "header" of the actual PostScript listing. You’ll only see this information if you open the resultant PostScript listing with a word processor. (See Additional PostScript Information dialog box.)
- Compile. Click Compile to confirm the PostScript file settings you’ve made. Finale asks you to name the PostScript listing (or EPS file) and then creates it, storing it on your disk; you’ll hear a beep when the process is complete. To print a compiled PostScript listing, be sure you download the MAEST.PFB laser font before downloading the listing itself. Of course, if the fonts are included in the listing, downloading the fonts separately isn’t necessary.
- Cancel. Click Cancel to return to the score without creating a PostScript file.
Tip: Be sure to either take the .pfm and .pfb music font files with you if you want to print to a postscript printer that does not have Finale installed or include the Fonts in the Listing. By default, Finale uses Maestro or Broadway Copyist as the music font, but you could also use PetrucciOne of Finale's music character fonts, named for Ottaviano Petrucci, the sixteenth-century Italian who first used movable type for printing polyphonic music. Both TrueType and PostScript versions are supported., Engraver Font Set, or Jazz.
See also:
Leave feedback on this topic
Finale 2014 for
Copyright and trademarks

