
How to get there
- Choose the Articulation tool
 , and click a note.
 - Click Create (or click a symbol and click Edit).
- In the Articulation Designer dialog box, click Handle Positioning.
What it does
The Articulation Designer dialog box contains positioning options which let you create articulation marks (accents, staccatos, and so on) that center themselves—and distance themselves uniformly from the notehead—automatically.
Not only do markings come in all different sizes and shapes, but different fonts handle symbols differently. For example, suppose you place a fermata on a note that comes from a nonstandard music font, and you decide that even though you’ve told Finale to center it on the note, it’s a little bit too far to the left. Using the Handle Positioning dialog box, you can teach Finale to place the symbol slightly farther to the right from now on, by slightly shifting the symbol’s handleA small square which appears on currently "selectable" elements in the score. Handles allow you to select, edit and adjust musical elements in the score. (which is always in the lower-left corner of the symbol).
You might also use the Handle Positioning feature to place breath marks and railroad tracks to the right of their attached notes automatically, for example, or to compensate for a symbol’s extra height when you use the Avoid Staff Lines placement option. See Articulation Designer dialog box. (Note: You generally don’t need to specify a handle position for each marking for centering purposes; Finale automatically measures a symbol’s width and centers it over its note, even if the handle is to the left of the note.)
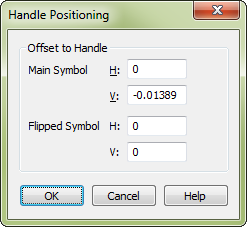
- Main Symbol • Flipped Symbol • H: • V:. In the H: and V: text boxes, type numbers that specify how much you want to move the marking. A positive H: number moves the marking to the right, and a positive V: number moves it upward. You can specify these options separately for the Main Symbol and its upside-down "Flipped" symbol (see Articulation Designer dialog box).
- OK • Cancel. Click OK to confirm, or Cancel to discard, the changes in handle positioning you’ve just made. You return to the Articulation Designer dialog box.
See also:
Leave feedback on this topic
Finale 2014 for
Copyright and trademarks

