
How to get there
- Choose
- Click the Font Annotation button.
Noteman says: If you are using a SMuFL-compliant font, editing the font annotation is not necessary. SMuFL fonts have the annotation built-in for all the glyphs they provide, so these fonts should not require editing, and Finale does not allow for this. If you are having issues with a SMuFL-compliant font’s annotation, contact the font developer for more help.
What it does
Modern font technology is orientated towards text rendering, but symbol fonts often require more information. The Font Annotation dialog box allows you to fine-tune the height and width of each font character, allowing Finale to better handle the selection area for font characters and collision avoidance for Engraver slurs. We’ve provided annotation files for each of the fonts provided by MakeMusic. If you use an alternative music font, you should create your own font annotation file for a smoother integration with Finale.
Any Font Annotation (FAN) files found in the Font Annotation folder will be automatically loaded upon starting Finale. See Preferences - Edit dialog box for information about defining your Font Annotation folder.
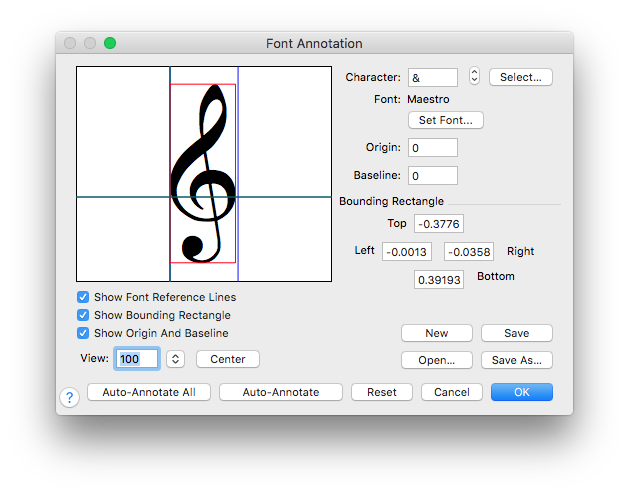
- Character: Select • Set Font. Click on the Select button to open the Symbol Selection dialog box, where you can scroll through the font characters. Type in the text box if you know the specific symbol number, or use the UP or DOWN ARROW to cycle to the character. Click on the Set Font button to switch to a different font. The currently selected font is displayed below the Set Font button.
- Origin • Baseline. These text boxes reflect the values for the green lines representing the font character’s origin and baseline.
- Bounding Rectangle: Top • Left • Right • Bottom. These text boxes reflect the values for the annotated size of the font character.
- Show Font Reference Lines. Check this box to display the blue lines which represent the size of the height of the largest character in that font.
- Show Bounding Rectangle. Check this box to display the red lines which represent the size of the font character. Uncheck the box to hide the rectangle.
- Show Origin and Baseline. Check this box to display the green lines which represent the font character’s origin and baseline.
- View % • Magnifier Glass + • Magnifier Glass -.Select a view percentage from the View drop-down list to change your display of the font character. Click the Magnifier Glass + button to increase the view percentage to the next highest percentage in the menu. Click the magnifier Glass - button to decrease the view percentage to the next smallest percentage in the menu.
- Center View. Click this button to center the display according to the font reference lines.
- Reset. Click Reset to return the font character to its default settings.
- New • Save • Open • Save As. Use these buttons for file management of Font Annotation Files (FAN). Click New to create a new set of annotations. Click Save to save your current changes to the font annotation file. Click Open to edit a previously created file. Click Save As to save the current font annotation file with a new name.
- Auto Annotate. Click this button to automatically annotate the selected character. The annotation rectangle will be set to match the smallest bounding rectangle for the character. See also Missing Font Annotation File dialog box.
- Auto Annotate All. Click this button to automatically annotate all characters in the selected font. The annotation rectangle is set to match the smallest bounding rectangle for all font characters. See also Missing Font Annotation File dialog box.
- OK • Cancel. Click OK to confirm, or Cancel to undo, the font annotation changes you’ve made, and return to the Font dialog box.

