
How to get there
- Choose the Selection tool
 . Select the first measure of the desired coda region.
 - Choose Plug-ins > Measures > Create Coda System.
What it does
This plug-in allows you to automatically define a coda, including a gap between measures in order to create an independent coda system on the same line. You are also given the option to add a Coda marking or symbol as well as the text repeat markings “D.C. al Coda” or “D.S. al Coda.” You can also add a segno ( ) and “To Coda” marking, and specify the appropriate measure for these items. Finale defines playback automatically based on your settings. A double barline is added to the end of the measure prior to the new coda system automatically.
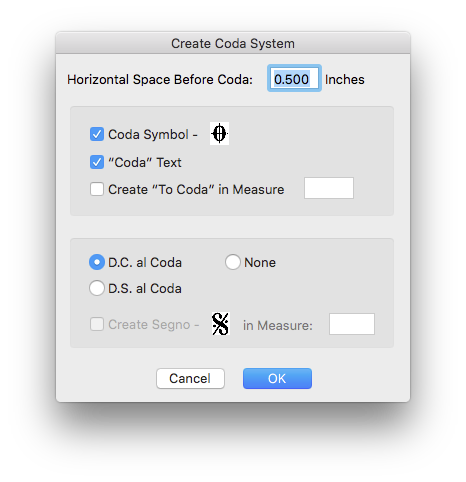
- Horizontal Space Between Systems. Here, enter the space desired between the first measure of the coda system and the previous measure. The default space is .5 inches. The units are whatever you've selected under
- Coda Symbol • “Coda” Text • Create “To Coda” in Measure __. Check Coda Symbol to place the standard coda symbol at the beginning of your coda system. Check “Coda” text to place the text “Coda” at the beginning of your coda system. Both of these options are checked by default. Check Create “To Coda” in measure and enter a measure number to add a “To Coda” marking.
- Although the dialog box displays the standard coda symbol, you can change the symbol after running the plug-in by right
 and choosing Edit Repeat Definition. The Repeat Designer dialog box is displayed, where you can select a different coda symbol.
- Although the dialog box displays the standard coda symbol, you can change the symbol after running the plug-in by right
- D.C. al Coda • D.S. al Coda • None • Create Segno in Measure __. Check D.C. al Coda or D.S. al Coda to place this marking at the end of the system prior to the coda system. Choose none to place no text at the end of the system prior to the coda system. Check Create Segno in Measure and specify a measure number to add a segno marking. These markings are added to the document as Text Repeats which can be edited with the Repeat Tool. They are automatically defined to apply to playback. In the case of a D.S. al Coda, playback will return to the Segno () marking added in a previous measure.
- OK • Cancel. Click OK to apply your settings. Click cancel to dismiss the dialog box without adding a coda system.
To remove a coda system created with the Create Coda System plug-in
- Select the Page Layout tool
 .
. - Choose Page Layout > Avoid Margin Collision.
-
The margins for the coda system needs to be reset to their previous values. Select a system after the first system but before the page break occurs. Choose Page Layout > Systems > Edit Margins. The Edit System Margins dialog box appears.
The first system includes margin offsets for a title and indent. If the first system is selected, these margins will be applied to the other systems.
- In the Thru field, type "0". This allows the system margins to be applied from the selected system to the end of the piece. Click Apply.
- Choose the Selection tool . Click any expression related to the coda and press DELETE. The expressions are deleted.
- To unlock systems, select the measures that were locked
 during the coda creation and choose Utilities > Unlock Systems. For tips on selecting multiple measures, see Selecting music.
 - To remove a double barline, select the Measure tool
 and double-click the double barline measure. The Measure Attributes dialog box appears.
 - Under Barline, select Normal and click OK.

