Tutorial 1b: Speedy Entry
In addition to Simple Entry, Speedy Entry offers another fast and
efficient method of music entry. This tool is particularly useful if
you plan to use a MIDI device for input. You can enter music very
quickly, with one hand on a MIDI keyboard and the other on the
numeric keypad, or using the MIDI device exclusively. You can
also edit existing music with equal ease.
In this tutorial, you’ll explore the Speedy
Entry tool in depth, and you’ll get to know some more of PrintMusic’s MIDI
input and playback capabilities. We assume you’ve already read about basic
navigation of the PrintMusic screen in Tutorial 1a: Simple Entry. By the end
of this tutorial, you should know how to get your notes on the page quickly
with the Speedy Entry method.
About MIDI
MIDI (for Musical Instrument Digital Interface) is an electronic
language spoken by computers and MIDI devices. Most MIDI
devices are keyboards, but there are also guitar, string, wind, percussion,
and even voice MIDI controllers. As mentioned earlier,
the term MIDI keyboard will be used to refer to whatever MIDI
device you’re using.
If you begin this tutorial and find that
your MIDI keyboard isn’t operating correctly, you may want to consult
the User Manual under MIDI Setup dialog box.
Remember, a MIDI keyboard isn’t required
for Speedy Entry.
Creating a New Document
from a Template
PrintMusic comes with more than 30 different kinds of templates
(piano-vocal scores, choral setups, chamber orchestra scores and
so on) to help you get started. Not sure what size to make your concert band score so all of the instruments fit vertically on a
page? Use the template. Occasionally write a pop lead sheet that
doesn’t use classical formatting? Use the Lead Sheet template. If
you find you use a particular template every single time, you may
wish to make it your default file—the template the Setup Wizard
uses.
We’ll start this tutorial with the Lead Sheet template and create
an arrangement of the folk song “Oh, Susannah.” If you haven’t
already started PrintMusic, do so now. Close any documents that
may be open or cancel out of the Wizard.
- From
the File menu, choose New, then Default Document. PrintMusic opens a new, Untitled
file with one staff and thirty-one empty measures.
Speedy Entry
- Choose the Speedy Entry tool
 . Another menu appears—the Speedy menu—whose commands
govern the behavior of this tool. Just to check, hold the mouse button
down on the word Speedy so that the menu drops down, and make sure that
there’s a check mark beside Use MIDI Device for Input.
. Another menu appears—the Speedy menu—whose commands
govern the behavior of this tool. Just to check, hold the mouse button
down on the word Speedy so that the menu drops down, and make sure that
there’s a check mark beside Use MIDI Device for Input.
If you’re ever stranded without a MIDI keyboard,
there are two ways in which you can enter music with the Speedy Entry
tool when the Use MIDI Keyboard for Input option is turned off. See Speedy Entry for details.
If Auto Launch is turned on, the measure sprouts
a rectangular frame. If not, click on the first measure. In the frame,
you’ll see a thin vertical cursor at the left side of it, called the insertion
bar. There’s also a short horizontal cursor called the pitch crossbar,
which indicates pitch.
Use the up/down arrow keys to move the pitch
crossbar, and the left/right arrow keys to move the insertion bar.
- Play
middle C on your MIDI keyboard. While
holding down the key, press the 5 key on your computer keyboard.
If your MIDI system is hooked up correctly, a middle C quarter note appears.
If your MIDI keyboard is not sending correctly to the computer, you’ll
see a quarter rest; in which case, see Installation
for Windows or Installation
for Mac for information on setting up your MIDI system. To remove
the rest, click it and press Delete.
Why did you press 5? The number keys, both
on the numeric keypad and on the top row of the alphabet keyboard (QWERTY
keyboard), have special meanings to PrintMusic. (Be sure to press the Num
Lock key if you’re using the numeric keypad.) In PrintMusic, 5 means a quarter
note. Take a look at these diagrams:
Note: To use Speedy Entry without a MIDI keyboard,
use the arrow keys to place the insertion bar on the pitch, then press
the duration number key.
Windows Speedy Entry Commands
Since the MIDI keyboard is providing PrintMusic
with the pitch information, all you have to do to provide the rhythmic
information is press the proper number key. If you’re holding down a MIDI
keyboard key when you press a number key, you get a note. If no MIDI keyboard
key is being held down when you press a number key, you get a rest.
- Hold
down the D key on your MIDI keyboard and press the 5 key again; then E
(and press 5); then F (and press 5). You’ve just built the first
four notes of a C scale. Before you could really see what you’d done,
however, PrintMusic advanced the editing frame to the next measure, ready
for you to play more notes.
- Note
that entry with a MIDI device using Speedy Entry is in a way opposite
from using a MIDI device with Simple Entry. In Simple Entry, the
note duration is specified in the Simple Entry palette before playing
the pitches. In Speedy Entry, the pitches are held down prior to specifying
the rhythmic duration. To lock Speedy Entry to a duration (like in Simple
Entry), see the User Manual under Speedy
Entry—To enter many notes of the same value.
You can turn off this auto-advance feature,
which advances to the next measure as soon as the first one is rhythmically
full:
- Press
the zero (0) key to exit the editing frame, or click the mouse on any
blank part of the screen. The editing frame goes away.
- From
the Speedy menu, choose Jump to Next Measure. If you click the
Speedy menu again, you’ll see that Jump to Next Measure no longer has
a check mark in the Speedy menu; you’ve just turned the auto-advance feature
off.
- Press
the zero key again. The 0 key also takes you back into the editing
frame you were last in.
- Now that
you’ve turned the Jump to Next Measure feature off, how will you move
from measure to measure?
- Press
the left bracket ( [ ) key on your keyboard. PrintMusic moves you back
to the first measure. The left and right bracket keys move the current
editing frame one measure to the left or right, respectively.
- Now
press the left arrow and right arrow keys on the keyboard a few times.
The insertion bar moves by one note or rest each time you press the right
or left arrow key. You can also move the insertion bar by clicking a note
with the mouse.
Editing with Speedy Entry
- Position
the insertion bar on the first note (middle C) and press the 4 key.
In PrintMusic, 4 means an eighth note, so your middle C quarter note has just
changed duration (rhythmic value). In PrintMusic, if you enter a rhythm incorrectly,
there’s no need to delete the note and reenter it; simply line up the
insertion bar with the note and press the desired duration key.
Whenever you change a note’s duration (or enter
a new note), the insertion bar moves to the right, ready for you to enter
a new note or rest (or to change the rhythmic value of an existing note).
- Press
the 4 key three more times. You’ve now changed all four notes in
this measure to eighth notes. They’re automatically beamed.
- Position
the mouse pointer squarely on the last note’s notehead. Click and
drag this F to the F line an octave higher. In Speedy Entry, you can move
notes to other pitches by dragging them in this way. (If your MIDI keyboard
is connected properly, PrintMusic plays the note each time it changes pitch.
This feature can be disabled by deselecting Playback from the Speedy menu.)
- Click
squarely on the high F’s notehead.With
the button down, drag it slightly to the right or left. The Speedy
Entry tool gives you complete control—not only of a note’s pitch, but
also of its position in the measure.
If you want to drag a note only horizontally
(so that you can’t drag it off of its pitch), or only vertically (so that
you can’t drag it left or right), press the SHIFT key while
you’re dragging.
- Move
the insertion bar to the third note in the measure (the E). Remember,
you move the insertion bar by pressing the arrow keys or by clicking a
note.
- Press
Delete. Pressing the delete key removes a note, rest, or chord
from the score.
But what if you delete a note by accident?
Any time you’re working with the Speedy Entry tool, remember that you
can undo your last action by choosing Undo from the Edit menu.
- From
the Edit menu, choose Undo (CTRL+Z). The note you deleted reappears.
To prepare for the next exercise, change all
four notes back to quarter notes:
- Move
the insertion bar back to the middle C, and press the 5 key four times.
Working with
Chords
- Position
the insertion bar on the F, and use the up/down arrows to move the crossbar
to the third-space C.
- Press
ENTER. There are now two notes in the chord. Using the
four directional arrows, you can maneuver anywhere in a measure, and using
the ENTER key, you can
add a note to an existing note or chord. (If the insertion bar is on a
rest, ENTER turns the
rest into a note.)

Try moving the crossbar up and down the notes
of this chord. If you hold down the up arrow key long enough, PrintMusic will
add so many ledger lines that the measure you’re working on scrolls downward
(or upward, if you’re pressing the down arrow key).
- Double-click
the second-space A of the same chord. Double-clicking is another
way to add a note to a chord.
- Use
the up arrow key to position the crossbar squarely on the top notehead
(F) of the chord. Press BACKSPACE. The BACKSPACE key is the opposite of ENTER:
it removes a note from a chord. (If there’s only one note in the
chord, this keystroke turns it into a rest.)
Accidentals
- Position
the crossbar on the C of this chord. Press the plus (+) key on the numeric
keypad. The note sprouts a sharp. The plus key raises the note
by a half step.
- Position
the crossbar on the A and press the minus (–) key. You guessed
it: the minus key lowers the note by a half step.
But what if you decide that a note has been
“spelled wrong” enharmonically? You can always flip a note to its enharmonic
equivalent by using the 9 key.
- Leave
the crossbar on the A
 and press the 9 key. The spelling
of the note changes to G
and press the 9 key. The spelling
of the note changes to G .
.
- Move
the crossbar down away from the two notes. Press the 9 key several times.
If the crossbar is on a chord’s stem and not on a notehead, pressing the
9 key cycles a chord through various enharmonic spellings.
For the moment, cycle through until the lower
note is an A. In the next step, you’ll hide the accidental.
- Position
the crossbar on the A. Press
the asterisk (*) key. You’ll usually want to use the asterisk key
on the numeric keypad. If you prefer, however, you can press shift-8 (the
main keyboard asterisk) instead.
Pressing the asterisk key hides an accidental—or,
if none is there, it causes an accidental to appear.The note retains its identity—the note that now looks like an A
will still play back as an A. To restore the accidental,
press the asterisk key again.
PrintMusic can even put an accidental in parentheses—simply
press the letter p key. See Courtesy
Accidentals.
Tuplets
You haven’t explored PrintMusic’s tuplet (triplets,
quintuplets, and so on) features in Speedy Entry yet. Scroll to measure
2—which is empty—and try the Tuplet tool.
- While
playing any MIDI keyboard key, press the 5 key four times. You’ve
just entered four quarter notes on the same pitch.
If PrintMusic doesn’t automatically advance the
editing frame to the next measure, press the right bracket key ( ] ).
- Press CTRL+3. You do this before
entering a triplet; PrintMusic puts a tiny “3” in the upper right of the editing
frame, letting you know it’s expecting the next three notes to constitute
a triplet.
- While
playing any MIDI keyboard key, press the 6 key three times. As
soon as the third note appears, PrintMusic centers the “3” over the triplet.
You’ve just created a half-note triplet.
- Press
the 0 (zero) key to exit the editing frame. In measure 2, you have
four quarter notes; in measure 3, you have a half note triplet. You can
modify each with the Tuplet tool.
- Choose the Tuplet tool
 in the Main tool palette. Shift-click the first quarter
note in measure 2. The Tuplet Definition dialog box appears.
in the Main tool palette. Shift-click the first quarter
note in measure 2. The Tuplet Definition dialog box appears.

At the top of the screen there are various
options for defining the temporal (time) definition of the triplet. Using
these drop-down lists and text boxes, you’ll answer the question, “How
many of what value are to be played in the time of how many of what value?”
Look at the two text boxes at the top of the Tuplet Definition dialog
box. As you see, PrintMusic has guessed that you want to fit three quarter
notes in the time of two—precisely the definition of a quarter-note triplet.
In the Appearance section, there are options
where you can specify how the triplet should look in the score. Should
it have a slur or a bracket? Should it be expressed as a ratio? Should
it have a number? For now, the default settings are fine.
- Click
OK. You’ve just turned ordinary quarter notes into a triplet by
clicking the first of them with the Tuplet tool. (You can edit the tuplet
to look any way you’d like.) Notice the six handles that appear. These
handles control the various elements of the bracket:
You can modify the triplet you made in Measure
3, too.
Inserting Notes or Rests
- Click
on the first measure and position the insertion bar on the two-note chord.
Remove it by pressing Delete.
- Move
the insertion bar back to the middle C note again. While holding down SHIFT,
press the 6 key on the number row, not on the numeric keypad. When
you press SHIFT, you
tell PrintMusic you want to insert a note or rest just before the insertion
bar. You pressed the 6 key to add a half rest—6 is the keyboard equivalent
of the half note value. (If you had held down a key on your MIDI keyboard
while you pressed SHIFT+6,
you would have inserted a note instead of a rest.) Again, to insert a
note or rest, you must use the number keys located on the number row (or
above the QWERTY keyboard), not on the numeric keypad.
Note: To insert rests in Speedy Entry without
a MIDI keyboard, hold down SHIFT+CTRL+ the number
key while in Insert mode.
Your example should now look like this:
The problem is that there are five beats in
the measure —the half rest and three quarter notes (even though you might
not see the third note). With PrintMusic’s rhythmic-watchdog feature (Jump
to Next Measure) turned off, PrintMusic won’t notify you until you exit the
editing frame.
- Press
the 0 (zero) key to exit the editing frame. PrintMusic displays a dialog
box that tells you that there are too many beats in the measure.
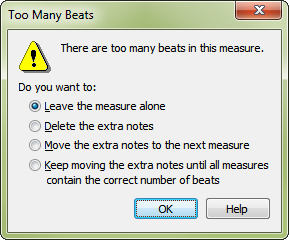
You’re offered four methods of solving the
problem. You could leave the extra beats in the measure (by selecting
the top option). You could tell PrintMusic to eliminate any extra beats by
removing them from the end of the measure (by clicking the second radio
button). You could tell PrintMusic to insert any extra notes that it removes
from the end of this measure into the beginning of the following measure
(by clicking the third radio button).
Finally, you could tell PrintMusic to rebar the
music by redistributing notes throughout the staff until no measure contains
more beats than are allowed by the time signature.
- Click
“Delete the extra notes,” and then click OK. PrintMusic eliminates
the extra beat—the last E quarter note—and you exit the editing frame.
In the next section, you’ll create a lead sheet
that begins with a pickup. To complete the first measure’s transformation
into the pickup measure, the only task remaining is to create a dotted
rhythm.
- Press
the 0 (zero) key. You reenter the measure.
- Position
the insertion bar on the C and press the period (.) key. PrintMusic
adds a dot to the note. If you were to continue typing periods, you could
add several dots to a note or rest.
- Press
the right arrow key, and then press the 4 key. You’ve turned the
last quarter note into an eighth note; the pickup measure is complete.
Entering Music: Speedy
Entry
You’ve now learned the basics of using
the Speedy Entry tool with the MIDI keyboard. You’ve learned how to enter
notes rapidly, change their values, change their pitches, add rests, insert
notes, add dots, and move around the score using the right and left bracket
keys.
The measure you’ve been working on now
contains the pickup notes for “Oh, Susannah.” Using your knowledge of
the Speedy Entry tool, enter the next twelve measures as shown. For the
moment, however, don’t enter any music past measure 13. Remember the Speedy
Entry keyboard commands you’ve learned:
|
Key
|
Effect
|
|
. (period)
|
Add a dot
|
|
4
|
Eighth note
|
|
5
|
Quarter note
|
|
6
|
Half note
|
|
] (right bracket)
|
Go to next measure
|
|
[ (left bracket)
|
Go to previous measure
|
|
Delete
|
Remove a note, rest, or chord
|

When you reach measure 14, you may realize
that the last four bars of “Oh, Susannah” are exactly the same as measures
6 through 9. To save time, you can use the Selection tool’s copying function
to complete the melody.
In the first tutorial, you copied a measure
of “Simple Gifts” by dragging one measure so that its image was superimposed
on another. In some cases, however, you won’t be able to drag measures
to copy them, because the dragging technique only works when you can see
both source and target measures on the screen at the same time.
Now you’ll use two PrintMusic shortcuts that
can be used to copy any amount of music from one place to another, even
when the source and the target are hundreds of measures apart.
Selecting Several
Measures by Shift-clicking
It turns out that there’s a common technique
for selecting large amounts of material—in word processors, spreadsheets,
and even music programs. It’s called SHIFT-clicking. You can use this technique to select the
four measures you want to copy. It works like this:

- Choose the Selection tool
 then click measure 6.
- While
pressing SHIFT, click
measure 9. Measures 6 through 9 are
now selected.
As a matter of fact, there’s yet another way
to select a range of measures that’s especially handy for selecting large
regions, because you don’t have to scroll to the endpoint to SHIFT-click. It’s the Select Region command in the Edit
menu. You’ll read more about it in a moment.
Copying Music to Off-screen
Targets
Now you have to copy this music to the
end of the piece. Here’s another keyboard shortcut. This one, used for
copying music from one place to another in PrintMusic, works like this:
You’ve already selected the source measures,
so proceed as follows:
- While
pressing CTRL, click measure 14.
That’s a very useful trick to remember: CTRL-clicking the target measure is the same as dragging
the image of the source measures onto the target measures.
- A dialog
box appears, asking how many times you want the material copied. Once
(the default) is enough.
- Click
OK (or press ENTER). That’s all there is to it! You’ve
entered all the music for your first lead sheet.
Note: To copy specific items, select the measures
with the Selection tool, then CTRL+SHIFT-click on the target measure to display
the Items to Copy dialog box where you can choose specific items to copy.
Deleting Measures
This version of “Oh, Susannah” is seventeen
measures long. However, you will remember that PrintMusic provided you with
thirty-one empty measures when you began this tutorial. Therefore, you
now need to delete measures 18 through 31, using the Selection tool and
the Select Region command mentioned a moment ago.
- Choose the Selection tool . Now adjust your view so that measure 18 is visible.
- Click measure 18. Scroll to the end of the piece. SHIFT-click on
the last measure.PrintMusic automatically highlights the measures
you specified, even though you might not be able to see
the end of the highlighted region.
- From
the Edit menu, select Delete Measure Stack. PrintMusic deletes the
extraneous measures.
No doubt you created the lead sheet melody
with grace and aplomb. Nonetheless, there may be times when you need to
erase some of your music. Here’s the quick way to do it. To return to
the first measure of the piece, you could use the scroll bars. Instead,
try this command:
- From
the View menu, choose Home Position. This command returns you to
the top of the page.
Erasing Music
- Choose the Selection tool . Or, any tool that allows regional selection.
- Select
the first two measures of the song. You can use any of the selection
methods you’ve tried so far: clicking one measure and then SHIFT-clicking the second, or drag-enclosing both at once.
- Press BACKSPACE. The measures are now empty.
For the purposes of this tutorial, however,
you really didn’t want to erase the first two measures of the song. Fortunately,
you can always recover from any Selection tool action like this one, as
follows:
- From
the Edit menu, choose Undo. PrintMusic restores the music.
More on Speedy Entry
Combining the speed of Speedy Entry with
the convenience of Selection tool copying, as you’ve just done, is a quick,
accurate method of entering music—especially with practice.
Eventually you’ll discover even more shortcuts:
for example, to enter several repeated notes, just hold the MIDI keyboard
key down continuously while you repeatedly press the rhythmic-value keys
(you don’t have to restrike the MIDI keyboard key each time).
As mentioned earlier, you can do the opposite,
too. You can tell PrintMusic that all the notes you’re about to play are sixteenth
notes, and then simply play them, as slowly as you wish, on your MIDI
instrument; PrintMusic will enter them into the score. You can press Caps
Lock to activate this feature. For instructions, see Speedy
Entry—To enter many notes of the same value.
Music only gets entered when you press
a rhythmic-value key, so feel free to play your MIDI keyboard as much
as you like, without fear that you’ll inadvertently throw notes onto the
screen. Chords are a breeze, too: just hold down MIDI keyboard keys for
the notes in the chord before you press the rhythmic-value key.
You can drag any note of a chord up or
down to change its pitch, just as you did with a single note earlier in
the tutorial. If you double-click and, on the second click, hold the button
down, you can drag an entire chord up and down the staff (instead of dragging
one note at a time). And don’t forget that you can also drag any note
or chord horizontally. If you want to drag a note only vertically or only
horizontally, press SHIFT
while you drag—your cursor will be “constrained” to perfectly vertical
or horizontal movements.
Take another look at the Speedy Entry Keyboard
Commands diagrams that appear earlier in this tutorial, and you’ll learn
about some other features of Speedy Entry. For example, if you position
the insertion bar on the second of two notes that are beamed together,
pressing the slash key (/) will break the beam; pressing it again will
rejoin the beam. There’s also a key that turns any note into a grace note
(and back again)—the semicolon (;).
Pressing the t key (lower case letter t)
ties a note to the next note. CTRL+= ties a note to the previous note. You can tie
all notes of a chord at once by positioning the crossbar on the chord
stem, and not on any notehead. And, if you’re working on a score with
several staves, pressing SHIFT+DOWN ARROW moves the editing
frame down to the next lower staff; pressing SHIFT+UP ARROW moves it back up.
Finally, if you ever want to hide an entry
(a note or rest), just position the insertion bar on it and press the
letter h key; the entry appears lightly in the score (if Show Hidden Notes
and Rests is checked under the View menu), and will not print. Also, when
you begin working with PrintMusic’s four transparent staff layers (called
Layer 1 through 4), you can flip through the layers by pressing SHIFT+’ (apostrophe).
There’s no need to learn all of these key
commands now. But it might be useful for you to keep the Speedy Entry
Keyboard Commands diagram handy.
Note: If you ever add too many augmentation dots,
press the appropriate number key to return the note to the original duration.
Playback
You’re about to discover that your folk
song masterpiece, “Oh, Susannah,” not only looks good—it sounds good,
too.
It doesn’t matter which tool is currently
selected.
- From
the Window menu, choose Playback Controls (if they’re not already on the
screen). The Playback Controls appear.

- Click
the Play button. If your MIDI system is hooked
up properly, you’ll hear PrintMusic play the song. To stop playback, click
either Pause 0 or Stop 8.
If you don’t hear anything, consult Installation
for Windows or Installation
for Mac for information on setting up your MIDI system.
Note: If you wish to use the internal speaker
on a Mac, select the MIDI menu > Device Setup > MIDI/Internal Speaker Playback. Then, for Playback To, choose Internal Speaker Playback.
- On
Mac, hide the Playback Controls by clicking on the Window menu, then select
Playback Controls so that the check mark disappears. This step
is not required on Windows.
As you’re about to find out, you don’t have
to use the Playback Controls to play back your score:
- Windows
Users: While pressing the SPACEBAR, click any measure. Mac users: hold
down Shift, press the Space bar and click any measure. Once again,
PrintMusic plays back your score, this time beginning with the measure you
clicked. Click anywhere on the screen to pause. Of course, this is only
the tip of the playback iceberg. Try this fun—but useful—feature:
- While
pressing CTRL and the Space bar, drag
the cursor back and forth across the notes in the score. This “scrubbing”
playback feature lets you spot-check any part of the score—a useful feature
when, for example, you’re entering lyrics and want to confirm your place
in the music.
You can play any PrintMusic document using either
this “Space bar-click” method or the Playback Controls.
More playback features will be discussed in
Tutorial 6: Playback.
Setting
the Initial Tempo
PrintMusic offers a number of ways to set the
tempo for a piece. For example, in Tutorial 6 you’ll learn how to make
tempo markings such as Allegro, Presto, and ritard actually control the
playback tempo. For now, though, we’ll set the tempo the quick way.
- Once
again, from the Window menu, choose Playback Controls. The Playback Controls
reappear.
- Double-click
the Tempo text box, and type 200. You can also click the small
up and down arrow buttons to increase or decrease the number in the Tempo
text box. If you want the tempo to be measured in half notes per minute—or
any other rhythmic unit—choose the value you want from the Tempo drop-down
list.
- Click
the Play button. PrintMusic plays your song back at a more sprightly
tempo.
- When
you’re through listening, click on the File menu and choose Save.
It’s always a good idea to save your work at the end of a session. If
you wish, open the file “Tutorial 1b” and compare your results to our
version.
If you’ve had enough for one session, choose
Exit from the File menu. If you want to continue to the next
tutorial, close the file, saving changes if you wish.
The next tutorial will introduce you to
the HyperScribe method of entry where PrintMusic will notate as you play
in real time.
 Previous
