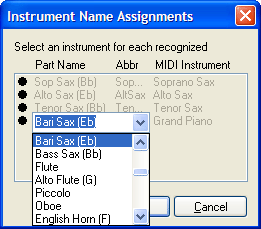
Instrument Name Assignments dialog box
How to get there
From the File menu, choose Scanning: SmartScore Lite > Scan and Import. Scan and import the file. In the SmartScore Lite 5 dialog box, click Final Scan. Prepare the your settings and then click Begin Recognition. PrintMusic prompts you with this dialog box.
Or, from the File menu, choose Scanning: SmartScore Lite > Import and Existing TIFF File. Then, add a TIFF graphic and click Begin Recognition. Before opening the file, PrintMusic prompts you with this dialog box.
What it does
This dialog box allows you to select instruments for scanned staves so that PrintMusic applies the correct staff name and instrument transposition when the staves are converted into a PrintMusic document.
- Part
Name. Here, a drop-down list appears for each staff. Choose the instrument that most closely matches the desired instrument staff, minding the listed transposition. You can type a new instrument name and then press enter to add it to the list. If you type a new staff name, the new entry will continue to use the same key listed in the parentheses.
- Abbr.
Enter the desired abbreviated staff name for each staff here.
- MIDI Instrument. From this drop-down list, choose the desired General MIDI instrument. Your choice here will be represented in the Instrument List.
- OK
• Cancel. Click OK to finish translating the file. PrintMusic will apply the staff name, instrument transposition, abbreviated staff name, and MIDI Instrument when the document is finished converting. Click Cancel to finish translation without setting up the staves.
See Scanning
