
How to get there
Choose Plug-Ins > JW Tools > JW Change > Sequence Editor..
What it does
This Sequence Editor is part of the JW Change plug-in and is used to create custom sequences comprised of individual actions. When individual actions are performed in the plug-in, they are stored in a history that is displayed in the Applied Action History list. This history remains available in the plug-in while in an open session of Finale. Once the program is closed, the history will be cleared. If there are no actions stored in the history, the plug-in will display a message stating this when opening the Sequence Editor.
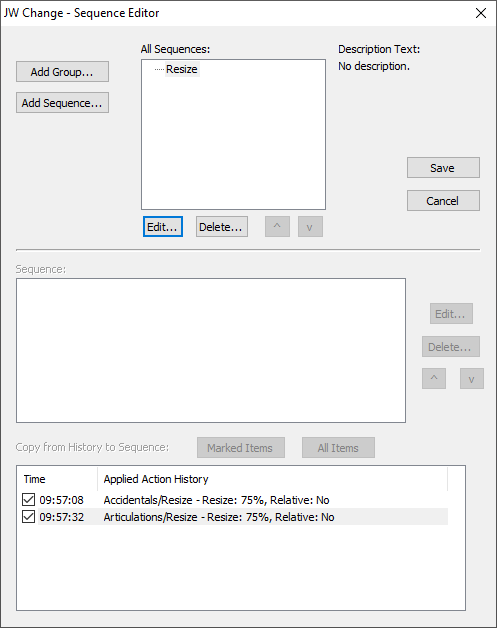
- Add Group. This button opens the Add New Group dialog box where a new group is created.
- Add Sequence. This button opens the Add New Sequence dialog box where a new sequence is created.
- All Sequences. This field displays all of the user saved groups and sequences.
- Description Text. This displays the user created description text for the highlighted group or sequence.
- Edit (upper button). This button opens the group or sequence editor for the item selected in the All Sequences field.
- Delete (upper button). This button will delete the group or sequence that it selected in the All Sequences field. Be aware that deleting a group will delete all of the sequences within the group.
- Up/Down arrows (upper). These buttons change the order of the selection sequence in the All Sequences field relative to the other sequences.
- Sequence. This field displays the actions in the currently selected sequence.
- Edit (lower button). This button will open the Edit Sequence Step dialog box for the action selected in the Sequence field. This will contain the same options that are available for the action in the plug-ins main dialog box.
- Delete (lower button). This button will delete the action that is selected in the Sequence field.
- Up/Down arrows (lower). These buttons will change the order of the selected action in the Sequence field relative to other actions.
- Marked Items. This button will add the actions selected in the Applied Action History list to the currently selected Sequence.
- All Items. This button will add all the actions in the Applied Action History list to the currently selected sequence.
- Applied Action History. This area displays all actions currently available in the plug-ins history. Each action will have specific details of the action, the time stamp for the action, and a checkbox to select the action.
- Cancel. Closes the dialog box and clears any unsaved modifications.
- Save. Saves the current and newly created sequences and then closes the dialog box.
- Go to Plug-Ins > JW Tools > JW Change > Sequence Editor...
- Click Add Group... The Add New Group dialog box appears. Enter a name and a description for your group. Click OK.
- Click Add Sequence.... The Create New Sequence dialog box appears. Enter a name and a description for your sequence. Click OK. The new sequence will be added to the group that is selected.
- Make sure that your new sequence is selected in the All Sequences field and then, in the Applied Action History list at the bottom of the dialog box, click the checkboxes of the actions you want in your sequence.
- When you have completed your selections, click Marked Items to add the actions to the sequence (or clickAll Items to add all actions in the history). The items are added to the Sequence field above in a numbered order.
- The actions now display as a sequence in the Sequence field and can be modified using the Edit... (to modify individual actions in detail) , Delete (to remove a single action), and the up/down arrows (to change the sequence order).
- Click Save to save the sequence and close the dialog box.
- The new group and sequence now appears in the Category list in the main area of the plug-in.
See also:

