
How to get there
- Choose the Expression tool
 and double-click a note or measure. The Expression Selection dialog box appears.
 - Click Edit Categories.
You can also access the Category Designer dialog box by selecting Document > Category Designer.
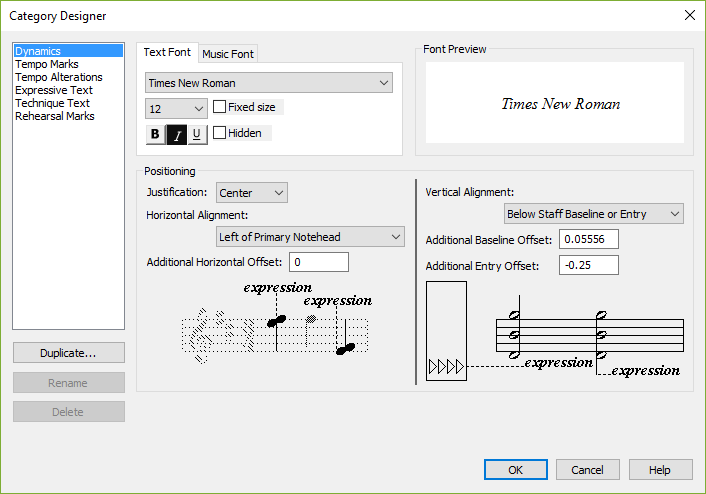
What it does
Finale separates expressions with similar positioning and appearance characteristics into independent categories. This dialog box displays text, positioning, and staff assignment settings for the expression category selected to the left.
Each category includes its own font, size, and style. When you create a new expression, Finale automatically assigns these attributes to the text you type. Because some markings, particularly tempo marks, require multiple fonts, a category can include up to three different fonts, Text (e.g. Times
Each category's positioning settings apply to all expressions in the category. A preview is displayed in the Positioning section for an example of the options chosen from the Horizontal/Vertical Alignment
To accommodate markings that apply to the full score, but only appear on certain staves, some expression categories include a Score List. For example, tempo marks often appear above the top staff of a large score, as well as above the top staff in each instrumental section. Score Lists are also capable of automatically placing expressions properly when systems include hidden staves (see Score List dialog box).
Score Lists are not designed for dynamics. To quickly apply dynamic expressions to multiple staves, use the Assign
Changes to the Category Designer dialog box apply to all expressions in the selected category, including those that already exist in the score, except those specifically defined to ignore category settings (see the Use Category Fonts and Use Category Positioning checkboxes in the Expression Designer - Main dialog box and the Expression Designer - Positioning dialog box).
- [Categories]. Choose from Dynamics, Tempo Marks, Tempo Alterations, Expressive Text, Technique Text, and Rehearsal Marks to display different settings for the selected category.
- Duplicate. Click this button to make a duplicate copy of the category. The Category Name dialog box will appear, prompting you to enter a name for your new category.
- Rename. Click this button to open the Category Name dialog box where you can rename new categories. Finale only allows you to rename categories you create using the Duplicate button.
- Delete. Click this button to delete the selected category.
- Text Font • Music Font • Number Font. Choose whether you would like to edit the font, size, and style of the text, music, or number font. The Expression Designer allows you to easily combine text and music fonts as you create or edit expressions using the Font
- Fixed Size. Select this option to maintain the exact size of the text despite the size of the music altered with the Resize tool
 .
. - Hidden. Select this option to prevent the expression from printing. Hidden expressions will continue to display on-screen at the Hidden Object Shading percentage specified in the Preferences - View dialog box.
- Justification: Left • Center • Right. Choose the desired justification relative to the Horizontal Alignment point and Offset from this
- Horizontal Alignment: Horizontal Click Position • Left of All Noteheads • Left of Primary Notehead • Stem • Center of Primary Notehead • Center of All Noteheads • Right of All Noteheads • Left Barline • Start of Time Signature • After Clef/Key/Time/Repeat • Start of Music • Center Between Barlines • Center Over/Under Music • Right Barline. Use these options to specify the alignment of the expression relative to the notehead, barline, or music, as illustrated by the diagram in this dialog box. To center the expression based on the primary notehead (this changes if added to a chord containing an interval of a second), choose Center of Primary Notehead. To align the expression with the first entry in the measure, choose Start Of Music. To center the expression based on where the music starts and ends (taking into account Before and After spacing in the Document Options - Music Spacing dialog box), choose Center Over/Under Music.
- Additional Horizontal Offset. Enter a value here to make an additional adjustment to the horizontal positioning of the expression. A negative number moves the expression to the left, and a positive number moves the expression to the right.
- Vertical Alignment: Vertical Click Position • Staff Reference Line • Above Staff Baseline • Below Staff Baseline • Top Note • Bottom Note • Above Entry • Below Entry • Above Staff Baseline or Entry • Below Staff Baseline or Entry. Use these options to specify the vertical positioning of the expression relative to the note or staff. If you choose Top Note or Bottom Note, the value for vertical positioning in the Expression Assignment dialog box represents the distance from the top or bottom note in the chord.
- Additional Vertical Offset. Enter a value here, positive or negative, to make an additional adjustment to the vertical positioning of the expression.
- Additional Entry Offset. Enter a value here, positive or negative, to make an additional adjustment to the vertical positioning of the expression relative to the entry.
- Additional Baseline Offset. This option appears only when Above Staff Entry, Below Staff Entry, Above Staff Baseline or Entry, or Below Staff Baseline or Entry is chosen. Enter a value here to specify an offset from the baseline above or below the staff. Positive for above and negative for below.
- Score List • Edit. Choose the Score List you would like to apply to the selected category from this
- Break Multimeasure Rests. This option is displayed when the Tempo Marks, Tempo Alterations, and Rehearsal Marks categories are selected. Check this option to force a break when expressions are placed in the middle of a multimeasure rest.
- OK
Noteman says: If you find that your selected measurement unit is too large or small to work with, you can override your global choice by including the units or abbreviation when entering values. Or, you can set the default measurement units used in this dialog box by choosing
Noteman says: When entering values in the Additional Vertical Offset, Additional Entry Offset, and Additional Baseline Offset fields, positive values position the expression above the selected Vertical Alignment and negative values position the expression below the selected Vertical Alignment.
See also:
Expression Selection dialog box

