
Beat Chart dialog box
How to get there
- Choose the Measure tool
 .
. - Click the bottom
 handleA small square which appears on currently "selectable" elements in the score. Handles allow you to select, edit and adjust musical elements in the score. of any barline that has two handles. Measures that have two handles contain beat chartsA set of handles (accessed through the Measure tool) used to adjust the horizontal position of notes. Handles appear either on the beat (Beat Spacing) or on each note of a measure (Note Spacing). Adjusting the handle for one note or beat will move the notes in all staves at once, keeping them rhythmically aligned..
 - Double-click any top-row handle, except the first, in the beat chart that has appeared.
Tip: There are two ways to provide a measure with a beat chart. Using the Measure tool , select the measure(s) and either 1) choose Utilities > Music Spacing > Apply Beat Spacing to Current Part/Score, or, 2) double-click the selected region to open the Measure Attributes dialog box, click the Position Notes
What it does
Noteman says: If you find that your selected measurement unit is too large or small to work with, you can override your global choice by including the units or abbreviation when entering values. Or, you can set the default measurement units used in this dialog box by choosing
A beat chart allows you change the horizontal position of a beat in all staves at once; for example, you might want to drag the fourth beat of a measure slightly to the left to allow room for a septuplet run in the strings. Finale usually provides a handle on every beat or every note in the measure. Using the Beat Chart dialog box, you can specify a precise beat or subdivision of a beat that you want a particular beat chart handle to control—even if no note falls on that beat. You can change the position of any beat handle (note or rest) within the measure numerically; Finale also displays the range of available values for your reference.
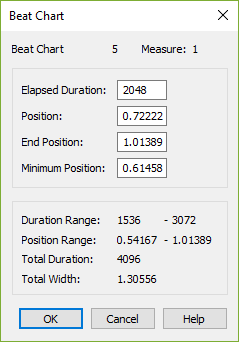
- Beat Chart [#]. This number identifies which beat chart handle, in order from left to right, that you are editing.
- Measure [#]. This number indicates which measure is represented by the beat chart.
- Elapsed Duration. The number in this text box (in EDUsEDUs, or ENIGMA Duration Units, are Finale's high-resolution measurement for the duration of notes and rests, defined as 1024 EDUs per quarter note.) tells which beat (or which subdivision of a beat) has its horizontal positioning controlled by this handle. In other words, if the text box displays a value of 1024 EDUs, then you can drag the lower handle of the pair to the left or right to reposition the occurrence of the second quarter note in all staves (that is, 1024 EDUs, or one quarter note, has already elapsed).
This text box can be useful if you want to move, for example, the second note of a triplet slightly to one side (in all staves). By calculating the appropriate EDU value to enter into the Elapsed Duration text box, you can specify precisely which element of the triplet you want the handle to control. In this example, if the quarter-note triplet begins on the first beat, you’d type 682 into the text box, because that’s one-third of 2048 (the total EDU value of the quarter-note triplet).
To make this handle control another beat in the measure, type its EDU equivalent in this text box. The number must be within the displayed range.
- Position. The number in this text box, in measurement units, tells you the current position of the handle and any notes or rests that line up with it.
- End Position. The number in this text box, in measurement units, tells you how close to the beginning of the next beat (or the end of the measure) you can adjust the note or rest.
- Minimum Position. The number in this text box, in measurement units, tells you how close to the end of the previous beat (or the beginning of the measure) you can adjust the note or rest.
- Duration Range. This displays the smallest and the largest note duration you can edit within the range of notes. The range indicates the values for the notes on either side of the note you selected by double-clicking its beat chart handle.
- Position Range. This displays the allowable values for this beat element's lower handle, from the end of the previous beat (or the beginning of the measure) to the beginning of the next beat (or the end of the measure).
- Total Duration. The number in this text box, in EDUsEDUs, or ENIGMA Duration Units, are Finale's high-resolution measurement for the duration of notes and rests, defined as 1024 EDUs per quarter note., tells you the total duration of the measure.
- Total Width. The number in this text box, in measurement units, tells you the total width of the measure.
- OK
See also:

