
How to get there
- Enter the Shape Designer (see Shape Designer dialog box).
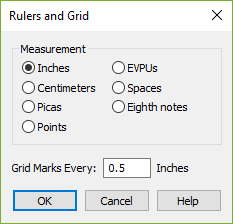
- Choose Shape Designer > Rulers and Grid.
What it does
This command lets you establish the units of measurement you want to use while creating a graphic shape in the Shape Designer. It also lets you specify how frequently you want grid points to appear (when Grid is selected in the Show submenu of the Shape Designer menu).
When this visual background grid is visible, you can use it for helping you draw straight lines, or for gauging the size of an object you’re manipulating. The grid doesn’t appear in printouts, and lines you draw don’t "snap to" it; it’s purely an on-screen visual aid.
- Inches • Centimeters • Picas • Points • EVPUs • Eighth Notes. Select the units of measurement you want Finale to use in displaying rulers and grids (and in displaying position coordinates in the H: and V: text boxes. (The Eighth Notes choice is primarily useful for creating Executable Shapes, for use in creating a playback effect.)
- Grid Points Every ___ . Enter the distance you want between grid points in the visual grid.
If you’re designing an Executable Shape, the imaginary horizontal grid lines don’t represent a unit of spatial measurement. Instead, each time your Executable Shape crosses a horizontal grid line, it generates a new playback value, representing an increase or decrease in the playback variable's value (one beat per minute, one unit of MIDI velocity, and so on).
- OK • Cancel. Click OK to confirm, or Cancel to undo, the changes you’ve made to the ruler and grid setup, and return to the Shape Designer window.

