
| Before playback | During playback |
|---|---|

|
|
How to get there
There are two ways to view the Mixer controls:
- Choose Window > Mixer.
- Choose View > Studio View.
What it does
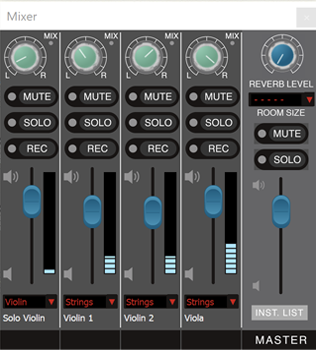
The Mixer contains two parts, a master set of controls and a set of controls for each staff in the score. The master controls can be used to adjust the volume and reverb of the overall output much like the master controls on a conventional mixer. The set of controls for each staff can be used to adjust the volume and pan value relative to other staves in the score much like the volume sliders and panning wheels for tracks on a conventional mixer. All settings defined in the Mixer are post-processed and applied on top of MIDI data that already exists in the score, including MIDI tool data, Human Playback data and expressions and articulations defined for playback. In other words, the Mixer doesn’t change the contour of the playback, only the overall output of how the staves relate to one another.
Settings applied to staves in the Mixer are dynamically linked to both the Staff Controls and the ScoreManager. For example, an increase to the volume for one staff changes the volume setting in the ScoreManager and Staff Controls uniformly. The same is true for the other settings.
- [Pan knob]. Use this knob to control the pan value for each channel. Click and drag clockwise to pan the channel right or counterclockwise to pan the channel left. Playback volume will be weighted to the left or right speaker accordingly. You can also right-click the pan knob to choose whether or not to send this panning data to the
- Mute. Click this button to indicate you want the channel to be silent when you play the score.
- Solo. Click this button to mute all other staves. In other words, you’ve just isolated a staff so that only it will play back, and all the other staves are silent. (You could achieve the same effect by clicking the Mute button for all other staves). You can solo one staff or multiple staves.
- Rec. Use these buttons to specify which staves you would like to record into with HyperScribe.
If you’re not multitrack recording (Record into One Staff or Split into Two Staves is selected in the Record Mode submenu of the HyperScribe menu), you don’t need to use the Mixer to specify which staff to record into; simply click the appropriate staff in the score. If, however, you prefer to use the Record button in the Playback Controls (instead of clicking a measure in the score), then you must use the Mixer’s Rec buttons to indicate which staves you would like to record. (You can use the ScoreManagerto specify individual layers for recording.)
If you would like to record into two or more staves simultaneously, choose HyperScribe > Record Mode > Multitrack Record. Then click the Rec button for all staves you would like to record into. The Record indicators turn red, indicating that Finale will record into those staves. Click the Record button in the Playback Controls to begin recording. (Also, when you click the HyperScribe tool, the HyperScribe frame appears on the selected staves.)
- [Volume Slider]. Use this slider to adjust the volume for this staff (and all other staves set to the same channel). Note that you can enter a specific volume value for each channel in the ScoreManager. You can also right-click the volume slider to choose whether or not to send this volume data to the
- [Program Change/Sound]. With MIDI/Audio > Play Finale Through MIDI selected, this indicator displays the MIDI program number selected for this staff. You can click this
If you’ve assigned several staves to the same instrument, once again remember that they’re all linked to the same Program. Therefore, if you edit the Program assignment for any one of these staves, the Program for all of them will change.
- Instrument. This is the name of the instrument assigned to the staff (as shown in the ScoreManager). You can edit this name (or define a new instrument) in the Instrument Definition dialog box.
- Reverb Level. The reverb knob controls the overall amount of decay, or length of time a sound persists after released. This applies to the overall output. Click and drag clockwise to increase the reverb effect, or counterclockwise to decrease the reverb effect. This knob only affects playback when MIDI/Audio > Play Finale Through MIDI is selected.
- Room Size. This
- Master Mute. Click this button to mute all staves. When you do so, the Mute button is activated in all Staff Controls and staff Mixer controls. You might use the Master Mute button if you plan to mute most staves and audition only a select few.
- Master Solo. Click this button to solo all staves. When you do so, the Solo button is activated in all Staff Controls and staff Mixer controls.
- Master Volume. Click and drag this slider up to increase the volume of the overall output, or down to decrease the overall volume.
- Inst. List. Click this button to open the ScoreManager where you can define new instruments, and make additional volume and pan settings for individual layers and chords. See ScoreManager.
See also:

