
How to get there
- Choose the Ossia tool
 .
. - If you’re in Page View, double-click the location on the page to which you want to attach the floating measure. If you’re in Scroll View, click the measure to which you want it attached (or click again if there’s already a floating measure attached to it). Or, to edit an existing floating measure, double-click its
 handleA small square which appears on currently "selectable" elements in the score. Handles allow you to select, edit and adjust musical elements in the score..
What it does
Noteman says: If you find that your selected measurement unit is too large or small to work with, you can override your global choice by including the units or abbreviation when entering values. Or, you can set the default measurement units used in this dialog box by choosing
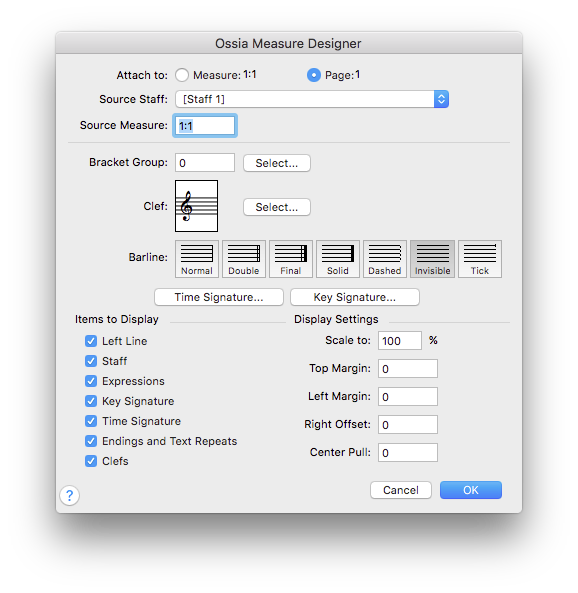
An ossia is a floating measure, unattached to the score itself that you can place anywhere in the score (for use as an explication of a trill, for example). The contents of such a measure are created and edited in an actual measure, called the source measure, which you can later hide. This dialog box lets you specify the source measure on which you’re basing the ossia, as well as several visual aspects of the measure.
There are two kinds of ossia measures. A measure-assigned ossia measure, which you create in Scroll View or Page View, remains attached to its measure in the score, even if that measure’s position in the score changes. A page-assigned ossia measure, which you create in Page View, remains fixed to a given place on the page, regardless of any repositioning of the music around it.
- Attach
- Source Staff. Use this
- Source Measure. Use this text box to enter the number of the source measure. In Scroll View, Finale automatically enters the nearest measure as the source measure.
- Bracket Group • Select. Use these options to select a brace or bracket for the ossia measure. Click Select to open the Bracket dialog box to define a bracket and specify its positioning.
If you want to bracket the floating measure together with staves in the score, remember that you can always drag one end of a normal staff bracket until it’s long enough to enclose the floating measure.
- Clef • Select. Click Select to set the floating measure’s clef from the Clef Selection dialog box. The chosen clef is displayed in the Ossia Measure Designer dialog box.
- Barline. Use this palette to select a barline that you want to use for the floating measure’s right barline. For a detailed discussion of these options, see the Measure Attributes dialog box.
- Key Signature • Time Signature. Click Key Signature or Time Signature to open the corresponding dialog boxes and set the floating measure’s key or time signature. See Key Signature dialog box and Time Signature dialog box.
If a key or time signature isn't selected, the floating measure uses the same default key and time settings of the source measure.
- Items to Display:
 . Left
 - Scale
- Top Margin. Use this text box to set the distance between the top line of the floating measure and the floating measure’s handle. A positive number moves the floating measure upward in relation to its handle; a negative number moves it downward. You can also position the ossia by dragging its handle once you’ve returned to the score.
- Left Margin • Right Offset. When you create a measure-assigned floating measure in Scroll View, its initial width setting is determined by the width of the assigned measure. By changing the number in the Left Margin and Right Offset text boxes, you can change the floating measure’s width. (These parameters also adjust the width of a page-assigned floating measure, but are less necessary, because you specify the width of a page-assigned floating measure in the Page Assignment for Ossia Measure dialog box.)
A positive Left Margin value moves the left barline to the right (making the measure narrower), and a positive Right Offset value moves the right barline to the right (making the measure wider).
- Center Pull. Use this text box to move the music within the floating measure. A positive number moves the music farther to the right (away from the clef and key signature); a negative number moves it to the left (closer to the clef and key signature).
See also:

