
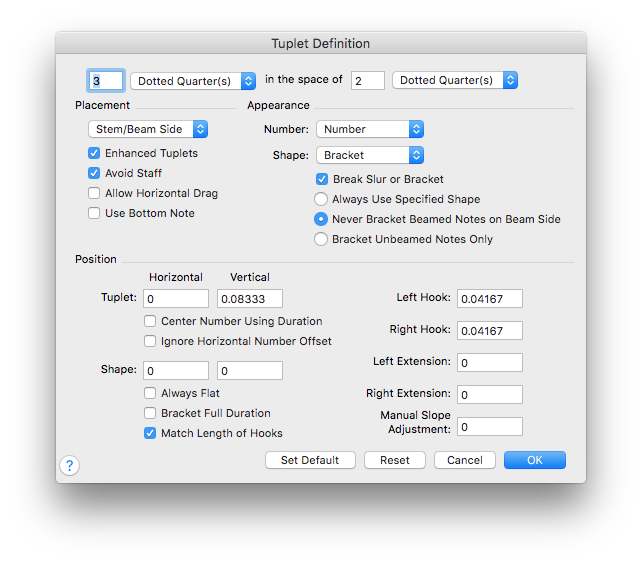
Tuplet Definition dialog box
How to get there
The Tuplet Definition dialog box can be accessed with either the Tuplet tool or the Speedy Entry tool:
- Choose the Tuplet tool
 .
. - Click the first note to include in the
 tupletThe irregular division of notes into a given beat (i.e. 3 into 2). Includes triplets, quintuplets, septuplets, etc. group, or click the first note of a tuplet, then double-click one of its handles.
Or,
- Choose the Speedy Entry tool
 .
. - Click a measure to display the editing frameA frame is a layer that contains one measure's worth of music. You can have up to four layers of music per measure, so one measure can contain up to four frames..
- Press CTRL+1 to define the tuplet you want to enter.
What it does
In this dialog box you can define both the rhythmic and visual aspects of a tuplet grouping—the number of eighth notes that are to be played in the time of a quarter note, for example—and whether or not a bracket or slur should appear, and so on.
Note that you can predefine the default visual aspects of the tuplets in your score, so that every tuplet you create automatically appears with a neatly positioned bracket (for example). To do so, CTRL-click the Tuplet tool; Finale displays Document Options - Tuplets, where you can specify these parameters. (See Document Options - Tuplets for a more complete discussion—although its contents are identical to almost all of this dialog box.) To set the default measurement units used in this dialog box, choose
Note also that you can store tuplet "definitions"—the settings you make in this dialog box—in a tuplet Metatool, so that you can instantly transform non-tuplet notes into tuplet notes (having the tuplet definition you prefer) with the press of a key. In fact, you can assign a different set of Tuplet Definition settings to each of the number and letter keys on your keyboard.
When you create a new tuplet, Finale usually places a number over it (such as the 3 above a triplet). In this dialog box, you can change the tuplet notation for each individual notation; for example, you could tell Finale to display a slur or bracket in addition to the number.
- __ ____ in the space of __ ____ • Half(s) • Dotted Quarter(s) • Quarter(s) (etc.). Define the rhythmic qualities (temporal definition) of the tuplet by entering numbers in these two text boxes (to specify how many) and selecting the rhythmic-value from the
For example, suppose you want to create an eighth-note triplet. In the score, click the Tuplet tool, and click the first of the three normal eighth notes you want to transform into triplets. Enter 3 and 2 in the text boxes ("3 in the space of 2"); choose eighths from the drop-down list: 3 eighths in the space of 2 eighths. (Alternatively, you could create an eighth-note triplet by specifying 3 eighths in the space of 1 quarter.) These text boxes apply only to the tuplet you’re currently placing in the score.
Placement:
- Manual • Stem/Beam Side • Note Side • Above • Below. When Manual is selected in this dropdown list, Finale uses the settings from the Document Options - Tuplets to position the tuplet on the notes in the score. Drag to reposition the tuplet in the score. When Beam Side is selected and you create a tuplet on beamed notes, Finale automatically places the tuplet on the beam side and matches the beam angle. If Beam Side is selected and you create a tuplet on unbeamed notes, Finale places the tuplet using the Document Options - Tuplets settings. You can then drag to adjust the tuplet in your score. Choose Above to place the tuplet above the staff by default. Choose Below to place the tuplet below the staff by default.
- Engraver Tuplets. Check this box to enable Engraver Tuplets. Engraver Tuplets automatically reposition to account for raised or lowered notes in the staff. They also update to avoid rests and staff lines. Bracket placement and slope for Engraver Tuplets is determined by the stem direction of the majority of stems in the tuplet (rather than the first stem in the tuplet as is the case when this box is not checked).
- Avoid Staff. Check this option to instruct Finale to always place tuplet brackets above the top line, or below the bottom line of the staff.
- Allow Horizontal Drag. Check this box to enable the ability to drag tuplet markings horizontally in the score. If this box is not checked, tuplets can only be adjusted vertically in the score.
- Use Bottom Note. If the first note in the tuplet group is a chord, the numbers in the Position text boxes are generally measured from the top note; if you transpose that note up or down, the entire tuplet moves with it. Select this option, however, if you want these numbers measured from the bottom note instead.
Appearance:
- Number: Nothing • Number • X:Y, X:Yq, Xq:Yq. Use this drop-down list to specify whether Finale should place a number, a ratio, or no mark on a tuplet. If you choose, for example X:Y, Finale displays "3:2" for triplet numbers. If you choose Xq:Yq for a quarter note triplet, Finale displays "3?:2?". Finale does not display X or Y values of 1. If durations are different (i.e. 3 quarter in the space of one half) X:Yq will display as Xq:Yq.
- Shape: Nothing • Slur • Bracket. Use the Shape drop-down list to display the tuplet with no shape appearing over it, or with a slur or bracket. Tuplets with slurs actually use slurs (with tapered ends), unless the slur is "broken" (Break Slur or Bracket is selected) in which case Finale uses curves (with non-tapered ends).
- Break Slur or Bracket. If you’ve chosen a slur as the shape for the tuplet, then select Break Slur or Bracket, to have Finale break a slur or bracket to allow for a number to be placed there.
- Always Use Specified Shape • Bracket Unbeamed Notes Only • Never Bracket Beamed Notes on Beam Side. Choose Always Use Specified Shape to place a bracket (of the shape defined above) on all tuplets. Choose Bracket Unbeamed Notes Only to instruct Finale to place brackets on unbeamed groups of notes only. Choose Never Bracket Beamed Notes on Beam Side to instruct Finale to place brackets on tuplets defined to appear on the note side of the staff (for example, if the beam appears above notes tuplets will only contain brackets if placed below the staff).
Position:
- Tuplet: Horizontal • Vertical. Enter values to adjust the horizontal and vertical position of the tuplet number displayed in the score.
- Center Number Using Duration. Check this box to position tuplet numbers based on the rhythmic center of the tuplet (rather than equidistant from the first and last note/rest of the tuplet).
- Ignore Horizontal Number Offset. If you have specified a global sideways shift for the numbers in your tuplets, select this option if you don’t want it to apply to this tuplet.
- Shape: Horizontal • Vertical. Enter values here to specify the horizontal and vertical adjustments for placing the shape (slur or bracket) in relation to the tuplet number. Enter a smaller or larger value for H: to change the position of the entire shape in relation to the notes. To move the shape closer to or further away vertically from the note, enter a smaller or larger value for V:.
- Always Flat. Check this box to instruct Finale to always use flat brackets for tuplets.
- Bracket full duration. Check this option to extend the right edge of the bracket to enclose the full duration of the tuplet.
- Match Length of Hooks. Check this box to always use same length for left and right hooks. If the values for Hook Length are different, Finale uses the smallest value for both hooks.
- Left Hook • Right Hook. These options replace the Left Offset and Right Offset text boxes that controlled the length of the left and right hooks on horizontal brackets in previous versions of Finale. Enter a negative value in Left Hook or Right Hook to set the length of the left-most or right-most hook. The value is negative because Finale measures down from the bracket. If Match Length of Hooks is selected, Finale updates the Right Hook text box with the new Left Hook value. If Match Length of Hooks is not selected, you can enter different values in each text box.
- Left Extension • Right Extension. By default, Finale initially creates a tuplet that surrounds the position of notes in the measures. However, in some cases it’s easier for a musician to interpret the music if the tuplet can encompass the visual space of the beat instead of just surrounding the notes. You can accomplish this by using these settings to specify how far the bracket or slur should extend beyond the notes. Enter a larger value to lengthen the bracket or slur.
- Manual Slope adjustment. Enter a positive value to specify the maximum angle of brackets or slurs when the right side is higher than the left. Enter a negative value to specify the maximum angle when the right side of the tuplet lower than the left.
- OK • Cancel • Set Default • Reset. Click OK (or press enter) to confirm, or Cancel to discard, the tuplet appearance you’ve created. Click Set Default to lock the current settings for all new tuplets you create (existing tuplets will not change). Choose Reset to revert to this session’s original settings.
Noteman says: If you find that your selected Measurement Unit is too large or small to work with, you can override your global choice by including the units or abbreviation when entering values.
Tip: Enter a smaller value for Horizontal of the Shape to change the position of the entire shape in relation to the notes. Enter a smaller Vertical of the Shape to move the Shape closer to the note. Hook is defined as the small lines at the end of the bracket while Extension are the longer lines of the bracket.
See also:

