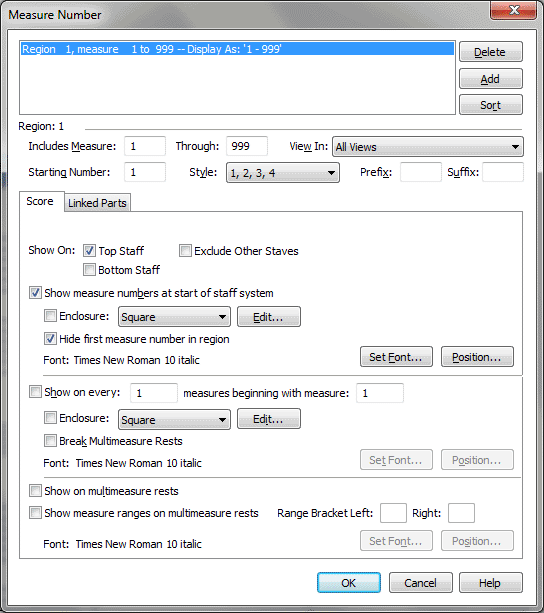
Measure Number dialog box
How to get there
- Click the Measure tool
 . The Measure menu appears.
- Choose Measure > Edit Measure Number Regions. Or, choose Document > Edit Measure Number Regions.
What it does
Here, you can define measure numbering for your score and parts. You
can create new measure number regions, cycle through
each region in your score, and display and change settings for regions.
It’s easy to set up measure numbers, edit their appearance, hide or show
them, and position them in the score (see Measure Numbers). A drop-down list provides common measure numbering
styles—1, 2, 3….a, b, c…, and so on—without requiring you to type in several
settings to define the style; and if you prefer, you can create your own
style. Options for selecting enclosures are available, and you can select
common enclosure shapes from a drop-down list.
- Region.
To display the settings for a region of measure numbers in your
score, select the desired region from the dialog box.
- Includes
Measure ___Through ___. Enter the numbers of the first and last
measures of the specific region. These are the actual measures in the
piece, regardless of what number you want displayed on them. For example,
you’d enter 1 through 49 here to tell Finale that measures 1 through 49
belong to the region, but you might use a completely different numbering
scheme for the same measures in your score (see First Measure in Region
below).
- Viewable
In: All Views • Page View Only • Scroll and Studio Views (on-screen) Only. Use these options to specify in which views the selected
measure number region will be visible.
- Delete
• Add • Sort. Click Delete to remove the currently selected measure
number region. Click Add to create a new measure number region after the
selected region. Finale will copy the settings of the currently selected
measure number region into the newly created region. Click Sort to sort
all measure number regions in the order they’ll appear in the score.
- Starting Number. Enter a value for the measure number on the
first measure in the region. If you selected a numeric style for your
measure numbers, enter the first number that you want to appear in the
region (1, or 2, or 3, and so on). If you selected a letter style, enter
a number that corresponds to the position or order of the letter in the
alphabet, such as 1 for A, 2 for B, 3 for C, and so on.
- Style.
Choose the numeric style (1, 2, 3, 4…), one of four alpha styles
(a, b, c...aa, bb, cc…; A, B, C...AA, BB, CC…; a, b, c...aa, ab, ac…;
A, B, C...AA, AB, AC…), or Time from the Style pop-up menu. If you’d rather
define your own measure numbering style, choose Other, then set up your
own style in the Measure Number Style dialog box. If you choose Time,
Finale displays the Time Style dialog box where you can specify the format
of the time to be displayed in the score. The time is based on Finale’s
playback taking into account tempo changes applied with the MIDI tool,
Tempo tool, and Expressions. (Time markers do not take into account tempo
changes applied with Human Playback.) See Measure
Number Style dialog box. For some of the examples above, you may need
to check Double Up in the Measure Number Style dialog box.
- Prefix
• Suffix. Enter a number, letter, or symbol in the Prefix text
box that you want Finale to display before every measure in the region.
Similarly, any number, letter, or symbol entered in the Suffix text box
will be displayed after every measure in the region.
- [Linked Parts]. Click this tab to show the measure number settings for links parts. The options for measure numbers in linked parts are identical to those for the full score.
- Use Score Settings [available when the Linked Parts tab is selected]. When this option is checked, your measure numbers settings are identical in both the score and all linked parts. Uncheck this option to enable the settings under the Linked Parts tab, which displays identical measure numbering options for linked parts, so that measure number settings for parts can be configured independently from the score.
- Show on: Top Staff • Bottom Staff • Exclude Other Staves.
Select Top (or Bottom) Staff to tell Finale to always
show a measure number on the top or bottom staff of each system, regardless
of which staff happens to be at the top (or bottom) of the system. Check
Exclude Other Staves to show measure numbers on the top and/or bottom
staves of systems only (depending on which of these options is checked).
Tip. Select one of
the options above if you’ve hidden empty staves so that all resting staves
are removed from the staff systems in Page View. That way, if you want
a measure number to appear in the score above the top staff, or on the
bottom staff, one will always appear, even if measure numbers are normally
turned off for that staff in the Staff Attributes dialog box.
- Show
Measure Numbers at Start of Each Staff System. Select Show Measure Numbers at Start
of Each Staff System if you want measure numbers to appear at the beginning
of every line. When this option is selected, a measure number appears to the upper left of each system's leftmost measure. If this option is not checked, measure numbers added to the leftmost measure of a system (manually or using the Show On Every option) will likely appear to the right of the clef and key signature (depending on settings made in the Position Measure Number dialog box).
- Enclosure: None • Square • Circle • Ellipse • Triangle • Rectangle • Pentagon
• Hexagon • Septagon • Octagon • Other • Edit. Use this Enclosure Shape
drop-down list to choose the geometric shape
of the enclosures that you want to appear on measure numbers that appear at the start of each staff system.
Choose None if you want no shape displayed with the numbers. Choose Other
to display the Enclosure Designer dialog box, where you can edit a shape.
For more information, see Enclosure Designer
dialog box. Click Edit to display the Enclosure Designer
dialog box, where you can edit the settings of the currently selected
shape.
- Hide
First Measure Number in Region. When this option is selected, Finale
will not display the first measure number in the region for measure numbers assigned with "Show on Start of Staff System." For example,
many copyists hide the measure number on the first measure in the score.
When the option is not selected, Finale displays the measure number.
- Set
Font • Position. Click Set Font to select the font Finale will use for the
measure numbers at the start of each staff system. The font that is currently selected appears
next to this button.Click Position to display the Position Measure Number dialog box, where
you specify the default position of measure numbers in the score for this
region. For more information, see Position Measure
Number dialog box.
- Show Every ___ Measures
Beginning with Measure ___. To display the measure number on every measure or on every few measures (every
5 measures, for example), starting at a particular measure number, select
Show Every ___ Measures Beginning with Measure ___, then enter values
for the measure number and the display interval. When "Show Measure Numbers at Start of Each Staff System" is checked above, and a measure number happens to appear on the leftmost measure of a staff system based on this setting, Finale defers to the font and positioning settings defined for "Show Measure Numbers at Start of Each Staff System" and does not display this (duplicate) measure number.
- Enclosure: None • Square • Circle • Ellipse • Triangle • Rectangle • Pentagon
• Hexagon • Septagon • Octagon • Other • Edit. Use this Enclosure Shape
drop-down list to choose the geometric shape
of the enclosures that you want to appear on measure numbers that appear according to your "Show Every" settings defined directly above.
Choose None if you want no shape displayed with the numbers. Choose Other
to display the Enclosure Designer dialog box, where you can edit a shape.
For more information, see Enclosure Designer
dialog box. Click Edit to display the Enclosure Designer
dialog box, where you can edit the settings of the currently selected
shape.
- Break Multimeasure Rests. Check this box to indicate that you want measure numbers that appear based on your "Show On Every" settings to interrupt multimeasure rests in parts. With this option checked, barlines that include measure numbers will always appear, separating multimeasure rests into two (or more) multimeasure rest measures.
- Set
Font • Position. Click Set Font to select the font Finale will use for the
measure numbers that appear based on your "Show On Every" settings. The font that is currently selected appears
next to this button. Click Position to display the Position Measure Number dialog box, where
you specify the default position of measure numbers in the score for this
region. For more information, see Position Measure
Number dialog box.
- Show
on Multimeasure Rests. Check this box to display measure numbers on all multimeasure rests.
- Show Measure Ranges on Multimeasure Rests • Range Bracket Left/Right.
Select this option to display measure ranges instead of a single measure number for multimeasure rests. When this box is checked, you can enter the
character to use for left or right brackets, such as parentheses or square
brackets. Leave the Left/Right boxes blank for no bracket.

Note that if "Show On Every" is checked, and an enclosure is defined for thosemeasure numbers, Finale will display both the enclosed measure number and the measure number ranges on multimeasure rests. If an enclosure is not defined, Finale will defer to the multimeasure rest range only. To hide an extra enclosed measure number, right-click the number's handle and choose Always Hide Number.
- Set
Font • Position [for multimeasure rest ranges]. Click Set Font to select the font Finale will use for the
measure numbers that appear based on your measure number ranges for multimeasure rest settings. The font that is currently selected appears
next to this button. Click Position to display the Position Measure Number dialog box, where
you specify the default position of multimeasure rest measure numbers in the score for this
region. For more information, see Position Measure
Number dialog box.
- OK
• Cancel. Click Cancel to return to the score without changing
the measure number settings. Click OK to confirm your settings and return
to the score. The measure numbers appear, according to your specifications.
See Also:
Measure numbers
Measure Number Style
Enclosure Designer
Position Measure
Number
Measure
Tool
