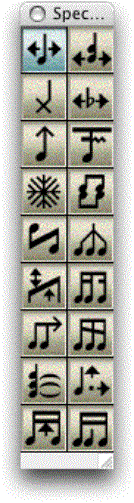
Special Tools Palette
How to get there
Click the Special Tools tool
 on the Main Tool Palette.
If the palette does not appear, choose Special Tools Palette from the
Window menu.
on the Main Tool Palette.
If the palette does not appear, choose Special Tools Palette from the
Window menu.
What it does
Using the Special Tools Palette, you can
edit any measure on the screen at any view size. You can move, resize,
hide, and reshape the palette on the screen as you like. To change layers,
choose the layer you wish to work in from
the Layer pop-up menu at the bottom of the document window. Click
on the name of the tool by the Special Tools palette to jump to see more
information.
When you select an element’s handle, Finale
displays the relative position of the selected element in the message
bar. If you select more than one handle, values are only displayed if
they are the same for all the selected elements. When no handles are selected,
Finale displays the message for the tool currently selected on the Special
Tools Palette.
- Note Position Tool
 . When you click this tool, a handle appears above
every note or rest in the measure (except a single default whole rest).
You can reposition any note, chord, or rest horizontally by dragging its
handle. Note, however, that you’re not actually moving the beat–the notes
that fall on this beat in other staves will stay where they are. To move
the beat–and the notes in all staves that fall on it–you should use the
Measure tool (see Measure tool and
Beat positions).
. When you click this tool, a handle appears above
every note or rest in the measure (except a single default whole rest).
You can reposition any note, chord, or rest horizontally by dragging its
handle. Note, however, that you’re not actually moving the beat–the notes
that fall on this beat in other staves will stay where they are. To move
the beat–and the notes in all staves that fall on it–you should use the
Measure tool (see Measure tool and
Beat positions).
- Notehead Position Tool
 . When you click this tool, every notehead in the
window sprouts a handle; drag a handle left or right to move a notehead.
Because the Notehead Position Tool lets you rearrange the horizontal positions
of the individual noteheads, you could use it to move notes in a cluster
chord from one side of the stem to another, for example. For more options,
CONTROL-click
on the handle of a notehead and choose Edit to display the Notehead
Settings dialog box. In this dialog box, you can enter a precise number
for positioning and change the size or shape of the notehead.
. When you click this tool, every notehead in the
window sprouts a handle; drag a handle left or right to move a notehead.
Because the Notehead Position Tool lets you rearrange the horizontal positions
of the individual noteheads, you could use it to move notes in a cluster
chord from one side of the stem to another, for example. For more options,
CONTROL-click
on the handle of a notehead and choose Edit to display the Notehead
Settings dialog box. In this dialog box, you can enter a precise number
for positioning and change the size or shape of the notehead.
- Note Shape Tool
 . You can change a notehead’s appearance with the
Note Shape Tool by double-clicking its handle. A palette of every symbol
in the default music font appears; double-click any shape in this palette
to substitute it for the standard oval notehead of the note you clicked.
In this way you can create individual X noteheads, diamond noteheads,
and so on within a measure of regular notes. This technique is best for
occasional notehead shape changes; use the Note Shapes feature from the
Staff Attributes dialog box to change all noteheads (of a specific pitch
or rhythmic value) to a certain shape. For full measures or regions, use
the Change Notehead command in the Selection tool. See Utilities/Change,
Staff Attributes dialog box, or Change
Noteheads dialog box for more information. For more options, CONTROL-click
on the handle of a notehead to display the Notehead
Settings dialog box. In this dialog box, you can enter a precise number
for positioning and change the size or shape of the notehead.
. You can change a notehead’s appearance with the
Note Shape Tool by double-clicking its handle. A palette of every symbol
in the default music font appears; double-click any shape in this palette
to substitute it for the standard oval notehead of the note you clicked.
In this way you can create individual X noteheads, diamond noteheads,
and so on within a measure of regular notes. This technique is best for
occasional notehead shape changes; use the Note Shapes feature from the
Staff Attributes dialog box to change all noteheads (of a specific pitch
or rhythmic value) to a certain shape. For full measures or regions, use
the Change Notehead command in the Selection tool. See Utilities/Change,
Staff Attributes dialog box, or Change
Noteheads dialog box for more information. For more options, CONTROL-click
on the handle of a notehead to display the Notehead
Settings dialog box. In this dialog box, you can enter a precise number
for positioning and change the size or shape of the notehead.
- Accidental Tool
 . When you click this tool, every accidental in
the measure sprouts a handle. Drag a handle to slide its accidental. This
tool can be useful for rearranging the configuration of accidentals on
a cluster chord or creating musica ficta, for example. For more options,
double-click on the handle to open the Accidental
Settings dialog box. In this dialog box, you can enter a precise number
for positioning, allow the accidental to be adjusted vertically, and change
the size, font or shape of the accidental.
. When you click this tool, every accidental in
the measure sprouts a handle. Drag a handle to slide its accidental. This
tool can be useful for rearranging the configuration of accidentals on
a cluster chord or creating musica ficta, for example. For more options,
double-click on the handle to open the Accidental
Settings dialog box. In this dialog box, you can enter a precise number
for positioning, allow the accidental to be adjusted vertically, and change
the size, font or shape of the accidental.
- Stem Length Tool
 . When you click this tool, any stemmed note sprouts
a handle (unless it’s part of a beamed group). You can drag the handle
up or down to change the length of the stem.
. When you click this tool, any stemmed note sprouts
a handle (unless it’s part of a beamed group). You can drag the handle
up or down to change the length of the stem.
- Broken Beam Tool
 . This tool can flip a sixteenth-note (or smaller)
beam “stub” from one side of its stem to the other. A handle appears on
each such broken beam; click the handle to flip the beam to the opposite
side of the stem.
. This tool can flip a sixteenth-note (or smaller)
beam “stub” from one side of its stem to the other. A handle appears on
each such broken beam; click the handle to flip the beam to the opposite
side of the stem.

- Stem Direction Tool
 . When you click this tool, a handle appears above
and below every stemmed note in the measure. A click on a handle flips
the stem in that direction. The process is called freezing a stem, because
it’s no longer free to flip up or down depending on its position on the
staff.
. When you click this tool, a handle appears above
and below every stemmed note in the measure. A click on a handle flips
the stem in that direction. The process is called freezing a stem, because
it’s no longer free to flip up or down depending on its position on the
staff.
You can also flip note stems when you’re editing
with the Speedy Entry tool: position the insertion bar on a note and press
the L key. (Press OPTION+L
to restore it to floating, “unfrozen” status.)
- Double/Split Stem Tool
 . When you click this tool, a handle appears on
every notehead in the measure; another appears above the staff and one
more below. Click the upper or lower handle to create double stemming,
like this:
. When you click this tool, a handle appears on
every notehead in the measure; another appears above the staff and one
more below. Click the upper or lower handle to create double stemming,
like this:
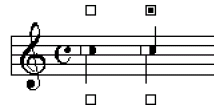
To create a double stem on a single-stemmed
note (top left), click the Double/Split Stem Tool in the Special Tools
window (right), and click the handle below the note. The result: a second
stem on the other side of the notehead (bottom left).
The new, second stem points the opposite direction
from the original stem, no matter which handle (top or bottom) you clicked.
The bottom handle has an additional feature.
It can produce split stemming within a chord, giving the effect of a separate
inner voice, like this.
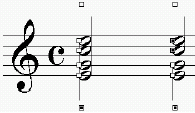
There are two steps involved in creating this
effect. First, click the bottom stem to let Finale know you want to create
split stemming (above left). Then click the handle of each note you want
to be a part of the upper stem only (above right).
For more options, CONTROL-click on the handle of a notehead
and choose Edit to display the Notehead Settings dialog box. In this dialog
box, you can enter a precise number for positioning and change the size
or shape of the notehead.
- Reverse Stem Tool
 . This tool flips the stem from one side of its
notehead to the other. To reverse a stem, click the handle above or below
the note, according to the note’s stem direction.
. This tool flips the stem from one side of its
notehead to the other. To reverse a stem, click the handle above or below
the note, according to the note’s stem direction.
You may need this tool when you create cross-staff
notation using the Note Mover tool; see Cross-staff
notes.
Note that you can
control Finale’s tendency to flip the stem direction of reverse-stemmed
notes; for a full explanation, read the description of the RevStem Adj
parameter in the Document Options: Stems entry. (Set the Reverse Stem
Adjustment parameter to zero if you never want Finale to change stem directions
on reverse-stemmed notes.) See Document
Options-Stems.
- Custom Stem Tool
 . The Custom Stem Tool provides great flexibility
for special stemming cases—such as splayed stemming, where a stem might
branch out into three mini-stems connecting the notes of a chord cluster
(for example, a Cf/Cn/Cs cluster). In fact, if you double-click a note’s
handle, you’ll enter the Shape Selection box, where you can select an
existing shape you want to use as a stem. If you then click Create, you
enter the Shape Designer, where you can draw
any shape for use as a stem—a squiggle, a curve, a box, a letter of the
alphabet, or anything you can create in the Shape Designer (see Shape
Designer, and bear in mind that the small white circle—the origin—represents
the point of the stem’s connection to the note). By entering and exiting
the Shape Designer without creating a shape at all, you create a stemless
note.
. The Custom Stem Tool provides great flexibility
for special stemming cases—such as splayed stemming, where a stem might
branch out into three mini-stems connecting the notes of a chord cluster
(for example, a Cf/Cn/Cs cluster). In fact, if you double-click a note’s
handle, you’ll enter the Shape Selection box, where you can select an
existing shape you want to use as a stem. If you then click Create, you
enter the Shape Designer, where you can draw
any shape for use as a stem—a squiggle, a curve, a box, a letter of the
alphabet, or anything you can create in the Shape Designer (see Shape
Designer, and bear in mind that the small white circle—the origin—represents
the point of the stem’s connection to the note). By entering and exiting
the Shape Designer without creating a shape at all, you create a stemless
note.
To restore a normal stem to a custom-stemmed
note, click its handle and press delete. To modify the shape itself, double-click
the handle to re-enter the Shape Designer.
- Beam Angle Tool
 . When you click this tool, any notes that are
beamed together sprout two handles, one at each end of the beam. The left
handle changes the beam height; as you move it up and down, the right
handle moves in tandem, and the beam angle doesn’t change. The right handle
changes the beam angle; as you move it up and down, the left handle remains
stationary.
. When you click this tool, any notes that are
beamed together sprout two handles, one at each end of the beam. The left
handle changes the beam height; as you move it up and down, the right
handle moves in tandem, and the beam angle doesn’t change. The right handle
changes the beam angle; as you move it up and down, the left handle remains
stationary.
- Secondary Beam Break Tool
 . This tool lets you specify places where you want
secondary beams (for sixteenth-note and smaller values) to break. When
you click the tool, a handle appears above each beamed note. Double-click
the handle above the note after the desired beam break; the Secondary
Beam Break Selection dialog box appears, letting you specify which beams
should be broken at the spot you clicked. For a complete discussion, see
Secondary Beam Break Selection dialog box.
. This tool lets you specify places where you want
secondary beams (for sixteenth-note and smaller values) to break. When
you click the tool, a handle appears above each beamed note. Double-click
the handle above the note after the desired beam break; the Secondary
Beam Break Selection dialog box appears, letting you specify which beams
should be broken at the spot you clicked. For a complete discussion, see
Secondary Beam Break Selection dialog box.
- Beam Extension Tool
 . This tool lets you extend any beam past its last
note, which can be useful for beaming across the barline. (To beam across
barlines automatically, use the Beam Over Barlines Plug-in). When you
click the tool, a handle appears at each end of every beamed group of
notes. Double-click the handle at the end you want to extend; the Beam
Extension Selection dialog box appears, letting you specify which beams
you want extended: eighth-note, sixteenth-note, and so on. For a complete
discussion, see Beam Extension Selection dialog
box.
. This tool lets you extend any beam past its last
note, which can be useful for beaming across the barline. (To beam across
barlines automatically, use the Beam Over Barlines Plug-in). When you
click the tool, a handle appears at each end of every beamed group of
notes. Double-click the handle at the end you want to extend; the Beam
Extension Selection dialog box appears, letting you specify which beams
you want extended: eighth-note, sixteenth-note, and so on. For a complete
discussion, see Beam Extension Selection dialog
box.
When you return to the document, you can drag
the beam handles to the right or left, shortening or lengthening the beams
you specified. Click a handle and press DELETE to restore a beam, or double-click
a handle to re-enter the Beam Extension Selection dialog box (to specify
a different set of beams to modify).
- Secondary Beam Angle Tool
 . This tool allows you to give sixteenth-note (and
smaller value) beams different slants—useful for creating the modern feathered
beaming notation for accelerandi and ritards, where several secondary
beams converge, signifying a gradual change from one rhythmic value to
another.
. This tool allows you to give sixteenth-note (and
smaller value) beams different slants—useful for creating the modern feathered
beaming notation for accelerandi and ritards, where several secondary
beams converge, signifying a gradual change from one rhythmic value to
another.
When you click the tool, handles appear at
each end of every beam. The right handle of each beam changes the beam
angle; as you move it up and down, the left handle controls the height
and the pivot point. By changing the angle of one beam independently of
the other (and by using the regular Beam Angle Tool to change the outer
[eighth-note] beam’s angle), you can make them appear to converge or diverge.
- Tie Tool
 . Three handles on ties let you adjust their position
in relation to noteheads. The first handle appears at the start of the
tie, the second handle appears in the middle-left of the tie, the third
handle appears at the end of the tie. To adjust the start and end points
of the ties, drag the first and last handles respectively. Drag the middle
handle to flatten or increase the arc of the tie. If you want to control
the left and right sections of your tie separately, double-click on the
middle-left handle. A second handle appears in the middle toward the right.
These two handles now control the left and right height and inset of the
tie, respectively. To return to three handles and symmetrical behavior,
double-click the middle-left handle again and the new handle disappears.
Also remember that you have control over the vertical placement of ties.
If you adjust the vertical placement, both endpoints adjust to maintain
the same vertical distance. Remember to take advantage of Finale’s auto-constrain
feature (hold down the SHIFT key) if you want to move ties horizontally.
Note that the handles will disappear while you are dragging them.
. Three handles on ties let you adjust their position
in relation to noteheads. The first handle appears at the start of the
tie, the second handle appears in the middle-left of the tie, the third
handle appears at the end of the tie. To adjust the start and end points
of the ties, drag the first and last handles respectively. Drag the middle
handle to flatten or increase the arc of the tie. If you want to control
the left and right sections of your tie separately, double-click on the
middle-left handle. A second handle appears in the middle toward the right.
These two handles now control the left and right height and inset of the
tie, respectively. To return to three handles and symmetrical behavior,
double-click the middle-left handle again and the new handle disappears.
Also remember that you have control over the vertical placement of ties.
If you adjust the vertical placement, both endpoints adjust to maintain
the same vertical distance. Remember to take advantage of Finale’s auto-constrain
feature (hold down the SHIFT key) if you want to move ties horizontally.
Note that the handles will disappear while you are dragging them.
If you prefer to enter exact values instead
of dragging, double-click an ending tie handle and enter new values for
the tie in the Tie Alterations dialog box.
These values override the global tie placement values you defined in the
Document menu.
Note that in cases
where a tie straddles a system (line) break, you can also edit the tie’s
“tail” on the next line—the miniature tie that represents the continuation
of the tie from the previous system. Use the Tie Alterations dialog box
settings (or Document Options-Ties for global settings for Tie System
Breaks).
- Dot Tool
 . Click this tool if you want to adjust the position
of a specific dot on a dotted note; a handle appears on every dotted notehead.
When you double-click a handle, the Dot Offsets dialog box appears, where
you can specify the precise positioning of this dot. (This tool is best
used for making adjustments to specific dotted notes; the default horizontal
dot position can be set globally in the Augmentation Dots category of
the Document Options.) See Document Options-Augmentation
Dots for a more complete discussion.
. Click this tool if you want to adjust the position
of a specific dot on a dotted note; a handle appears on every dotted notehead.
When you double-click a handle, the Dot Offsets dialog box appears, where
you can specify the precise positioning of this dot. (This tool is best
used for making adjustments to specific dotted notes; the default horizontal
dot position can be set globally in the Augmentation Dots category of
the Document Options.) See Document Options-Augmentation
Dots for a more complete discussion.
There are up to two handles on dotted notes.
Drag the first (or only) handle to move the first dot away from or closer
to a note. A second handle appears on notes with more than one dot. It
appears after the last dot, and controls the space between dots. Drag
the second handle to move the last dot away from, or closer to the previous
dot. Finale automatically adjusts any dots between the first and the last
dot so they are evenly spaced.
- Beam Width Tool
 . Click this tool to adjust the thickness of beams
in a beam group. Handles appear at the beginning and end of each beam
group. Click and drag or use the arrow keys to change the thickness of
all beams in the group. To adjust the thickness of all beams see Document
Options-Beams.
. Click this tool to adjust the thickness of beams
in a beam group. Handles appear at the beginning and end of each beam
group. Click and drag or use the arrow keys to change the thickness of
all beams in the group. To adjust the thickness of all beams see Document
Options-Beams.
- Beam Stem Adjust Tool
 .
Click this tool to adjust the stem connection to beams. This would allow
you to shorten all the stems inside a beam group to only reach the beams
closest to the notehead. A handle appears on each stem that ends in a
beam. Click and drag or use the arrow keys to move the stem lower or higher
in the beam group.
.
Click this tool to adjust the stem connection to beams. This would allow
you to shorten all the stems inside a beam group to only reach the beams
closest to the notehead. A handle appears on each stem that ends in a
beam. Click and drag or use the arrow keys to move the stem lower or higher
in the beam group.
Tip: Click and drag-select
several stems in a beam group to uniformly adjust them at one time.
See Also:
Main Tool
Palette