- Click the MIDI
Tool
 . The MIDI tool
menu appears.
. The MIDI tool
menu appears.
- Double-click the measure in which you want
the patch to change. The MIDI tool window
appears.
- Click the Patch Change icon
 .
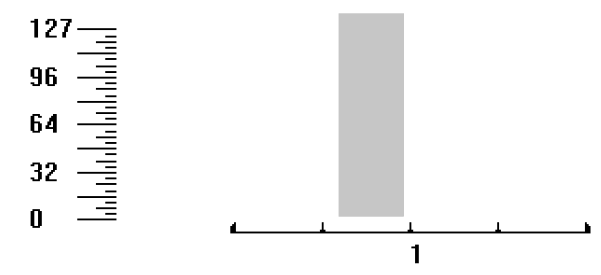
On the left side of the MIDI tool window you see a scale of continuous-data
values—in this case, patch numbers—from 1 to 128. Unless you’ve already
created patch changes with the MIDI tool (or recorded them during a Transcription
Mode performance), the window is empty. You’ll specify where you want
to insert a patch change by dragging through a sliver of the graph area.
.
On the left side of the MIDI tool window you see a scale of continuous-data
values—in this case, patch numbers—from 1 to 128. Unless you’ve already
created patch changes with the MIDI tool (or recorded them during a Transcription
Mode performance), the window is empty. You’ll specify where you want
to insert a patch change by dragging through a sliver of the graph area.
- Drag through a small horizontal “slice” at
the beginning of the graph area, as shown. Keep in mind that the
actual patch change will occur at the beginning of the region you select. It really doesn’t matter,
therefore, how much of the window you highlight; the patch change will
be inserted at the far left edge of your highlighted region.
- Choose MIDI/Audio > Set To. The
Set To dialog box appears.
- Enter the appropriate Bank and Program numbers
you want the staff’s playback to switch to. Click OK (or press RETURN). You return to the MIDI tool window. Part of the graph area
is now black. That’s because you’ve just inserted a patch change that’s
in effect from the point you selected to the end of the piece. Repeat
the entire process at other points in the score where you want the patch
to change (for example, if you want the patch to change back to the original
patch).
To remove patch changes you’ve created in
this way, reselect the same region in the MIDI tool windows and press
CLEAR,
or use the Selection tool to clear Continuous Data.
