
How to get there
- To create a new group, choose the Staff tool
 . The Staff menu appears.
 - Select the measures to include in the group, then choose Staff > Group and Bracket > Add.
- To edit an existing group, click the Staff Tool. Click a group handle, then choose Staff > Groups and Brackets > Edit. Or, double-click a group handle or a bracket handle. (In the Group Attributes dialog box, you can use the arrow controls to display the attributes of the groups in the document.)
What it does
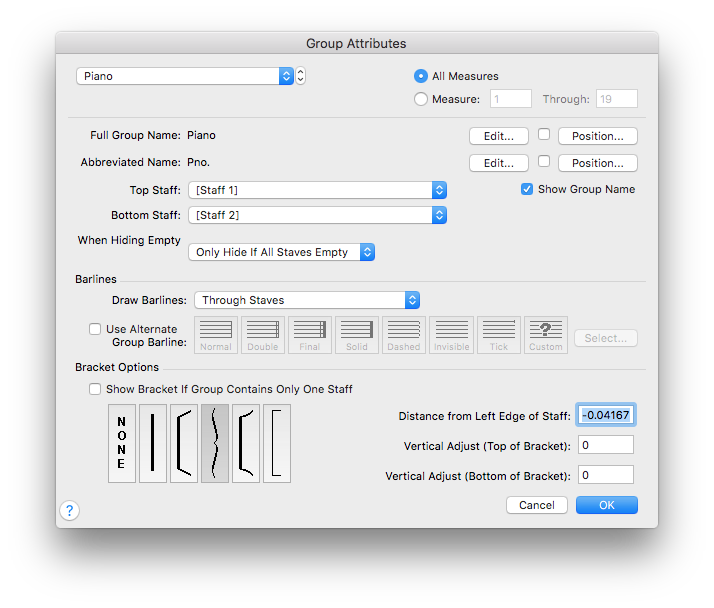
In Finale, groups are created and edited in the Group Attributes dialog box. You can assign a staff to as many groups as you like, and customize how you want barlines and brackets to appear.
- [Group Name]. This
- All Measures • Measures _ Through _. Choose All Measures to assign this group to all systems in the score. Or, in these text boxes, enter the measure range for the group to assign it to specific systems. So long as a measure is in this range, and begins a staff system, the bracket will appear. (Note that when you delete a bracket on an individual system, Finale automatically creates new bracket definitions for the measure ranges before and after the deleted bracket. See To modify brackets on a system-by-system basis.)
- Full Group Name • Edit • Position; • Abbreviated Group Name • Edit • Position. The full or abbreviated names you enter for the group appear in a regular text font. Click the Edit button to display the Edit Text window, where you can enter or edit the full or abbreviated group name, as well as set fonts and text styles. For details, see Edit Text window.
By default, Finale positions group names vertically between the first and last staves in the group. The default positioning is used unless you explicitly change the position of a group name. To set individual positioning, click Position. The Position dialog box is displayed. Once a change is made in the Position dialog box, the Position checkbox is selected in the Group Attributes dialog box. To bypass the changes made in the Position dialog box and use the default settings, uncheck the Position checkbox.
- Top Staff • Bottom Staff. These Staff
- Show Group Name. This check box controls whether group names that you enter will appear in the score. When selected, the full and abbreviated group names appear in your score. If you prefer to hide the names for this group, deselect this check box.
- When Hiding Empty Staves: Hide Normally • Only Hide if All Staves Are Empty • Never Hide. These settings pertain to hiding staves, particularly while hiding staves for large portions of the score (see To hide empty staves). Choose Hide Normally to tell Finale to disregard this group definition while hiding empty staves. Choose Only Hide if All Staves are Empty to allow staves in this group to be hidden only if there are no notes in any measure of the system. This is typically used for instruments such as piano and harp that are notated on more than one staff. In these cases, you would ordinarily want either both staves to show, or none, but not just one. Choose Never Hide to prevent staves in this group from being hidden using the Staff menu's Hide Empty Staves feature.
- Draw Barlines: Only on Staves • Through Staves • Only Between Staves (Mensurstriche). Select Only on Staves if you want the barlines drawn only within each staff, without connecting each staff with the barline; select Through Staves to draw one continuous barline passing through all the staves in the group. Select Only Between Staves (Mensurstriche) to draw barlines between the staves, but not through the staff lines of each staff in the group.
- Use Alternate Group Barline. Select this option if you want Finale to use an alternate barline style that you select from the Barline palette, instead of the barline style selected in the Measure Attributes dialog box. If this option is not selected, Finale uses the barline style specified in the Measure Attributes dialog box.
- [Barline Styles]. Click to choose an alternate style for the current group. Finale uses the selected style unless Override Group Barlines is selected in the Measure Attributes dialog box. This barline style is only used if Use Alternate Group Barline is selected in this dialog box. For a description of Custom, See Measure Attributes dialog box.
- Bracket Options. When you first enter this dialog box, None is selected by default. Click to select the bracket style you want to use for the current group, or click None if you don’t want a bracket to enclose the group. If you want more than one bracket to appear for a group, create additional groups for the staves, then choose a different bracket style for each group.
- Distance from Left Edge of Staff • Vertical Adjust (Top of Bracket) • Vertical Adjust (Bottom of Bracket). As an alternative to entering values here to adjust positioning, you can drag the handles of a bracket on the score. Distance from the Left Edge of Staff is the distance from the left edge of the grouped staves on which Finale places the bracket. Enter a negative number to move the bracket to the left. Enter numbers in the Vertical Adjust (Top of Bracket) and Vertical Adjust (Bottom of Bracket) text boxes to tell Finale how far to extend the upper and lower ends of the bracket in relation to the top of the top staff and the bottom of the bottom staff, respectively. The default value of zero aligns the bracket ends evenly with the top and bottom lines of the group. A positive number moves the bracket end upward; a negative number moves the bracket end downward. The units are whatever you've selected under
- Show Bracket if Group Contains Only One Staff. Select this option if you want a bracket to appear on a group containing only one staff, if all staves but one are hidden (i.e., removed because the staves are resting instruments), or if you selected one staff from the group, then selected Document > Special Part Extraction. This option is not selected by default, because brackets are generally omitted when only one staff appears in a staff system.
- OK • Cancel. Click Cancel to return to the score without changing group settings. Click OK to confirm your settings and return to the score.
Tip: Use Show Default Group Names in the Staff menu to control whether default, non-printing group names appear in the score.
Noteman says: You can override the barline selected for a group on a measure-by-measure basis (such as for the final bar in a piece) by choosing Override Group Barlines in the Measure Attributes dialog box. When you choose this option, the barline set in the Measure Attributes dialog box will always appear, regardless of any alternate barline style selected in the Group Attributes dialog box. This might be used for the final bar in a piece.
Tip: To display more than one bracket on a staff or staves in a group, create additional groups for the staves, then choose a different bracket style for each group.
See also:

