ScoreManager®
How to get there
Choose Window > ScoreManager or press COMMAND+K.
What it does
The ScoreManager is a realizable floating window that allows you to view, edit, reorder, and delete score Instruments. This includes the ability to change staff settings, transposition, and others. The ScoreManager also allows you to assign playback sounds.
To resize the ScoreManager window, click and drag the lower right corner.
The ScoreManager also includes a File Info tab with options that allow you to include information about the score, define standard text like the title and composer, and view file statistics.
As a modeless, floating window, changes made in the ScoreManager apply instantly to the score. All of SongWriter's menu commands remain available when the ScoreManager is open.
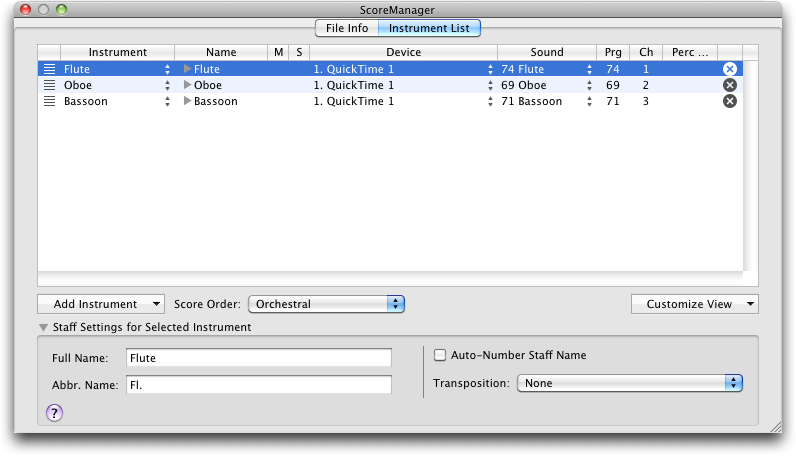
Instrument List tab
The Instrument List tab of the ScoreManager includes two portions: the list of Instruments in the top portion, and the staff settings below. The list includes an expandable row for each Instrument in the score. If the Instrument contains more than one staff, such as a piano grand staff, click the  to the left of the Name to expand the row, showing the individual staves. Click an individual Instrument (directly on the Name) to activate the settings in the lower portion of this window, which can be used to edit the staff properties, such as the clef or notation style. Click the to the left of any Staff Name to display the individual layers, chords, expressions, and mid-score instrument changes. (Individual staves, layers, expressions, and chords in mid-score instrument changes are not available for editing).
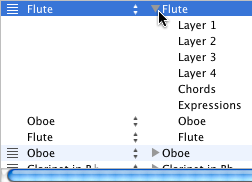
Click the arrow to the left of the Instrument name to display individual layers, chords, expressions, and mid-score instrument changes.
The several columns of the ScoreManager also allow you to adjust mixer settings (mute/solo/pan) and assign (Audio Units or MIDI) sounds to Instruments. These settings can be assigned to Instrument's layers, chords, expressions, and mid-score instrument changes.

Use the columns of the ScoreManager to configure sound and mixer settings.
Use the  popup menu to select the available columns.
For more information on managing Instruments with multiple staves (like piano), see Multi-staff Instruments.
- Instrument. This column lists the Instruments in the same order displayed in the score. This identifier corresponds to SongWriter's internal list of Instruments, and usually matches the Name (although it isn't required to). Click the arrows to the right of the slot to open a popup menu, which you can use to change the Instrument at any time. When opening a file created in an earlier Finale-family notation product, (like Finale 2011), you will see "Unknown" listed in this column if SongWriter was not able to identify the instrument using the staff attributes of the old file. (You can click the adjacent arrows to assign the "Unknown" instrument to one of SongWriter's integrated Instruments, with standard clef, transposition, and other attributes.)
- Name. This is the Full Staff Name of the Instrument (as defined in the lower portion of the ScoreManager).
- R.
A Record (R) column that specifies which staves or layers will be recorded
into, with HyperScribe, always appears. When the Record column is blank,
no staves (or layers) of staves are selected to record into. Click in
the R column next to the staff you want SongWriter to record into. A black
triangle appears in the R column, indicating that SongWriter will record
into the active layer of that staff.
- M
(Mute). In this column, a black square appears across from the
name of each staff that you want to mute when you play your score. By
clicking in this column across from a certain staff, you make the square
turn
white, indicating that the staff will not sound when you play the
score. If you’ve expanded a staff to view its individual
layer assignments, and you turn on the Mute setting for some layers but
not others, the square in the Mute column will appear striped. That is
your signal that the individual layers of the staff have mixed settings
in the Mute column.
- S
(Solo). When you click in the Solo column across from a staff name,
a black circle appears. In other words, you’ve just isolated a staff so
that only it will play back, and all the other staves are silent. (You
could achieve the same effect by clicking the Mute column for all other
staves—but that would take much more time and effort.) You can solo more than one staff, if you wish—for
example, you can solo two or three staves, and all the others will be
silent. In fact, you can solo all staves, although there wouldn’t be much
point, since you may as well solo none of them.
Note. If a dot appears
in the Solo column, only the soloed staves (or instruments) will play
back.
- Vol. You
can use this text box specify an exact volume value, 0-127, for a staff,
and all other staves set to the same channel.
- Pan. Use this text box to specify an exact
pan value, 0-127, for a staff, and all other staves set to the same channel.
A higher value pans right, a lower value pans left. Playback volume will
be weighted to the left or right speaker accordingly. 64 is center.
- Device. This column lists the MIDI output device specified for the channel in the MIDI Setup dialog box.
- Sound. This column lists the playback sounds in the selected device (the General MIDI instrument or included SmartMusic SoftSynth GM sound library). You can click the popup arrow and choose from the complete list of General MIDI sounds. Click the popup arrow and choose Edit Patch to open the Set Patch To dialog box where you can assign Program data for playback through an external MIDI device. See To
establish MIDI sound settings for a score Instrument. If a device uses midnam files, the Sound popup menu will display banks and sounds for the device associated with the midnam file. To use midnam files, see Configuring a new device in Audio MIDI Setup. If SmartMusic SoftSynth is selected, to select percussion, choose "MakeMusic GM : Bank 128." (See also Percussion MIDI Maps: SmartMusic SoftSynth).
- Prg The number in this column identifies the program (synthesizer sound) number
assigned to each staff (or layer). To edit it, just double-click the number
and type a new one.
- Ch.
This column displays the MIDI channel assignment for each staff
(or layer), from 1 to 64 (or 32, if your MIDI interface is a 32 bit card).
To change this number, double-click, and type a new channel. If you’ve assigned several staves to the same
Instrument, by the way, remember that they’re all linked to the same MIDI
channel. Therefore, if you edit the Ch. assignment for any one of these
staves, the Chan. for all of them will change to match, because any given
Instrument can only have one channel assignment.
- Perc MIDI Map. From this popup menu, choose the desired Percussion MIDI Map for playback. See Percussion MIDI Maps.
 . Click this button to delete Instruments from your Score.
 - Add Instrument. When you click this button, a two-tiered menu appears displaying the available Instrument families and Instruments. Click a family to view its Instruments. Double-click an Instrument to add it to the score. Once you have added an Instrument, its type and family are selected automatically the next time you add an Instrument. (This allows you to easily enter multiple Instruments in the same family, one after another). Instruments are added according to the selected Score Order. If the Score Order is “Custom,” Instruments are inserted below the currently selected row. To add an Instrument to the top of a score when Custom is selected, add the Instrument, then click and drag its
 icon up to the top of the list. (See Reordering Instrument Staves.)
- Score Order. Use this menu to select a standard score order for your instruments. Instruments in your document will reorder immediately after you select a new Score Order. The Score Order selected in this menu is applied whenever new instruments are added to the document, and changes to “Custom” automatically if you manually adjust the order of your instruments.
- Customize View. Use this popup menu to select which columns you would like to display in the list of Instruments above.
- Full
Name • Abbr. Name. Edit these text boxes to modify the full and abbreviated staff name. The names you
enter here appear in a regular text font.
- Auto-Number Staff Name. Check this box to automatically number instruments in score sections (Flute 1, Flute 2, etc.).
- Transposition. Use this popup menu to select an Instrument's transposition. To make the staff non-transposing again, choose None. Once you’ve established the transposing instruments’ staves, you can tell SongWriter to display the full score either in its transposed form or in its untransposed (concert pitch) form. Choose Document > Display in Concert Pitch to show the score untransposed. For a more complete discussion of transposing
instruments, see Transposing
instruments.
File Info tab
SongWriter supplies a quick, convenient way
to add notes about your document, such as reminders to yourself or to
the person (or publishing-house) where you’re sending the file. The File
Information dialog box has plenty of room for you to enter the title of
the piece, the composer’s name, and copyright information. You can type any file-specific information that you may want
to refer to later on.
- Title
• Subtitle
• Composer • Arranger
• Lyricist
• Copyright.
Enter text in these text boxes to help manage your documents, and allow
you to use the text inserts in the Text
tool to easily place these items into your score, or automatically with
the use of file templates.
- OK
• Cancel. Click OK to use the information entered and return to
the score. Click Cancel to return to the score ignoring any changes that
were made.
