Installation for Macintosh
Installing Finale SongWriter
Installing SongWriter onto your hard disk is
easy.
Before you begin installing
SongWriter, make sure
there’s enough room on your
hard disk to hold the program
and its associated
files. For a full installation,
you’ll need about one hundred megabytes (100,000K) of free
space on your hard disk. You should also bear in mind that, like
many other software programs, SongWriter creates and makes
use of “temporary files” during its normal operations, which it
then deletes from your hard disk when you exit the program. We
recommend having an additional ten megabytes (10,000K) of free
disk space for these files.
The Installer sets up a folder called “SongWriter” for the SongWriter program and its associated files and folders. Do
not alter this setup.
- Insert
the SongWriter disc into your CD/DVD drive. Its icon appears on your
desktop.
- Double-click
the CD/DVD icon. The contents of the CD/DVD appear on your screen.
- Double-click
the Installer icon. You are prompted to enter your computer administrator’s
password.
- Enter
your password and click OK. In a moment, the SongWriter Installer screen
appears.
- Follow the instructions on the screen until the installation is complete.
The SongWriter Installer lets you select which files you want
installed and where you want them placed on your hard disk. The
Installer offers to create a folder called “SongWriter” We recommend
that you install all of the SongWriter files into this new folder. For
the most part, you can press Return to confirm the defaults. When
you open an older Finale family notation file (choose File, then Open and navigate to your older file), SongWriter takes a moment
to convert it into the new format, then opens it as an “Untitled”
file. If you save the file in SongWriter using the same name as
before, you will not be able to reopen that file using an earlier
version of SongWriter. It is suggested, therefore, that you save the
file with a slightly different name (for instance, “My Score” could
become “My Score 2”), unless you are sure that you won’t need to
reopen the file in an earlier version of SongWriter.
Preparing
for Printing
These instructions cover the basic preparations
for printing from SongWriter or any program. If you can print successfully
from other programs already, skip ahead to the next section. Before you
print for the first time, you must tell the Macintosh where to send its
printing information, especially if you have more than one printer.
To Set up
Your Printer
- Install
OS X drivers for your printer. If the printer is compatible with
OS X, you’ll find these drivers on a CD included with your printer. You
can also usually download the necessary drivers from the printer manufacturer’s
web site. See the printer’s user manual for additional information.
- Navigate
to the hard drive, and choose Applications, Utilities, and then Printer
Setup Utility. The Print Center dialog box appears.
- If
your printer isn’t already listed, click the Add button.
- In
the new window, choose the appropriate zone from the pop-up menu.
- Click
your printer’s name and click Add.
- Quit
Print Center/Printer Setup Utility.
Setting Up Your
MIDI System
MIDI stands for Musical Instrument Digital
Interface. It’s the language spoken by computers and electronic musical
instruments. We’ll assume that you’re connecting a MIDI keyboard, although
you can use any MIDI instrument. In this manual, “MIDI keyboard” refers
to whatever type of MIDI device you are using.
At the very least, you’ll need the following
equipment for an operational MIDI system (not including your computer):
A MIDI keyboard
Amplifier/speaker or headphones
Two MIDI cables
A MIDI interface with appropriate USB cable
The last item, a MIDI interface, is a box
that translates the signals arriving from the MIDI keyboard into signals
the computer understands, and vice versa. Interfaces can be very simple
or very elaborate. The most basic ones require no external power and have
ports (jacks) for a single MIDI keyboard; more expensive models have ports
for multiple MIDI devices or other features. Most Macs have USB (Universal
Serial Bus) ports, a standard that allows users to connect devices to
their computers without needing to restart for the devices to become active.
- Place
the computer, keyboard, and MIDI interface where you want them.
Go ahead and plug in any power cords, but don’t turn anything on yet.
- Plug
one end of the MIDI interface cable into the interface (if applicable).
Plug the other end into the USB or serial port on the back of your Macintosh.
- Plug
one end of a MIDI cable into the MIDI keyboard port marked MIDI In.
Plug the other end into the MIDI interface port marked MIDI Out. Plug
the second MIDI cable into the interface port marked MIDI In and the MIDI
keyboard port marked MIDI Out. The most common problem encountered by
a new MIDI user is improperly connected cables. The trick is to think
of the route the music data is taking. The notes you play will leave your
MIDI keyboard from the port marked Out, and enter the interface through
the port marked In, then on to the computer. Similarly, when the computer
plays back your music, the notes go out from the computer to the interface,
leave the interface through the port marked Out, and enter your MIDI keyboard
through the port marked In. So, although it may seem contrary to common
sense, plug the In to the Out and vice versa.
Your connections should resemble those
in this figure:

- Turn
on all your equipment.
Your MIDI system is now configured. To name
a MIDI device or configure additional settings, jump ahead to Configuring
MIDI in OS X. If you do not wish to name a MIDI device or make additional
settings, you can skip ahead to Starting SongWriter.
Configuring
MIDI in OS X
You can use helper utilities already available
on your computer to configure your MIDI devices by following these steps.
- Navigate
to your hard drive, and choose Application, Utilities, Audio MIDI Setup.
The Audio MIDI Setup dialog box appears. Now, we’ll add new devices.
- Click
the MIDI Devices tab. Audio MIDI Setup will search for MIDI hardware
and software. After the search, your MIDI interface will appear.
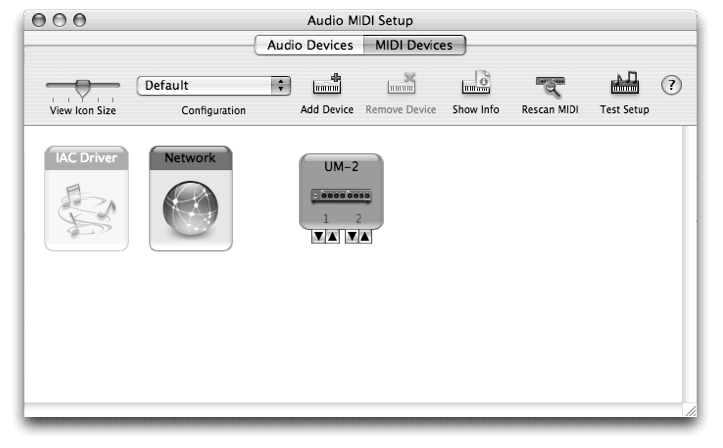
- In
the button bar, click Add Device to add a new device icon to the window
below. If necessary, drag the new icon so it isn’t overlapping
any others.
- Double-click
the new device icon. The New External Device Properties dialog
box appears.
- Enter
a device name, then select or enter the manufacturer and model.
If more options are required, click the More Properties arrow.
- Click
Apply and close the dialog box. Repeat the last four steps for
any other devices. Now, we’ll connect new devices to the interface.
- If
you are using a controller for MIDI input, drag the outgoing arrow of
the MIDI controller to the incoming arrow on the MIDI interface.
- If
you are using a sound module for playback, drag the incoming arrow of
the sound module to the outgoing arrow on the MIDI interface.
- If
you are using a device such as a MIDI keyboard for both input and playback,
connect the outgoing arrow on the MIDI device to the incoming arrow on
the MIDI interface, and then connect the incoming arrow of the MIDI device
to the outgoing arrow of the MIDI interface. Now, to ensure your
devices are installed properly on your computer, we’ll test the MIDI setup.
- Click
the “Test Setup” button on the upper right. The cursor changes
into two eighth notes.
- Click
the down arrow beneath a device’s icon
 . Your computer sends
a message to your MIDI device. You see the “Out” light illuminate
on your MIDI interface and/or a sound played on the MIDI device.
. Your computer sends
a message to your MIDI device. You see the “Out” light illuminate
on your MIDI interface and/or a sound played on the MIDI device.
- Click
the Internal Speaker icon in the upper right corner of the finder and
drag the slider near the top to ensure the volume is up (as shown here).

- Play
a note on the external MIDI device. The external MIDI device sends
a message to your computer. You see the “In” light on your MIDI interface
illuminates and/or hear a beep from your computer’s internal speaker.
- Quit
Audio MIDI Setup.
Now that you have set up MIDI with OS X, skip
directly to Starting SongWriter.
Starting SongWriter
- Double-click
on the “SongWriter 2012” icon on your Desktop. When you launch SongWriter
for the first time, you will see the Authorize SongWriter dialog box. This
dialog box continues to appear each time you launch SongWriter until the product
is authorized.
- Click Authorize
Now! to start the SongWriter Authorization Wizard. Follow the simple instructions
to authorize your copy of SongWriter. Or, click Remind Me Later to authorize
at a later time. You have 30 days to authorize your copy of SongWriter. After
30 days, printing and saving are disabled until your copy of SongWriter is
authorized.
If you have Internet access (and are not running firewall,
security, or virus software that would block information from
being received back at your computer), simply select this
option, and the rest is taken care of automatically.
Otherwise, select one of the other options for Manual via
WebSite, FAX, or mail and a window will be displayed containing
a User Code. You may enter this code at www.finalemusic.
com/register, print out this page and FAX or mail it to
us, or call with your serial number and User Code. In any
case, we will generate an Authorization Code that you manually
type in to complete the process. Subsequently, our system
automatically sends an e-mail confirmation of the information.
If you selected the internet option, but have a firewall
that blocked the information from being received, then you
can manually type in the Authorization Code information provided.
Your copy of SongWriter can be authorized on one operating
system at a time, but with an Internet connection, authorization
can be moved from one computer to another at will. Simply
choose Deauthorize SongWriter from the Help Menu to
open up a free authorization slot. Your copy of SongWriter can
now be authorized on a different computer (or another OS installed on the same computer if, for example, you are running
both Mac and Windows on an Intel-based Mac). Also,
deauthorize prior to making hardware changes to your computer,
such as replacing a hard drive. Doing so will ensure a
slot is open to authorize after updating your hardware. When
you deauthorize, printing and saving are disabled until authorization
has been restored.
PLEASE NOTE that the User/Authorization Codes are computer
specific, and will only work on the given computer installation.
Make sure that the Authorization Code is typed in using capital
letters, and also verify that the correct serial number has been
entered. If you have made a change to the computer (replaced the
hard drive or motherboard, or installed a new operating system),
and didn’t deauthorize prior to doing so, contact Customer Service
directly by phone, FAX, or standard mail with your serial number
and the location ID for the specific installation in question, and one
of our representatives can clear the previous authorization from
your account. If the software is not "reminding" you to authorize
when you run the program, then the authorization has been successfully
completed.
- Click OK. The Launch Window appears. From here, you can
choose how you want to begin a new score, continue working on
an existing project, or access reference materials. For example,
choose Setup Wizard to begin a new custom document by specifying
the title, staves, key signature, time signature, and other
attributes. You’ll learn more about the Setup Wizard in chapter
1a.
The MIDI
Setup Dialog Box
The MIDI Setup dialog box is where you
instruct SongWriter which devices you’d like to use for MIDI functions. On
the left side of the dialog box, you’ll choose the MIDI input device.
On the right side, you’ll choose the desired output device. What you choose
here will determine on which device SongWriter will play back your music.
Setting
Up MIDI with OS X
- Start
SongWriter.
- Navigate
to the MIDI Menu and choose MIDI Setup. The MIDI Setup dialog box appears.
- For
the MIDI System, choose CoreMIDI.
- Select
the proper input and output devices from their respective menus.
If only ports are listed, select the port on your interface to which your
MIDI device is connected.
- Click
OK. You’re all set to explore SongWriter on your own.


