
In this tutorial we’ll show you the easiest ways to start a new document and get notes on the page. There are three basic note entry methods, so we’ve divided this tutorial into three parts: Simple Entry, Speedy Entry, and HyperScribe. We recommend you start with the Simple Entry tutorial to get a good introduction to navigating around PrintMusic. Simple Entry is PrintMusic’s most basic entry method and also one of its most powerful. If you want, you can simply click notes onto the staff with a mouse. Or, for more speed, quickly type them in with your computer or play them in with a MIDI keyboard. As you enter, you can even enter articulations, expressions, and other items on the fly. By the end of this tutorial, you will be able to enter your notation into PrintMusic using the powerful options offered by Simple Entry.
You are probably familiar with Wizards from other applications, such as word processors and spreadsheets. This Wizard is designed to help you set up a new PrintMusic document. Let’s create a simple piano score.
If you haven’t already started PrintMusic, do so now. When the Launch Window appears, click the Setup Wizard button. If PrintMusic is already started, click on the File menu and choose New, then Document with Setup Wizard. The “Select and Ensemble and Document Style” page appears.
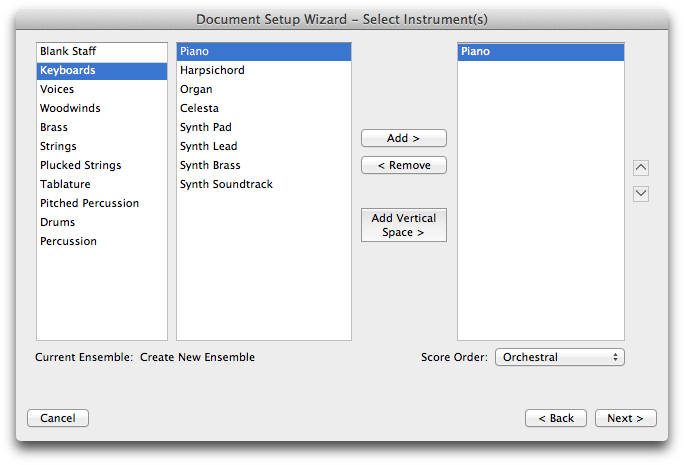
You should be aware that the order in which the instruments appear in the third column is the order in which they will appear, from top to bottom, in your score. If you are creating a multi-instrument score and the Document Setup Wizard incorrectly orders your instruments, you can use the small up and down arrows to move the instruments around in the list until they are correct. You can also select a “standard” score order from the drop-down menu: Custom, Orchestral, Choral, Concert Band, or Jazz Band.
Your Wizard should now look like this:
 button.
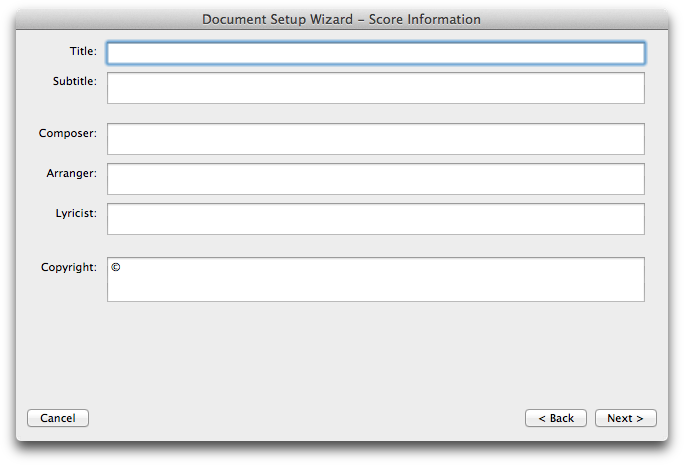
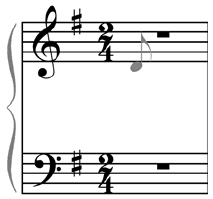
Your Wizard should now look like the following picture:
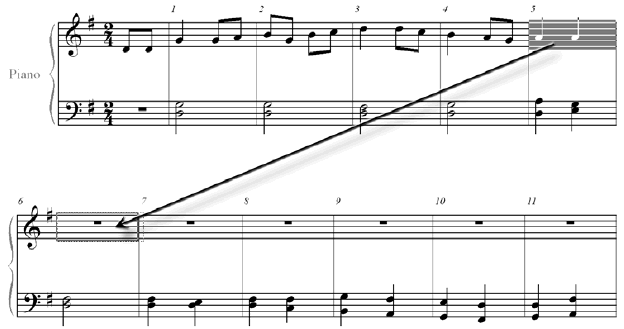
You could continue with this file, but let’s close it and open a file where we’ve completed the left hand for you.
The left-hand part has been prepared for you; in this tutorial, you’ll finish the melody.
Mac View
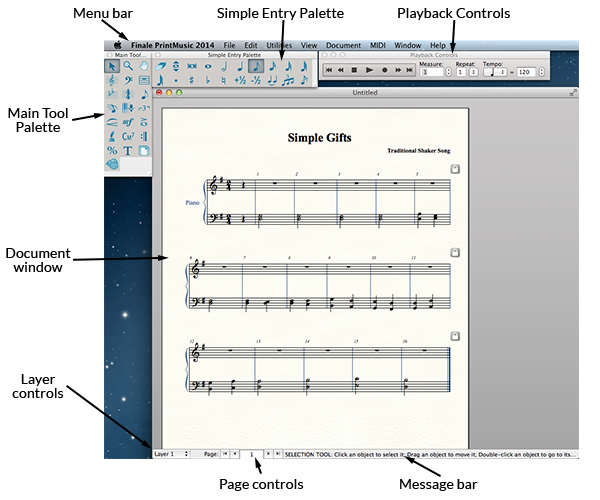
Take a look around the screen. Across the top, you’ll find the menu bar. You’ll be using these menus to control PrintMusic’s behavior, edit documents, change the view, and much more. There are eight unchanging menus; File, Edit, Utilities, View, Document, MIDI, Window, and Help. Also, you will likely see another menu which corresponds to the tool currently selected in the Main tool palette.
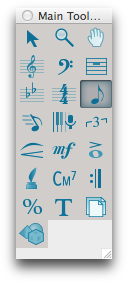
Below the menu bar is the Main tool palette. Each square tile on these toolbars contains a symbol representing its function. Just about everything you do in PrintMusic will be in the context of one of these tools. You’ll also see the Simple Entry palette: on Windows running vertically along the left edge of the screen, on Mac to the right of the Main tool palette. All of these toolbars can be hidden, providing you with more space to view your music, or they can be viewed as palettes that float in front of the music. To hide any toolbar, select it from the Window menu to remove the check mark. Selecting it again will cause it to reappear.
(Note: Depending on your monitor's video resolution, the toolbars may first appear as palettes on your screen.)
To turn a toolbar into a floating palette, click on the edge of the toolbar and drag it out into the center of the screen, until you see a dotted line representation of a smaller palette. Release the mouse button.
The palette can then be moved to any position on the screen. To restore a palette to toolbar status, double-click. For now, leave the toolbars in their original positions.
The right side of the screen has a vertical scroll bar, which you’ll use to move the music you’re viewing up or down; and across the bottom of the screen is a horizontal scroll bar, which you’ll use to move left or right through your piece.
You’ll also see the Page counter; this number identifies the current page on the screen. To jump to any page in the score, highlight the current page number, then type a new number into the box and press
At the bottom of the window, you’ll see the Status Bar. On Mac, you’ll find the Message Bar at the top of the window.
If you look at your score, you may notice that PrintMusic automatically fills any empty measures with a whole rest (hereafter called a default whole rest). That’s just to save you time. You’ll also notice that the music is displayed as a page of sheet music.
If you’re new to computers, take a moment to click and drag (while holding down the mouse button!) across the menu titles at the top of the screen, noticing how the lists of commands drop down as you pass over each title.
 on the Main tool palette. Not only does the icon highlight, but there is now an additional menu on the menu bar: the Staff menu. Some PrintMusic menus appear only when you select certain tools, so they’re out of your way until you need them.
Now that you’ve had a look around, let’s begin our masterpiece. Click the horizontal and vertical scroll bar arrows until measure one is visible (if necessary).
PrintMusic offers many different entry methods. The simple entry tool itself can be used to click notes onto a staff, or enter notes with your computer keyboard or with a MIDI keyboard. Here, you’ll learn how to enter notes using each of these methods.
 . The Simple Entry palette becomes active. From the Window menu, choose Simple Entry Rests palette to show the Simple Entry Rests palette. These palettes are shown on the next page. Also, another menu has appeared on the menu bar: the Simple menu. This menu contains commands, a list of keyboard shortcuts, and other options that allow you to customize the way Simple Entry works.
Note: In addition to this tutorial, you can also open the file "EntryExercise” in the PrintMusic/Tutorials folder for hands-on training.
You can click tools in the Simple Entry palette to specify the rhythmic duration, and other attributes, prior to entering a note. The tools are divided into different groups. There are duration tools, like quarters, eighth notes, etc., accidental tools, like a sharp or flat, a tie tool, tuplet tool, and grace note tool. Click a duration tool to select it, then click an accidental, dot, or tie to modify the note. Notice your mouse cursor displays the tools selected in the Simple Entry palette. Click a modifier tool again to de-select it if you don’t want to use it anymore. To select any tool and clear all the other tools, double-click on it, or press the keystroke twice.
You can mix and match the tools to build exactly the note you want to add, whether it’s a quarter note or a sharped, tied, dotted note that starts a triplet! Simply click in the staff to enter the note displayed on the mouse cursor.

Note: To see a list of Simple Entry keyboard shortcuts from the Simple menu, choose Simple Edit Commands and Simple Navigation commands.
You can always select the note and edit it later using different, modifier keystrokes, which we’ll talk about soon. The fastest way to enter notes in Simple Entry involves using keystrokes to select tools in the Simple Entry palette, and then enter the notes using keystrokes on your computer keyboard, which we’ll do now.
 on the Simple Entry palette. The Simple Entry palette contains an icon for each note duration. Notice the note with a vertical line at the beginning of the first measure. This line is called the Simple Entry Caret. The caret is much like a cursor in a word processing program. You’ll learn how to quickly type in music using the caret soon.
For now, move the mouse cursor above and below the staff. Notice PrintMusic draws temporary ledger lines to help you place new notes. The cursor also changes to show you where you are and what will happen if you click the mouse. Currently, a ghostly eighth note should be floating above your music, waiting for your click to place it into the score.
 in the Simple Entry palette to remove items in the score. Choose the Eraser tool, and then click a notehead to remove the note. Click above or below a chord to remove the whole chord. Click on an accidental, tuplet, tie, or dot to remove it.
Now, although it would be fast to simply click in measure 6, let’s use the Selection tool to copy and paste measure 5 to a couple of other measures that require identical notation.
 .
.
Note: To see a list of Simple Entry keyboard shortcuts from the Simple menu, choose Simple Edit Commands and Simple Navigation commands.
again.
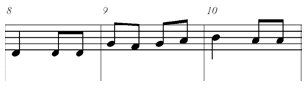
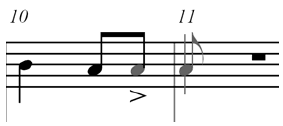
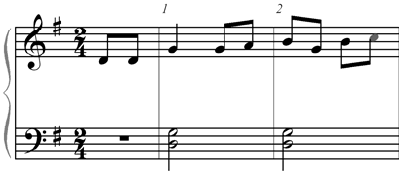
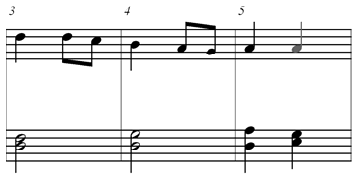
Now, notice the 10th measure of “Simple Gifts” has the same rhythm as the 11th and 12th measure. This is a good opportunity to demonstrate how copying music and repitching a melody can save time.
For the following we’ll use the Selection tool again. Note that you can also use any tool that permits regional selection for copying, moving, and erasing music.
.
. Now that we’ve got the right rhythms, let’s repitch measures 11 and 12 accordingly. in the Simple Entry palette. The Repitch tool allows you to quickly change pitches of existing notes.
If you have a MIDI device, such as a MIDI keyboard, you can use it to easily specify pitches in Simple Entry. (If you do not have a MIDI device, skip to the step marked [Non-MIDI users]). First, ensure your MIDI device is properly configured with your computer (See earlier chapters Installation for Windows or Installation for Mac (depending on the platform you are using) for information on setting up a MIDI device). Then continue with the following steps.
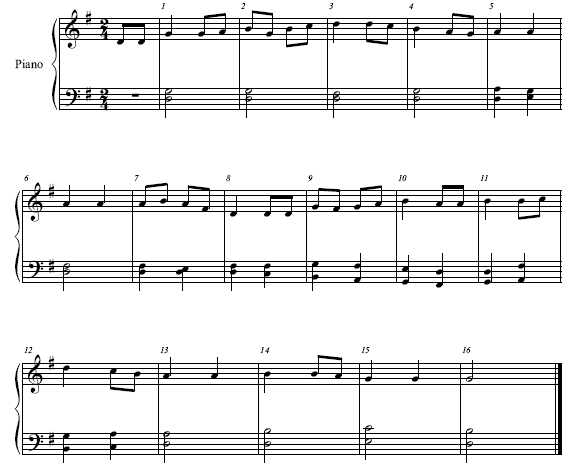
Congratulations! You’ve completed your first PrintMusic melody.
You can use additional Simple Entry keyboard shortcuts to add ties, grace notes, articulations, and even clef, key, and time signature changes. See Simple Entry for detailed info. Also, while using Simple Entry, right
As we mentioned earlier, you can adjust the behavior of Simple Entry by changing items available under the Simple menu such as: Check for Extra Notes, Fill with Rests at End of Measure, and Playback Notes on Entry. When Check for Extra Notes is selected (this command is selected by default), PrintMusic will consult the time signature and not allow you to inadvertently enter extra notes in a given measure. Fill with Rests will add enough rests to fill the measure if you leave the measure and start entering notes in another measure.
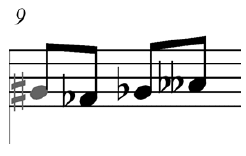
Let’s add some blues to our melody line to illustrate how to add accidentals. If using the mouse or the Caret, you can specify an accidental by choosing both a duration tool and an accidental tool prior to entering the note. You can also specify accidentals as you enter notes by using keystrokes to apply a sharp (+= key) or flat (- key) to the note you just entered. By selecting an accidental tool exclusively, you can click to add accidentals to any note in the score. The Sharp tool  and the Flat tool
  add a sharp or flat to the note, if needed by the key signature. If you use the Half Step Up tool
  or the Half Step Down tool
  , you’ll raise or lower the note. If the note is already sharp, raising the note will add a double-sharp.
. First, we’ll clear a measure to show how to enter accidentals while entering notes.., or press numeric keypad 4, and then enter a second line G at the beginning of measure 9. An eighth note appears in measure nine. and Flat tools in the Simple Entry palette to specify an accidental before entering a note. in the Simple Entry palette. Now both the eighth note and the flat are selected in the Simple Entry palette.
(or press numeric keypad 4 twice) to deselect all other tools.. Only the Flat tool is selected.. Choose the A again. A double-flat appears next to the A. The Half Step Up/Down tools are ‘relative’ - they increment the pitch up or down a half step with each click. When you selected the Half Step Down tool, the Flat tool automatically deselected. You can only have one accidental tool selected at one time. Let’s try a sharp now.. Click the first note of measure 9 (G flat). A sharp appears next to the note. Also notice PrintMusic automatically places a flat on the second G flat because it is no longer implied by the first. Because this melody probably wouldn’t sound too great, we’ll remove the sharp and the double-flat.
.

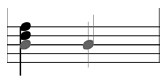
Building chords is a snap with Simple Entry. To add notes with the mouse, just select the same duration icon as the note already entered, then move the cursor above or below a note. Notice vertical lines appear above and below the note as shown to the right. This indicator tells you that a click will add a note to the chord. While entering with the Simple Entry Caret, simply press the number that corresponds to the interval above or below the selected note to add it to the chord. Let’s try entering and adding chords to the left hand.
. First, we’ll clear a measure to use for this example., and double-click the Quarter Note tool 5.
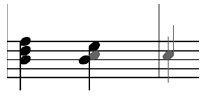
Note: While entering chords, hold down SHIFT and type an interval to add notes lower than the selected pitch.
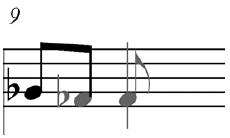
Tuplets are any irregular grouping, including triplets, quintuplets, and so on. We’ll cover tuplets briefly here; see Tuplets in Tutorial 1b for a more in depth lesson. Let’s enter a triplet to the second beat of measure 7, and then learn how to change existing entries to a triplet.
, then click on the last two notes in measure 7 in the top staff. First, we’ll place the caret in the staff as if we were entering this music for the first time.
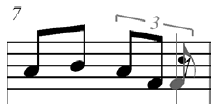
To click a tuplet onto the staff with your mouse, choose the rhythmic duration and the Tuplet tool in the Simple palette, and click to create the tuplet. Then, simply Choose the rests to fill in the tuplet. PrintMusic will ignore attempts to create a nested tuplet with the Simple Tuplet tool. If you want nested tuplets, ratios, or other fancy tuplets, see the Tuplet tool.
Now, we’ll change the first three eighth notes in measure 2 to a triplet.
 on the Simple Entry palette. Only the Tuplet icon should be highlighted in the Simple palette.
To enter more advanced tuplets, hold down
While entering with Simple Entry, you can use keyboard shortcuts to change the key and meter.
Although this tutorial has the right number of measures, there will undoubtedly come a time when you need to add more. This can be done in several ways. First of all, if you are using the Simple Entry Caret, PrintMusic will automatically add a measure when you fill the last measure of the score. Therefore, you can simply continue entering notes and PrintMusic will create the measures for you. You can also use the Edit menu to add measures at any time. To do this, from the Edit menu, choose Add Measures. In the Add Measures dialog box that appears, type in the number of measures to be added, and click OK. To add a single measure, just double-click the Measure tool.
Note that as you add measures, the final barline will move to the last measure of the score.
Note: To delete measures, click on the Selection tool, double-click to select a measure stack, then press Delete.
Before going on, you should get accustomed to moving around your score.
PrintMusic offers you the choice of three views of your music. So far, you've been working in Page View, where you see the music laid out like a page of sheet music. PrintMusic also offers Scroll View, where the music is displayed as a continuous horizontal band. Most of PrintMusic's tools work equally well in any view, although you’ll find that the computer redraws the screen faster in Scroll View. For now we’ll focus on Scroll View.
As you can see, the name of the piece has disappeared. Names, page numbers, and other page-oriented text are visible only in Page View. You'll also notice that the Page counter you saw in Page View has been replaced by the Measure counter, indicating the number of the leftmost measure currently visible.
If you click to the right of the scroll box, PrintMusic moves your view of the music to the right by one screenful; if you click to the left, your view shifts to the left. You can also advance one measure at a time by clicking the right and left arrows.
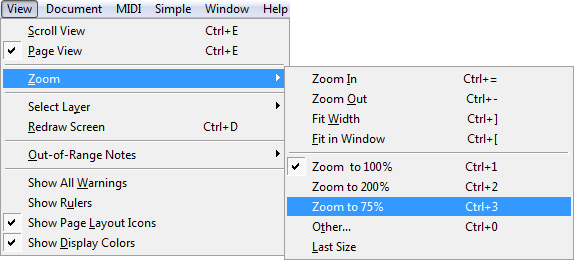
Depending on your monitor, you might not be able to see very much of the music right now. It might help if you “zoomed out” by selecting a smaller view size.
You haven’t actually reduced the printed size of the music. You’ve simply changed the way it’s displayed on the screen. The music will still print at full size.
Now you have a good overview of your piece. In certain cases you’ll need the music to be large enough for you to maneuver with precision.
When you opened this document, the computer transferred the song from the hard disk into its memory; at this moment, all the changes you’ve made to “Simple Gifts” exist only on the screen. If someone trips on the computer’s power cord at this moment, all of your work will be lost, and you’ll be left with the original, incomplete “Tutorial 1a” document.
For this reason, it’s a good idea to save your work back onto the disk at regular intervals—perhaps every 15 minutes or so. To save your work on the disk:
If you’re afraid you might forget to save your work and run the risk of losing some of your changes in the event of a power or system failure, consider using PrintMusic’s automatic backup feature. See Preferences dialog box.

If you want to take time out for some experimentation before proceeding to Tutorial 1b, choose Default Document from the New submenu of the File menu. PrintMusic will open a new “Untitled” document.
If you’re ready to move on, go right ahead to the next tutorial. If you’ve had enough for one lesson, choose
 Previous Previous
|
Next 
|
|
PrintMusic User Manual Home
|

|