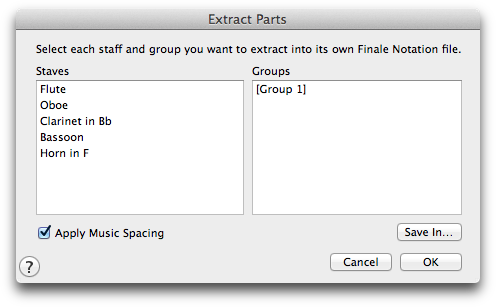
Extract Parts dialog box
How to get there
- Open the document from which you’ll be extracting parts.
- Choose File > Extract Parts.
What it does
Extract Parts places each extracted part in its own separate PrintMusic document that you can view and edit before printing.
In this dialog box, you can tell PrintMusic which staves or groups are to be extracted (you would specify a group so that both staves of a keyboard part will be extracted together, for example).
- Staves • Groups. The Staves list contains the name of each staff in the score, and the Group list contains the number of each group. Use the scroll bar to display all staves in the score. Click to select a single staff in the Staves list. Shift-click to select all staves between the currently selected staves and the staff you shift-click. COMMAND-click to select an additional single staff from anywhere in the list, or COMMAND-click a selected staff to remove a single staff from the selection. After selecting staves to extract, select any groups you want to extract at the same time. PrintMusic will extract each selected staff and group, create a separate document for the extracted part, and open each part layered on top of each other. To switch between open documents, click on the Window menu and select the desired file. For more information, see Window menu.
- Apply Note Spacing. Choose Apply Note Spacing to position each note based on its duration. For details, see Note spacing.
- Save In. Click this button to select the folder in which you want the parts saved.
- OK • Cancel. Click OK (or press RETURN) to confirm your parts extraction settings, or click Cancel to return to the score without changing any settings.
