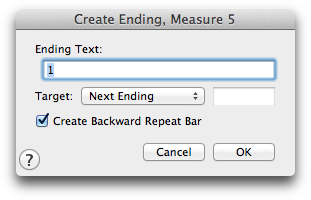
Create Ending dialog box
How to get there
- Choose the Repeat tool
 .
.
- Highlight the measures you want to include in the ending.
-
Control-click and select Create Ending. Or, after selecting the desired measures, choose Repeat > Create Ending.
Or, double-click a measure. The Repeat Selection dialog box appears. Double-click the ending graphic repeat.
What it does
Note: To easily create repeats with a standard first and second ending, see First and Second Endings.
In this dialog box, you can specify the properties of a repeat ending, including the text and playback attributes.
- Ending Number(s). Number(s) (separated by a comma if more than one) entered in this text box will appear within the ending bracket. Ending numbers entered in this box will apply to playback.
- Target. When a target is specified, after playing back the total number of passes (specified in Ending Numbers), PrintMusic will skip from the beginning of the repeat ending measure(s) to the specified target.
- Choose Next Ending to automatically skip to the next ending in the score.
- Choose Measure # to indicate a specific measure number.
- Choose Never Skip Ending if this ending is the last ending and will be played every time through.
- Create Backward Repeat Bar. Check this box to automatically create a repeat bar after the ending. (It will be assigned to have a target of “Nearest Forward Repeat”). Uncheck this box when creating the last ending of a repeated section (which requires no repeat barline).
- OK • Cancel. Click OK (or press RETURN) to return to the score, where the new (or edited) repeat barline appears. Click Cancel to tell PrintMusic to ignore any changes you made in this dialog box and return you to the score.
