How to get there
From the MIDI Menu, choose MicNotator.
What it does
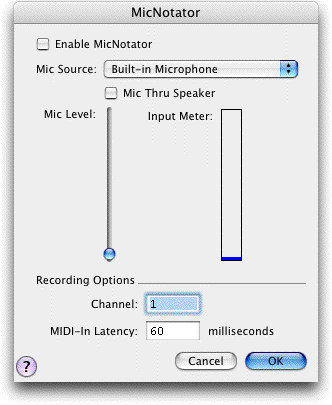
This dialog box allows you to set up options
for the MicNotator feature. With MicNotator, PrintMusic converts the pitch
you play in a microphone into a MIDI note when you use Speedy Entry or
HyperScribe. Check the Enable MicNotator box to use the MicNotator feature
in Speedy Entry and HyperScribe. You should use the levels meter to fine-tune
your microphone input. For more details, see MicNotator.
- Enable
MicNotator. Check this box to use the MicNotator feature to convert
pitches recorded through the microphone to MIDI notes that PrintMusic
can transcribe into notation in Speedy Entry or HyperScribe.
- Levels:
Mic Level · Input Meter. When you play into the microphone, you’ll
see colored bars in the Input Meter, indicating how loud PrintMusic heard
you. Adjust the Mic Level slider to change your microphone input levels
so that your loudest note doesn’t hit the red levels. If the levels are
too “hot,” the distortion will impair MicNotator’s pitch recognition.
- Recording
Options: Channel. Specify your input channel.
- Mic
Options: Mic Source · Mic Play Thru Speaker. Select an input source
from popup
menu. Check the Mic Thru box to have the microphone play through
your speaker. Note: Mic Play Thru is greyed
out when unavailable due to a bug in some Mac OS versions. If Mic Play
Thru is unavailable with External Mic, try using Sound In as the Mic Source.
- Microsoft®
Volume Controls: Output · Input. These button open the Volume Controls
of your Windows operating system.
- OK
· Cancel. Click OK (or press return) to confirm, or Cancel to discard,
your MicNotator settings and return to the score.


