
How to get there
Choose Plug-ins > Expressions > Auto-Dynamic Placement. If you prefer to apply Auto-Dynamic Placement to a specific region, select the region using the Selection tool before using the plug-in.
What it does
The Auto-Dynamic Placement plug-in allows you to place dynamics in your score automatically based on the recorded MIDI key velocity. You can specify the range of key velocities associated with each dynamic.
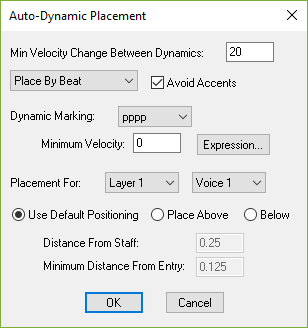
- Min. Velocity Change Between Dynamics. Change the number in this text box to vary the amount of velocity change required to place the next dynamic marking.
- Place By Entry • Place By Beat • Place By Measure. Select the one of these placement options to determine where dynamics should be placed. Place By Entry will place dynamics at every entry if there is a great enough change in Key Velocity (specified in Minimum Velocity Delta between Dynamics). Place By Beat will place dynamics at every beat where the change in key velocity is greater than the specific minimum. Place By Measure will place dynamics by measure where the average of the key velocities over that measure indicates a change in dynamic level.
- Avoid Accents. Deselect this check box to have the plug-in place dynamics on accented notes as well as unaccented notes.
- Dynamic Marking: pppp • ppp • pp • p • mp • mf • f • ff • fff • ffff. Select the dynamic from the
- Minimum Velocity. Enter the minimum key velocity for the selected expression in this text box. It is not influenced by the current text expression library. The key velocity range is 0-127.
- Expression. Click on Expression to select the a different expression not available from the Dynamic
- Placement: Layer 1 • Layer 2 • Layer 3 • Layer 4. With this
- Placement: Voice 1 • Voice 2. Select which voice to place the dynamics into with this
- Place Above Staff. Choose Place Above to place generated expressions above the staff.
- Distance from Staff. The number in this text box represents the distance from the staff the dynamic will be placed. The larger the number the farther away from the staff the dynamic will be placed, the smaller the number, the closer to the staff. This is measured from the top or bottom line of the staff depending on whether the Place Above Staff check box is selected or not.
- Minimum Distance From Entry. Place the desired minimum amount of distance between entries and dynamics in this text box. Even though you have set a specific distance from the staff, sometimes notes and rests above and below the staff may collide with dynamics unless you have specified that the dynamics must be placed some distance away (either above or below) the entries.
- OK • Cancel. Click OK to place dynamics using the specified settings. Click Cancel to return to the document without placing any dynamics.

