
Specifying the title, instruments, and beginning time and key signature
The Setup Wizard is Finale’s easiest and most efficient way to get started. Each page in the wizard allows you to quickly specify all the basic score elements.
In this lesson, you will learn how to:
- Specify the style of your document
- Choose the instrumentation
- Set the title, composer, and copyright information
- Set the Key signature, time signature, tempo and pickup measure
Step 1: Choose the Ensemble and Document Style
If you haven’t already started Finale, do so now. When the Launch Window appears, click the Setup Wizard button. If Finale is already started, choose File > New > Document with Setup Wizard.
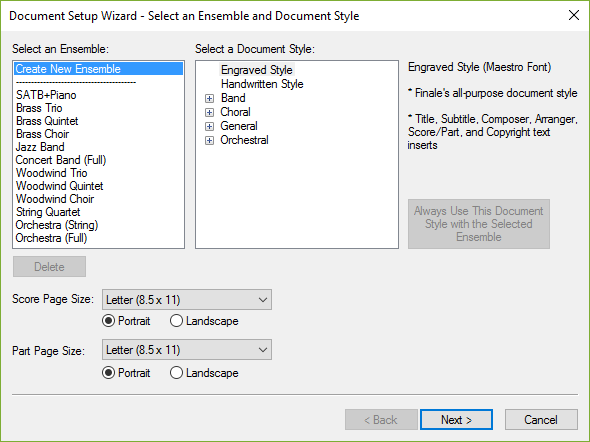
Setup Wizard Page 1 - What it Does:
This page lists Ensembles and Document Styles you can use to create a new document. Document Styles include fonts and markings associated with particular styles of writing. The two most common Document Styles are listed first (“Engraved” and “Handwritten”) with other options listed in their respective sub-categories.To set up a document quicker, you can select from a list of preset ensembles. Or, if you don’t see the instrumentation listed there that you want to use, you can create your own ensemble.
What to do:
- Ensure Create New Ensemble and the Engraved Style Document Style are selected.
- Click Next.
Step 2: Select your instruments
Next, select a family to choose an instrument and double click the instrument to add it to the score.
.png)
Wizard Page 2 - What it Does:
This window shows you the various instruments available to you. (Of course, you'll be able to add, change, or delete instruments at any point as you work with the score).
To select your score instruments
- Select "Keyboards" in the left column and then double-click "Piano" in the middle column.
- Select "Voices" in the left column and then double-click "Voice" in the middle column. You’ll notice that the Voice staff is added below the piano staff. To change this…
- From the Score Order menu, choose Choral.
- Click Next.
Step 3: Set Title, Credits, and Copyright
Now enter the basic score information. Of course, you can always add or change anything you set in the Setup Wizard later.
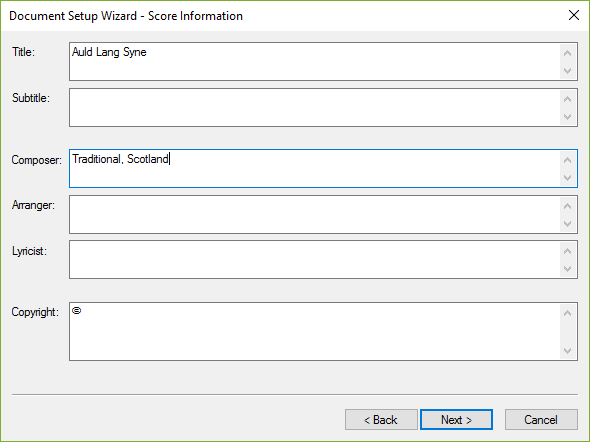
Setup Wizard Page 3 - What it Does:
Finale displays the information about your music as you enter it here. (Depending on which Document Style you’ve selected, different fields will appear on your finished score.)
To specify the title and composer
- Type the title, “Auld Lang Syne” and then click the Composer text box and type “Traditional, Scotland.”
- Click Next.
Step 4: Set the Key signature, time signature, tempo and pickup measure
Finally, specify standard musical elements, like the time and key signature.

Setup Wizard Page 4 - What it Does:
Finale sets up the initial markings on your music for you. All of these settings can be changed later.
To specify the time signature and key signature
- Click the Time Signature tool
 .
. - Click the Up Arrow next to the Key Signature display so the key of G is selected (one sharp).
- Because our example does have a pickup measure, check "Specify Pickup Measure" and select the Quarter Note icon
 to set the pickup and click Finish.
- Finale creates two placeholder text blocks, one for "Subtitle" and one for "Arranger." To delete these, choose the Selection tool
 , click each one and press DELETE.
 Previous Previous
|
Next 
|

