
How to get there
- Choose Document > Document Options and select Stems.
- Click the Stem Connections button. The Stem Connections dialog box appears.
- Then, click Edit to edit an existing stem connection for a notehead, or click Create to create a new stem connection.
What it does
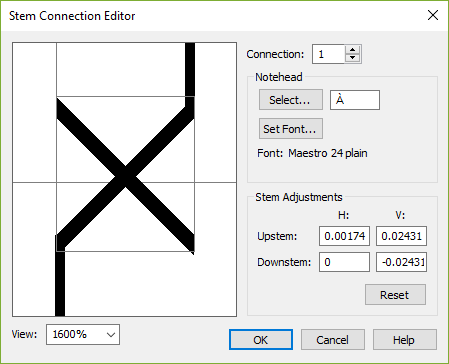
Use this dialog box to graphically adjust where stems connect to every occurrence of a notehead, such as an X or a diamond, in your score. You can adjust how upstems and downstems connect to noteheads by entering values in the dialog box; or you can drag and precisely position stems on the notehead that appears in the display area.
- Display area. This area displays the alternate notehead shape with its upstem and downstem. Adjust how the stems connect to this notehead in the score by dragging the stems vertically and horizontally. Drag the upstem and downstem to adjust their connections to the notehead. As you drag, the values in the Upstem and Downstem H: and V: text boxes change to match the new stem positioning.
- Connection. Up to 128 stem connections for alternate noteheads (such as X noteheads, diamonds, and so on) may be defined in a single document. The number of the currently displayed connection (1 through 128) appears in the text box; this number matches the slot number of the connection in the Stem Connections dialog box. To move forward or backward through the list of stem connections in the current Finale document, just click on the spin controls, or type the number of the connection you want to adjust.
- Notehead: Select • Set Font. Click Select to choose the notehead whose stem connections you want to adjust. The alphabetic equivalent of the notehead character appears in the notehead text box. Note that this character always appears in a regular text font, regardless of the music or text font you selected for the notehead shape. Click Set Font to display the Font dialog box, where you can tell Finale which font to use for the notehead. The notehead symbol in the font that you’ve selected appears in the display area.
- Stem Adjustments: • Upstem: H: • V: Downstem: H: • V: • Reset. Instead of dragging the stems in the display area, you can adjust the stems by typing values. Enter new values in the H: and V: text boxes to adjust the horizontal and vertical positioning of the upstems and downstems in relation to the notehead. A positive number in the Upstem or Downstem H: text box moves the downstem or upstem to the right, and a negative number moves it to the left. A positive number in the Upstem or Downstem V: text box moves the stem’s base (where the stem connects to the notehead) up; a negative number in a V: check box moves the base of the stem down, at a resolution of 64ths of an EVPU. Click Reset to reset all H: and V: settings to zero (the default value). The units are whatever you've selected under
- View. For more precise control over positioning of stems, you can enlarge the view of the notehead from its actual size (100%) up to over 32,000%. Type a value for the percentage into the check box, or select a percentage from the
- OK • Cancel. Click Cancel to return to the Stem Connections dialog box without changing any settings for the currently displayed stem connection. Click OK to confirm your stem connection settings and return to the Stem Connections dialog box.

