
How to get there
- Choose File > Open and
- Double-click the name of a MIDI file you want transcribed. The Import MIDI File Options dialog box appears.
- Select Set Track-to-Staff List. The Track/Channel Mapping to Staves dialog box appears.
- Click the topmost unassigned row of track information.
What it does
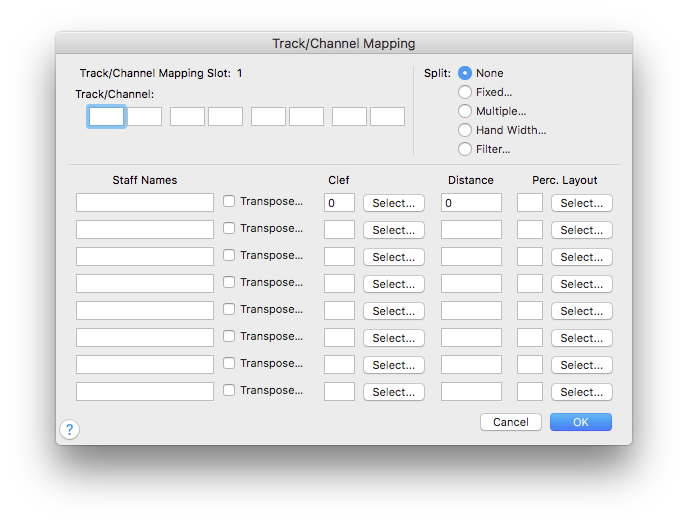
This dialog box offers you a great deal of control over the way in which your sequencer-file ![]() tracksA location where one records or plays back a musical message — usually a portion of the total arrangement. Tracks are for convenience; channels are required. are transformed into Finale staves.
tracksA location where one records or plays back a musical message — usually a portion of the total arrangement. Tracks are for convenience; channels are required. are transformed into Finale staves.
For example, you can tell Finale to create up to eight staves out of a single sequencer track. You can also tell Finale to create one Finale staff from up to four sequencer tracks—to transcribe several woodwind tracks onto a single staff, for example.
Furthermore, you can create four staves from four tracks, but without necessarily having a track-to-staff correspondence; for example, you can tell Finale to treat the notes in all four tracks as if they came from a single track, and then to split them into Finale staves by register—the highest notes into one staff, and so on.
This dialog box also lets you specify the staff name, clef, transposition, and spacing of each resultant Finale staff. You can also select a Percussion Layout which adjusts the percussion notehead, placement and alternate playback.
- Track/Channel Mapping for Slot (#). This number indicates which "slot" or row of track information you’re creating or editing.
- Track/Channel. There are four pairs of text boxes at the top of the screen, letting you specify the track number (and, within that track, the MIDI channel number) of each sequencer track whose music you want included in the staves you’re about to create.
To create a single staff from a single track, enter the track’s number and the MIDI channel from which it was recorded in one pair of the Track/Channel boxes. Note: You normally don’t have to enter anything in the MIDI Channel text box (the second text box of each pair). Enter a MIDI channel value only if you want to specify that a single MIDI channel’s data be transcribed from a track containing music recorded from several MIDI channels.
Next, enter a staff name, transposition, clef, and so on. Of the Split options, leave None selected—otherwise, you’ll transcribe the selected track onto more than one staff.
To create a single staff from multiple sequencer tracks, enter up to four track/MIDI channel number pairings in the text boxes. (Note again that you can leave the MIDI Channel boxes blank—or enter zero—if each track was only recorded from a single channel, or if it’s OK for Finale to notate the contents of all channels in the track onto one Finale staff.) Once again, enter a staff name, and leave None selected—or, if you want to include on the resultant staff only the notes within certain pitch ranges, click Filter (see below).
To create several staves from either a single sequencer track or several tracks, enter the track and channel numbers in the text boxes, as before. This time, however, you must specify one of the Split options (see below). As far as Finale is concerned, the music on all the tracks you’ve specified in the text boxes are part of a single "source" track, which you can then split, by register, into as many as eight staves.
- Split: None. Choose this option to place the music from all the tracks you’ve specified in a single staff, instead of splitting it into separate staves.
- Fixed. When you select this option, Finale displays the Fixed Split dialog box, in which you can specify up to four split points for the music in the specified tracks. In each pair of text boxes, you enter a low and a high key number; in this way, you can specify up to four registers, each of which will be notated on its own staff (in the same top-to-bottom order as the text box pairs) in the resultant Finale document. (Middle C is key number 60, and the numbers increase sequentially as you move up the keyboard. But you don’t have to type in these numbers; you can enter them simply by clicking the Listen button and then playing the notes. Finale enters their key numbers in the text boxes automatically.)
- Multiple. Click this button to display the Multiple Splits dialog box, where you can "explode" all the music on the specified tracks onto as many as eight staves. The advantage of this method is that notes are "separated out" in order from top to bottom, instead of by register; in other words, this would be a more appropriate way to separate single musical lines—for string parts, for example—into individual staves.
This dialog box works in much the same way as the Explode Music command in the Utilities menu, letting you specify the number of resultant staves as well as the Overload Order.
- Hand Width. Select this option to display the Hand Width Split dialog box, which lets you transcribe the contents of the sequencer tracks you’ve specified onto two staves, splitting the notes by tracking the positions of your hands on the keyboard. Finale follows your hands as they move up and down the keyboard, eliminating the need to specify a single, fixed split point—provided there’s always enough distance between the hands for Finale to tell which hand is which.
- Filter. Select this option to display the Filter Channels dialog box. With this option, you can specify certain ranges of notes from each of several tracks that you want to be merged onto a single Finale staff.
- Staff Names. In these text boxes, enter staff names for the Finale staves you’re creating.
- Transpose. Click the appropriate Transpose check box to display the Staff Transpositions dialog box, in which you can specify an instrumental transposition (for a trumpet or clarinet, for example). This is the same dialog box that appears when you click Transposition in the ScoreManager.
- Clef • Select. This text box identifies, by number, the staff’s starting clef. Finale offers eighteen standard clefs, numbered 0 through 15.
Enter the number in each Clef text box corresponding to the clef you want to designate as the starting clef for the resultant Finale staff. You can also click Select to choose from a graphic of each available clef.
- Distance. The number in this text box specifies the distance, between the top line of the staff you’re defining and the top of the Finale window (in Scroll View). It’s a negative number, because this staff appears below the top of the window. Note that if you want all your staves evenly spaced, you don’t have to enter numbers in these boxes; instead, when you return to the Track/Channel Mapping to Staves dialog box, click Set Dist to display the Set Distances dialog box, in which you can enter a global staff distance measurement.
- Percussion Layout • Select. The number in this text box specifies which Percussion Layout you’ve selected for this staff. Click the Select button to open the Percussion Layout Selection dialog box, where you can select from any Percussion Layouts available in the default file.
- OK • Cancel. Click OK to confirm, or Cancel to discard, the track-to-staff configurations you’ve created. You return to the Track/Channel Mapping to Staves dialog box.
See also:

