
How to get there
- Choose the Smart Shape tool
 . The Smart Shape menu appears.
 - Choose Smart Shape > Smart Shape Placement.
What it does
Noteman says: These changes are global. In other words, changes to the Placement settings for any of the four Smart Shape types affect all the respective existing and yet-to-be-entered Smart Shapes in your score, unless you've manually adjusted the end points of a particular Smart Shape; Finale does not change any Smart Shape you've deliberately edited.
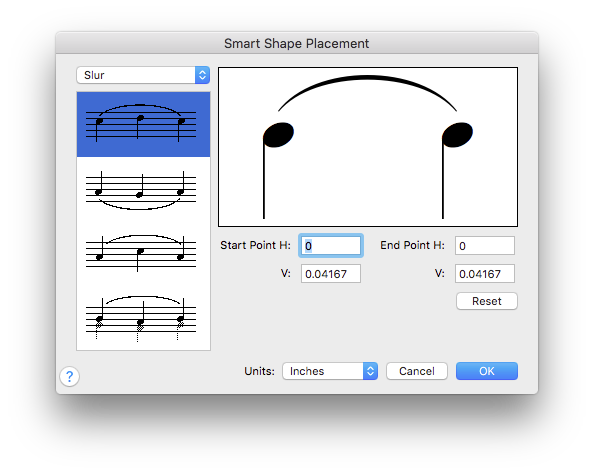
Settings in the Smart Shape Placement dialog box let you control with precision how slurs, bends and glissandos attach to notes or noteheads in a score, by defining their position relative to the top center or bottom center of a note or the tip of a stem. This guarantees exact positioning and consistent placement by Finale that would be time-consuming and difficult to achieve if you had to manually adjust each Smart Shapes yourself. Any changes you make to a particular type of Smart Shapes in the Smart Shape Placement dialog box will affect the corresponding end points of similar Smart Shapes in the score, except for any end points that have been manually adjusted.
The horizontal and vertical positions of a slur or bend end are measured from a reference point that is different for slurs attached to noteheads and those attached to stems.
For slurs or bends attached to noteheads, the reference point is the top center or bottom center of the notehead. When the horizontal and vertical offsets are zero, the slur or bend end will touch the reference point on the notehead:
For slurs or bends attached to stems, the reference point is the end of the stem. When the horizontal and vertical offsets are zero, the slur or bend end will touch the end of the stem:
It is important to remember that whenever you create a slur, bend, slide or glissando, Finale uses the current Smart Shape Placement settings. Changes to these settings also apply to corresponding end points that haven’t been manually adjusted in existing Smart Shapes. However, end points that you’ve manually adjusted are never affected by Smart Shape Placement settings.
- Slur • Tab Slide • Glissando • Guitar Bend. Select the type of Smart Shape you would like to set placement options for from the
- Slur List box. The different notational contexts upon which the attachment of slurs and bends is based are modeled in the list box. The general placement of slurs and bends is based upon standard music notational practice. However, the precise placement is entirely up to you.
Finale makes intelligent decisions about a slur or bend’s direction and end position based on the stem positions of notes, as well as conditions of voicing and beaming. The slurs in the list box represent the rules that Finale automatically follows.
Although there are a limited number of examples in the list box, they cover most of the contexts for controlling how note-attached slurs will connect to noteheads and/or stems. In the first slur model shown in the list box above, you have control over two separate connections, even though they appear in the same example:
- The start of a slur or bend where a normal stem-down note begins a slur or bend (i.e., the stem is not frozen downward), and
- The end of a slur or bend where a normal stem-down note ends a slur or bend.
The examples shown in the list box are meant to be general; the above example controls all similar situations of normal stem-down notes, not merely notes that begin and end on the same pitch.
When you want to change how slurs and bends are attached in specific contexts, select the specific model and edit its Start Point and End Point. You can edit the settings by dragging the slur ends in the display area (or by typing new values in the text boxes).
The list box slur models (contexts) are shown below, with an explanation of how each slur connects to its start and end notes (Remember that because bends are just a special case of a slur, they are affected by these settings as well):
Starting Connection Context Ending Connection Over notehead. Applies to a down-stem note at the beginning of a down-stem or mixed stem context. 
Down-Stem NotesOver notehead. Applies to a down-stem note at the end of a down-stem or mixed stem context. Under notehead. Applies to a note at the beginning of an up-stem context. 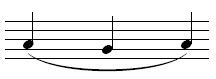
Up-Stem NotesUnder notehead. Applies to a note at the end of an upstem context. Over stem. Applies to an up-stem note at the beginning of a mixed stem context. 
Mixed Stem NotesOver stem. Applies to an up-stem note at the end of a mixed-stem context. Over stem. Applies to a note at the beginning of an up-stem layer context. 
Up-Stem LayerOver stem. Applies to a note at the end of an up-stem layer context. Under stem. Applies to a note at the beginning of a down-stem layer context. 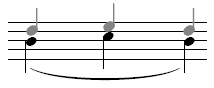
Down-Stem LayerUnder stem. Applies to a note at the end of a down-stem layer context. Over flagged stem. Applies to a flagged stem at the beginning of a mixed-stem context. 
Mixed-Stem Notes With FlagCan’t be set for this style. (Uses the connection from the over mixed-stem notes context.) Over flagged stem. Applies to a flagged stem at the beginning of an up-stem layer context. 
Up-Stem Layer With FlagCan’t be set for this style. (Uses the connection from the up-stem layer context.) Under flagged stem. Applies to a flagged stem at the beginning of a down-stem layer context. 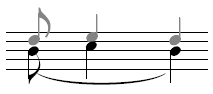
Down-Stem Layer With FlagCan’t be set for this style. (Uses the connection from the down-stem layer context.) Over stem. Applies to an up-stem note in a beamed group, unless it’s the last note in the group (so it’s treated as a stemmed note). Context may be mixed-stems or an up-stem layer 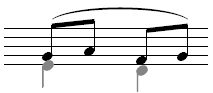
Over BeamsOver stem. Applies to an up-stem note in a beamed group, unless it’s the first note in the group. Context may be mixed-stem or an up-stem layer. Under stem. Applies to a down-stem note in a beamed group, unless it’s the last note in the group (so it’s treated as a stemmed note). Context is a down-stem layer. 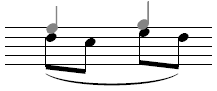
Under BeamsUnder stem. Applies to a down-stem note in a beamed group, unless it’s the first note in the group. Context is a down-stem layer. Under notehead. Applies to an up-stem grace note that precedes a down-stem principal note. 
Mixed-Stem Grace Note (down-stem principal)Under stem side of notehead. Applies to a down-stem principal note that follows an up-stem grace note. Over stem. Applies to a grace note in an up-stem layer. 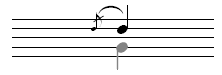
Grace Note in Up-Stem LayerOver stem. Applies to a principal note in an up-stem layer. Under stem. Applies to a grace note in a down-stem layer. 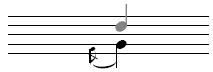
Grace Note in Down-Stem LayerUnder stem. Applies to a principal note in a down-stem layer. Over fret number. Applies to fret numbers in a TAB staff. 
Fret numbers in a TAB staffOver fret number. Applies to fret numbers in a TAB staff. Under fret numbers with stems. Applies to fret numbers with stems in a TAB staff. 
Fret numbers in a TAB staff with stemsUnder fret numbers with stems. Applies to fret numbers with stems in a TAB staff. As you’d expect, there are exceptions to these rules, and these exceptions allow you more flexibility. If you freeze note stems (for example, when you’re working with two layers or voices or using the Selection tool, Finale may automatically flip the slur. You can also override individual slur or bend directions by using the Direction submenu in the Smart Shape menu. Collision avoidance in Engraver slurs can also override Smart Slur Placement settings.
- Tab Slide List box. The different notational contexts upon which the attachment of tab slides is based are modeled in the list box.
Finale makes intelligent decisions about a tab slide’s direction and end position based on the positions of notes, as well as the pitch direction. The slides in the list box represent the rules that Finale automatically follows.
When you want to change how tab slides are attached in specific contexts, select the model from the list box and edit its Start Point and End Point. You can edit the settings by dragging the slide ends in the display area (or by typing new values in the text boxes).
Starting Connection Context Ending Connection Notehead on line. Applies to a note on a line where the pitch is increasing to the next note on a different staff line. 
Different V, Lines, Increasing PitchNotehead on line. Applies to a note on a line where the pitch is increasing from the previous note on a different staff line. Notehead on space. Applies to a note on a space where the pitch is increasing to the next note on a different staff space. 
Different V, Spaces, Increasing PitchNotehead on space. Applies to a note on a space where the pitch is increasing from the previous note on a different staff space. Notehead on line. Applies to a note on a line where the pitch is decreasing to the next note on a different staff line. 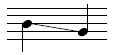
Different V, Lines, Decreasing PitchNotehead on line. Applies to a note on a line where the pitch is decreasing from the previous note on a different staff line. Notehead on space. Applies to a note on a space where the pitch is decreasing to the next note on a different staff space. 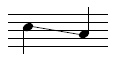
Different V, Spaces, Decreasing PitchNotehead on space. Applies to a note on a space where the pitch is decreasing from the previous note on a different staff space. Notehead on line. Applies to a note on a line where the pitch is increasing to the next note on the same staff line. 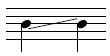
Same V, Lines, Increasing PitchNotehead on line. Applies to a note on a line where the pitch is increasing from the previous note on the same staff line. Notehead on space. Applies to a note on a space where the pitch is increasing to the next note on the same staff space. 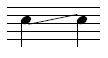
Same V, Spaces, Increasing PitchNotehead on space. Applies to a note on a space where the pitch is increasing from the previous note on the same staff space. Notehead on line. Applies to a note on a line where the pitch is decreasing to the next note on the same staff line. 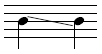
Same V, Lines, Decreasing PitchNotehead on line. Applies to a note on a line where the pitch is decreasing from the previous note on the same staff line. Notehead on space. Applies to a note on a space where the pitch is decreasing to the next note on the same staff space. 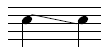
Same V, Spaces, Decreasing PitchNotehead on space. Applies to a note on a space where the pitch is decreasing from the previous note on the same staff space. Notehead on a space or line. Applies to a note on a space or line where the pitch is the same to the next note on the same staff space or line. 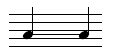
Same V, Same PitchNotehead on a space or line. Applies to a note on a space or line where the pitch is the same from the previous note on the same staff space or line. - Glissando List box. When you want to change how glissandos are attached edit its Start Point and End Point. You can edit the settings by dragging the glissando ends in the display area (or by typing new values in the text boxes).
Starting Connection Context Ending Connection Notehead. Applies to all notes that begin a glissando. 
Different V, Lines, Increasing PitchNotehead. Applies to all notes at the termination of a glissando. - Guitar Bend List box. There are three figures Finale defaults to while creating Guitar Bend Smart Shapes, Bend (top option), Release, (second option) and Quarter Bend (third option). Choose the figure you want to edit from the list on the left. Then, use the preview window to make desired edits to its default appearance.
Starting Connection Context Ending Connection Bend. Applies to a fret number on any line but the top. 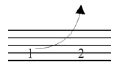
Different V, Lines, Increasing PitchArrowhead. Applies to the default arrowhead placement. Further discreet adjustments can be made to each guitar bend arrowhead in the score. Release. Applies to a fret number on any line but the top one on a TAB staff. 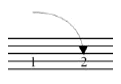
Different V, Spaces, Increasing PitchArrowhead. Applies to the default arrowhead placement. Further discreet adjustments can be made to each guitar bend arrowhead in the score. Quarter Bend. Applies to a fret number on any line but the top one on a TAB staff. 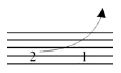
Different V, Lines, Decreasing PitchArrowhead. Applies to the default arrowhead placement. Further discreet adjustments can be made to each guitar bend arrowhead in the score. Bend on top line. Applies to a fret number on the top line of a TAB staff. 
Different V, Spaces, Decreasing PitchArrowhead. Applies to the default arrowhead placement. Further discreet adjustments can be made to each guitar bend arrowhead in the score. Release on top line. Applies to a fret number on the top line of a TAB staff. 
Same V, Lines, Increasing PitchArrowhead. Applies to the default arrowhead placement. Further discreet adjustments can be made to each guitar bend arrowhead in the score. Quarter Bend on top line. Applies to a fret number on the top line of a TAB staff. 
Same V, Spaces, Increasing PitchArrowhead. Applies to the default arrowhead placement. Further discreet adjustments can be made to each guitar bend arrowhead in the score. - [Active display area]. Use the Active display area to alter the Smart Shape model selected in the list box. Simply drag the Smart Shape’s end points to adjust where they’re placed relative to the notehead or stem. Note that the values for the Start and End Points are updated as you drag. Changes you make to the Smart Shape’s end points will apply to all Smart Shapes of this type that you create. These changes will also apply to end points that haven’t been manually adjusted in all similar Smart Shapes in the score.
- Start Point H: • Start Point V: These settings define the horizontal and vertical positions of the Smart Shape in relation to its start point. The Smart Shape initially attaches to the note stem or to the center top (or bottom) of the notehead, depending on the rule.
Drag the cursor to the left or right to change the Smart Shape’s horizontal position. As you move to the left, the H: text box changes from zero (the initial setting) to a negative number. As you drag the cursor to the right, the H: text box becomes a positive number.
To change the vertical distance or angle between the Smart Shape and the note, drag the Smart Shape up or down as far as you need. Drag the cursor up or down to change the vertical offset. The further you move the Smart Shape up from its initial setting, the positive number in the V: text box increases. If you drag the Smart Shape downward, the number becomes negative.
- End Point H: • End Point V: These settings show the horizontal and vertical positions of the Smart Shape in relation to its end point. The Smart Shape initially attaches to the note stem or to the center top (or bottom) of the notehead, depending on the rule.
Drag the cursor to the left or right to change the Smart Shape’s horizontal position. As you move to the left, the H text box changes from zero (the initial setting) to a negative number. As you drag the cursor to the right, the H text box becomes a positive number.
To change the vertical distance or angle between the Smart Shape and the note, drag the Smart Shape up or down as far as you need. Drag the cursor up or down to change the vertical offset. The further you move the Smart Shape up from its initial setting, the positive number in the V: text box increases. If you drag the Smart Shape downward, the number becomes negative.
- Units: EVPUs • Inches • Centimeters • Points • Picas. The first time you enter the Smart Shape Placement dialog box, the measurement
- Reset • Cancel • OK. Click Reset to restore the built-in Finale default settings. Click Cancel to cancel any changes you made to the settings, or click OK to save any new settings and return to the score.
Noteman says: Any settings that refer to up-stem or down-stem layers also apply to Voice 1 and Voice 2 notes, as well as stems frozen using the flip stems utility, Special Tools or Speedy Entry tools.
See also:

