Occasionally, more than one voice appears in the same score staff (e.g. “Flutes 1 & 2” or a divisi section). If this is the case, you may want to print separate parts, for example, one for “Flute 1” and another for “Flute 2.” Finale can help you hide notes to isolate a single voice in preparation for printing the part.
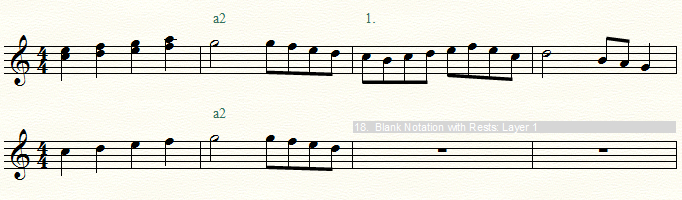
There are nuances to part voicing which make it impossible for Finale to guess entirely which notes you want to include. In multi-part staves, markings like a2 signify both instrumentalists should perform a monophonic section in unison. Finale cannot interpret these markings to decide which notes belong to the voice and which should be removed like the Process Extracted Parts plug-in can. However, with the help of Staff Styles, parts can be modified so that only a single voice is showing while the link to the score is retained. (The Process Extracted Part plug-in requires the part to be extracted into another autonomous document).
When specifying part voicing, bear in mind note attached items attached to one layer cannot be copied automatically to another layer. Also, the following data is removed from voiced parts:
- Manual adjustments to rests
- Stem alterations
- Beam alterations
- Manual positioning of notes (including "automatic" collision avoidance due to notes in layers that are 2nds apart, for example.)
To generate a single-voice part from a multi-voice score staff
Create a new part definition and add the multi-part staff to this new part (a staff can be added to more than one part). To this new part, apply voicing settings that will isolate one of the voices.
Noteman says: The Simple Entry, Speedy Entry, HyperScribe and Note Mover tools are disabled for the part once voicing is applied. You can, however, edit notation of these parts by working with the notation of corresponding staves in the score.
- Choose Document > Manage Parts. The Manage Parts dialog box appears.
- Choose New Part > Edit Part Name. Type the name of the part and click OK. The new part appears in the left list and is automatically selected.
- Select the multi-voice instrument staff from the list on the right and click Add to Part to add it to the part. The staff moves to the center column.
- Click to select the staff you just added to the middle column.
- Click the Edit Voicing button to open the Voicing for Staff in Part dialog box.
Here, you will first eliminate the majority of extra notes by specifying the layer or chord position in which most notes in the voice currently appear. The method you will use depends on how the voices are delegated in the part. For example, if Flute 1 uses layer 1 all of the time, select All Notes in Layer and choose Layer 1 from the
- Click Selected Notes from One or More Layers.
- Choose the option that most closely describes the vertical position of this voice. For example, if your part is filled with two-note divisi sections, and this is the Violin 2 part, choose Bottom Note. If there are more than two voices, choose Selected Note(s) to indicate the note within chords of a triad or greater to display.
As you add or remove notes while isolating voices, articulations may remain on the incorrect side of the staff. To set articulations to automatically flip to the appropriate side of the staff as notes/layers are added/removed, set them to Auto Note/Stem Side under the Position
- When you have configured this dialog box to represent the majority of notes in the layer you would like to display, click OK. For more information, see Voicing for Staff in Part dialog box. You return to the Manage Parts dialog box.
- Click OK. It is likely that there are some measures in the part containing extra notes. You can use a Staff Style to hide these sections.
- Choose the Staff tool
 . Highlight the sections containing extra notes.