- Click the Expression tool
 , and click a note or
a measure in the staff you want to mask. Click a note at the appropriate
end of the staff. The Expression Selection dialog box appears.
, and click a note or
a measure in the staff you want to mask. Click a note at the appropriate
end of the staff. The Expression Selection dialog box appears.
- Click Shape. Proceeding through the dialog
boxes, click as follows: Create; Select; Create. You arrive in
the Shape Designer. You’re about to draw a mask that’s the height of a
standard staff and two inches wide.
The following instructions give measurements
in points (1/72 inch). If you’ve been working in different units, choose
Rulers and Grid from the Shape Designer menu and select Points.
- Click the Rectangle Tool
 . Note the origin,
the small white circle.
. Note the origin,
the small white circle.
- Click the origin; without releasing the mouse,
drag up and to the right, until the number in the “H:” box is 144 and
the “V:” box is 28. You’ve just drawn a rectangle.
- Click the Selection tool
 , and select the rectangle.
Choose Shape Designer > Fill > White. The
inside of the rectangle turns white, but the outline is still black.
, and select the rectangle.
Choose Shape Designer > Fill > White. The
inside of the rectangle turns white, but the outline is still black.
- Choose Shape Designer > Line Thickness > None. The black line goes away.
- Click OK or Select in each
dialog box until you return to the document.
The shape appears in the score as a whited-out rectangle.
The technique: if you want to cover up
everything, attach the expression to a subsequent note. In the following
illustration, you can see the difference.
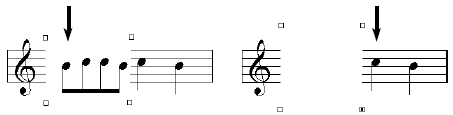
At left, the Expression was attached to
the first eighth note, as indicated by the arrow. As a result, the shape
only covers up the staff lines. If the shape is attached to a following
note (right), the mask covers everything.
If your shape is an expression,
however, the white rectangle will always cover everything, including
the notes.
