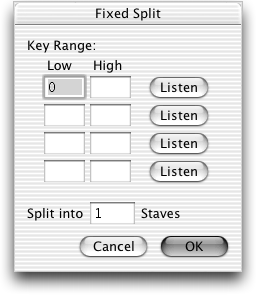
Fixed Split dialog box

How to get there
- Choose File > Open and select
MIDI File from the File Type pop-up list.
- Double-click the name of
a
you want transcribed.
- In the Import MIDI File Options dialog box, click
the Set Track-To-Staff List radio button.
- In the Track/Channel Mapping
to Staves dialog box, click the top unassigned row of track/channel mapping
information.
- In the text boxes at the top of the Track/Channel Mapping
dialog box, enter the track numbers and MIDI channel numbers of the "tracks"
you want to split.
- Click Fixed.
What it does
In this dialog box, you can specify up
to four split points for the music in the sequencer track (or tracks)
you’ve specified for transcription. In each pair of text boxes, you specify
a range of notes you want to appear in a separate staff. You could, for
example, include only the notes in the flute’s register to place in one
staff; only the notes in the bass’s register to put in another, and so
on. You can even specify overlapping split ranges so that some notes are
transcribed more than once.
- Key
Range: Low • High. In each pair of Low/High text boxes, enter a
low and a high key number, where middle C is key number 60, and the numbers
increase sequentially as you move from left to right on the keyboard.
The notes to which these synthesizer key numbers refer—and all notes in
between—will be split into their own staff.
Note. You don’t have
to calculate the key numbers and type them in manually. Click the Listen
button (see below) beside each pair of text boxes, and play each note—the
lowest, then the highest note in the range; Finale enters their key numbers
in the text boxes automatically. You can split the notes of the track
(or tracks) you’ve indicated into as many as four separate staves this
way. These staves will appear in the same top-to-bottom order as these
pairs of text boxes.
- Listen.
When you click this button, Finale goes into "listen" mode,
waiting for a MIDI signal. (A message to this effect appears on the screen.)
Simply play the desired key on your keyboard; Finale enters the appropriate
key number in the active text boxes.
- Split
into ___ Staves. After indicating all the desired ranges of notes
in the text boxes (see above), tell Finale how many resultant staves you
want by entering the appropriate number in the Split text box (1 to 4).
- OK
• Cancel. Click OK to confirm your split points, or Cancel to discard
them, and return to the Track/Channel Mapping dialog
box. In the Split column for the row you clicked, you’ll see Fixed (if
you clicked OK) or None (if you clicked Cancel).
See Also:
Track/Channel Mapping


