SmartMusic Performance Markers
You can use SmartMusic performance markers to specify effects that are found in standard accompaniments such as rehearsal letters, pauses for fermatas, cadenzas, cesuras, and repeats. You can also use markers to adjust the level of Intelligent Accompaniment during the course of the performance. You can add all of these markers using the Add SmartMusic Markers dialog box under the Document Menu (as described in this section). After doing so, the markers appear in the score as expressions defined for playback as the appropriate SmartMusic marker type.
Since SmartMusic markers always appear in a Finale score as (hidden) expressions, they can also be added manually with the Expression Tool. Although the Add SmartMusic Markers dialog box is the recommended method, some users prefer the extra control offered when entering them manually. When you apply SmartMusic markers this way, you create expressions that contain special SmartMusic playback data that SmartMusic can recognize while performing the accompaniment. If you decide to add SmartMusic Markers manually, follow the same instructions for placement of each marker outlined in this section. (We recommend always trying the Add SmartMusic Markers dialog box first while creating performance markers. It’s faster and easier.)
SmartMusic markers are added to the beat or measure you want the effect to occur, depending on the marker type. See To add SmartMusic performance markers for details. Here is a basic description of all performance markers.
Note that several markers are sometimes added for you automatically while using the Add SmartMusic Markers utility. For example, Reset Tempo is always added at the point the accompaniment is to resume after a Wait for Note marker has been added. (It is assumed the performer will resume at the tempo specified in the score).
To add SmartMusic performance markers
Although the following instructions apply to all SmartMusic markers, if you intend to add them as Expressions, you will first want to review the section To add SmartMusic Performance Markers as expressions (below). Furthermore, additional steps are required to properly define pauses and repeats with Expressions. See To define and add pause markers manually with the Expression Tool and To Add Repeat Markers Manually as Expressions for details.
To add SmartMusic performance markers as expressions
The following steps are general and are required anytime you want to add a SmartMusic Performance Marker as an expression. Remember to always try using the Add SmartMusic Marker utility (under the Edit Menu) prior to creating expressions manually with Expressions.
Note that if you are creating a rehearsal mark, the expression should be aligned with the beginning of the measure.
To add pause markers for a SmartMusic Accompaniment
Pause markers are used to tell SmartMusic to wait for a note or cue from the soloist to resume the accompaniment. Many musical elements including fermatas, cesuras, cadenzas, and sometimes ritardandos and rallentandos require a pause marker for the soloist to accurately perform the musical passage (or have freedom to interpret the music as desired). You can add a pause marker easily by placing it on the note you wish the accompaniment to resume using the Add SmartMusic Markers dialog box.
A note (Wait for Note On) - Choose this option to instruct SmartMusic to wait for a specific note performed by the soloist as a cue to resume the accompaniment. This type of pause marker is appropriate for a ritardando or rallentando (see To add pause markers for ritardandos or rallentandos), rests or held notes in the accompaniment, (see To pause for accompaniment rests or held notes), and fermatas within a piece (see To add pause markers for fermatas). A Wait for Note marker is generally only required on the note you want the accompaniment to resume.
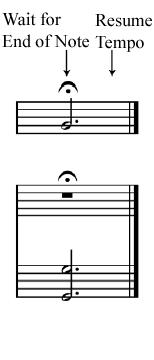
The release of the note (Wait for End of Note) - Choose this option to instruct SmartMusic to hold notes in the accompaniment until the current note is released, for example, a fermata on the last note of a piece. See step three under To add pause markers for fermatas.
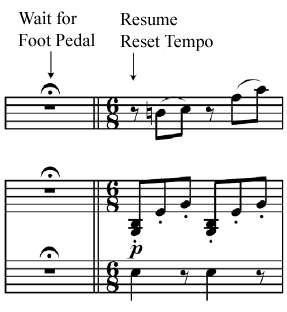
A foot pedal message (Wait for Foot Pedal) - Choose this option to instruct SmartMusic to resume the accompaniment upon receiving a foot pedal message from the soloist. This type of pause marker is recommended for cadenzas (see To add pause markers for cadenzas), but could also be used for fermatas, rests/held notes in the accompaniment, or even rallentandos. A Wait for Foot Pedal marker is only required at the location you want the accompaniment to resume.
You will notice hidden text above the solo staff that indicates the markers you’ve added. These are actually hidden text expressions that Finale generated for you based on your settings in the Add SmartMusic Markers dialog box. The Add SmartMusic Markers dialog box is basically a tool that allows you to automatically generate these expressions without having to define them manually. If you wish, you can manually define these SmartMusic Markers using the Expression Tool as we’ll explain next.
To define and add pause markers manually with the Expression Tool
If you add SmartMusic Markers manually with the Expression Tool (instead of the Add SmartMusic Markers utility), at least two markers are required to properly define a pause; a marker that indicates the point at which the accompaniment should pause (Wait for Note, Wait for End of Note, or Wait for Foot Pedal) and a marker that indicates the point at which the accompaniment should resume (Resume). A third marker, Reset Tempo, should be added at the same point as each Resume marker to tell SmartMusic to resume at the tempo defined in the document (eliminating any tempo changes added by SmartMusic’s Intelligent Accompaniment feature). If you have used the Add SmartMusic Marker dialog box, you may have noticed Finale automatically places the ‘Wait for...’ expression on the note prior to the point defined in the Add SmartMusic Markers dialog box. Actually, the ‘Wait for...’ need only precede the ‘Resume’ by a tiny increment because there is almost never a need to pause the accompaniment at a musically significant point prior to the resume point (as the accompaniment would be resting or holding anyway).
As shown in the Add SmartMusic Markers dialog box, there are three ways SmartMusic can be ‘cued’ to resume an accompaniment; upon hearing a pitch (Wait for Note On), upon hearing the cutoff of a pitch (Wait for End of Note), or upon receiving a foot pedal message (Wait for Foot Pedal). The cue SmartMusic ‘waits for’ depends on the marker used to indicate the point at which the accompaniment should pause. The same marker, Resume, is always used to indicate the point at which the accompaniment should resume. Like any expression defined for playback, SmartMusic Marker expressions apply to the note they are attached to or the horizontal placement within the measure. Specific placement recommendations are explained below under To add pause markers for ritardandos or rallentandos, To pause for accompaniment rests or held notes, and To add pause markers for fermatas.
To add pause markers for ritardandos or rallentandos
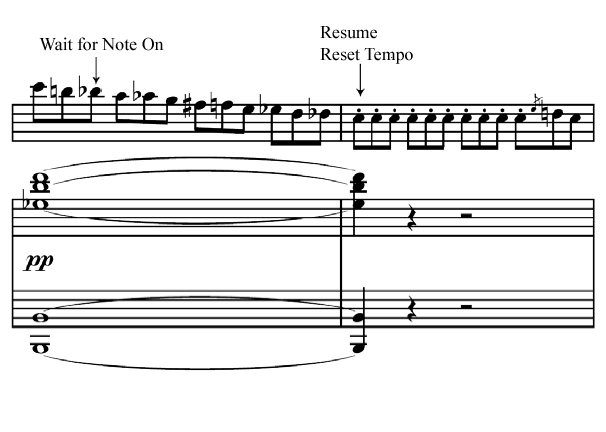
To specify this effect with the Add SmartMusic Marker utility, simply place a Wait for Note marker on the note you want the accompaniment to resume. The Resume and Reset Tempo marker is added for you automatically. See Wait for Note dialog box.
To assign the necessary markers manually with Expressions, add a Wait for Note On marker at the end of a passage, and then a Resume and Reset Tempo marker on the note the accompaniment is to resume. When the soloist plays the pitch assigned to the Resume marker, the accompaniment resumes. This is particularly useful if an a tempo marking follows the ritardando or rallentando.
Tip: Since the accompaniment will be expected to slow for the performer, it might be a good idea to increase the IA level for the ritardando region. The Wait for Note marker is only required imediately prior to the return to a steady tempo.
To add a pause marker for ritardandos or rallentandos manually using expressions:

To pause for accompaniment rests or held notes
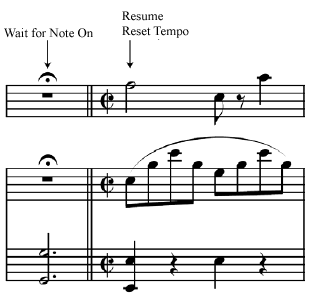
To specify this effect with the Add SmartMusic Marker plug-in, place the Wait for Note marker on the note you want the accompaniment to resume. The Resume and Reset Tempo marker is added for you automatically. See Wait for Note dialog box. A Wait for Note pause marker can also be used when there is a break or held note in the accompaniment to ensure SmartMusic resumes playback along with the performer (for a rubato or expressive section of the piece for example). Again, the entrance of the accompaniment resumes upon hearing the designated note in the solo line.
To add a pause for accompaniment rests manually with expressions:
Pause for rests in accompaniment

Pause for held note(s) in accompaniment
In SmartMusic, during the performance of the above examples, the performer will see a message “Waiting for Pitch _” until the designated pitch is performed (and the accompaniment resumes).
Note that the same procedure can be used to pause the accompaniment for cadenzas if the “Resume” note is not performed during the cadenza passage. Simply place the Wait for Note On marker at a point (preferably towards the beginning) of the cadenza. For more information on adding pause markers for cadenzas, see To add markers for cadenzas.
To add pause markers for fermatas
Pause markers can be added to accommodate fermatas in much the same way they are added for rests or held notes in the accompaniment (described above). The type of pause marker used depends on whether the soloist or accompaniment resumes playback.
To specify this effect with the Add SmartMusic Marker plug-in, place the Wait for Note or Wait for Foot Pedal marker on the note you want the accompaniment to resume. The Resume and Reset Tempo marker is added for you automatically. See Wait for Note dialog box.
To add a pause marker for a fermata manually with expressions:
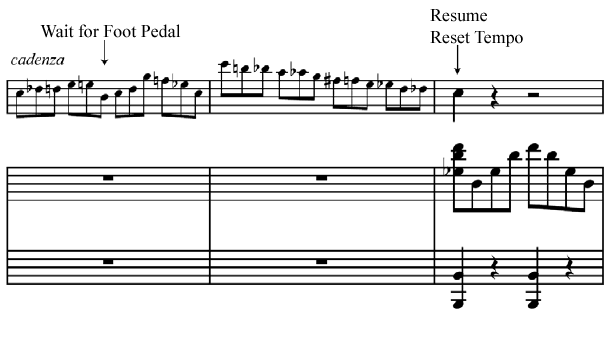
To add pause markers for cadenzas
Cadenzas are unaccompanied passages performed by the soloist. You can use a Foot Pedal marker inserted during the cadenza, and then a Resume marker after the cadenza to ensure the accompaniment resumes in coordination with the soloist (upon receiving a foot pedal message).
To specify this effect with the Add SmartMusic Marker plug-in, place the Wait for Foot Pedal marker on the note you want the accompaniment to resume. The Resume and Reset Tempo marker is added for you automatically. See Wait for Foot Pedal dialog box.
To add a pause marker for a cadenza manually with expressions:
![]()