Important note: Prior to printing Linked Parts, always view them to update multimeasure rests. Doing this ensures there are no missing or extra measures in the printout. Press
A Linked Part is simply a representation of one or more score staves arranged in a part layout that walks in-step with notation and other changes you make to the score. Although their basic purpose is to eliminate the need to make redundant changes to the score and part separately, their integrated nature offers many other time and labor-saving advantages:
To find out if an element is permanently linked, independent, or intelligently linked, see the Linking Details for Linked Partschart in the Appendix.
Special mouse clicks and keyboard shortcuts
Linked Parts context menus. Every element whose link can be broken includes a context menu command. The command available depends on whether you are viewing the score or part and the status of the link. To illustrate, we’ll use an expression. Right-click an expression in the score and choose Unlink In All Parts to break the link for this expression in all parts; choose Relink In All Parts to restore the link for all parts. Right-click an expression in a part and choose Relink To Score to completely restore the link (show/hide and positioning). See also Contextual Menus.
Contextual menus are reached by right-clicking on the handle of an object. A contextual menu will be displayed where you can select various items.
|
Menu item |
What it does |
|
Show |
Toggles show/hide setting |
|
Relink |
Restore the link to its corresponding score item |
|
Unlink in All Parts (parts only) |
Break the link between the score and this item in all parts |
|
Relink in All Parts (score only) |
Restore the link between the score and this item in all parts |
You can easily create linked parts while setting up new documents (or even adding new staves) using the Setup Wizard. Simply check Generate Parts on page 2 of the Setup Wizard while setting up your document (or adding new staves using the New Staves (with Setup Wizard) command under the Staff Menu). When the score appears, Finale automatically creates a part for each instrument.
Additionally, parts can be generated from existing score staves at any time. In fact, you could choose to generate parts after the score is complete or after opening a file created in an old version of Finale. To create new linked parts in an existing score:
The following techniques allow easy navigation and are recommended while working with a document containing linked parts.
To hide an item in the score (and leave it showing in parts)
Use the override key and a context menu to do this easily. These steps apply to all “intelligently linked” items. See Linking Details for Linked Parts.
To show an item in the Score (and hide it in all Parts)
Use the override key and a context menu to do this easily. These steps apply to all “intelligently linked” items. See Linking Details for Linked Parts.
To show an item in one part only (and hide it in other parts and the score)
Use the override key and context menus to do this easily. These steps apply to all “intelligently linked” items. See Linking Details for Linked Parts.
To reposition an item in the score without moving it in parts
Use the override key to do this easily. These steps apply to all “intelligently linked” items. See Linking Details for Linked Parts.
To reposition an item in all parts while viewing a part
Use the override key to do this easily. These steps apply to all “intelligently linked” items. See Linking Details for Linked Parts.
Expressions follow the paradigm described at the beginning of this section (see Linked Parts). When an expression is added to either the score or part, it appears in both. Similarly, when an expression is deleted from either the score or part, it is removed from both.
The following properties of expressions are permanently shared between the score and parts:
The following table lists properties of note expressions that are broken if changed in a part:
|
Property changed |
Link type broken |
|
Repositioning (nudge, drag, or H: V: values) |
Positioning |
|
Remove Manual Adjustments |
Positioning |
|
Hide/Show setting |
Hide/Show |
Note: Removing Manual
Positioning in a part (e.g. selecting an expression handle and pressing
When you first add an expression, positioning changes to that expression in the score apply to all parts containing that expression. If an expression is repositioned in a part, the change does not affect other instances of that expression in the score or other parts, and future positioning changes to that expression in the score do not apply to that part. However, if an expression is repositioned in a part containing multiple instances of that expression, all instances of that expression in the part are broken (and all instances of that expression in the part continue to move uniformly).
Broken expressions in parts can be relinked to the score at any time (see Relinking part items to the score).
The “Allow individual edits per staff” setting in the Expression Assignment dialog box allows you to reposition, hide, or show an instance of an expression without applying these changes to other instances of that expression.
Show/hide setting for expressions
The show/hide linking behavior for expressions follows the same rules as repositioning. See Repositioning expressions above.
When an articulation is added to a note in a score or part, it appears in both. When an articulation is deleted from either the score or a part, it is removed from both.
The following properties of articulations are permanently shared between the score and parts:
The following table lists properties of articulations that are broken if changed in a part:
|
Property changed |
Link type broken |
|
Repositioning (nudge, drag, or H: V: values) including repositioning of second handle using “Copy the Main Symbol) |
Positioning |
|
Remove Manual Positioning (Backspace key) |
Positioning |
|
Hide/Show setting |
Hide/Show |
Note: Removing Manual Positioning in a part (e.g. selecting an articulation handle and pressing Backspace) does not relink the articulation. In fact, doing so in a part breaks the positioning link.
If your score was created in Finale 2006 or earlier, articulations will not automatically flip across the staff when appropriate when working with part voicing (see Part Voicing). To define an articulation’s definition so that it is optimized for use with linked parts:
Measure-attached text in linked parts
When a measure-attached text block is added to either the score or part, it appears in both. Similarly, when a measure-attached text block is deleted from either the score or part, it is removed from both.
The following properties of measure-attached text blocks are permanently shared between the score and parts:
The following table lists properties of measure-attached text blocks that are broken if changed in a part:
|
Property changed |
Link type broken |
|
Repositioning (nudge, drag, or H: V: values) |
Positioning |
|
Hide/Show setting |
Hide/Show |
Page-attached text in linked parts
When a page-attached text block is added to either the score or part, it appears in both on corresponding pages. When a multiple-page-attached text block is deleted from either the score or part, it is removed from both.
When a page-attached text block is added to a score or part, Finale adds it to the corresponding page of the score or linked part based on page number, and also takes into account title pages.
The following properties of page-attached text blocks are permanently shared between the score and parts:
The following table lists properties of page-attached text blocks that are broken if changed in a part:
|
Property changed |
Link type broken |
|
Repositioning (nudge, drag, or H: V: values) |
Positioning |
|
Edit page offset |
Positioning |
|
Hide/Show setting |
Hide/Show |
Page-attached text blocks behave differently depending on whether they are attached to a single page or multiple pages. (See Frame Attributes dialog box.)
Single-page-attached text blocks
When a page-attached text block is added to a single page, Finale adds it to the corresponding page of the score or part based on page number, and also takes into account title pages. Since the page number of the score will generally be far different than the page number of the part, single page-attached text blocks should only be used for title pages, or the first page of music. To attach text to a measure that adjusts according to layout changes, use measure-attached text blocks or measure-attached expressions (see To assign a text block to a measure and To create an expression).
In order to properly account for title pages that may differ in number between the score and parts, Finale manages the placement of single-page-attached text blocks as follows:
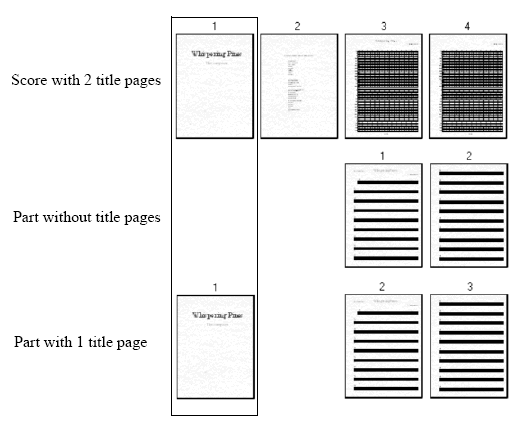
When a page-attached text block is deleted from either the score or part, it is removed from both.
Multiple-page-attached text blocks
When a multiple-page-attached text block is added to either the score or part, it appears in both on corresponding pages. When a multiple-page-attached text block is deleted from either the score or part, it is removed from both.
Page-attached graphics and in linked parts
When a page-attached graphic is added to the score or part, it appears in both. The graphic is placed on the corresponding page number(s). (If there are blank title pages in the score or parts, Finale bases the graphic placement on the page number starting with the first page containing music.) When a page-attached graphic is deleted from either the score or part, it is removed from both.
The following properties of page-attached graphics are permanently shared between the score and parts:
The following table lists properties of page-attached graphics that are broken if changed in a part:
|
Property changed |
Link type broken |
|
Repositioning (nudge, drag, or H: V: values) |
Positioning |
|
Hide/Show setting |
Hide/Show |
When a page-attached graphic is added to a single page, Finale adds it to the corresponding page of the score or part based on page number, and also takes into account title pages. Since the page number of the score will generally be far different than the page number of the part, single page-attached graphics should only be used for title pages, or the first page of music. To attach text to a measure that adjusts according to layout changes, use measure-attached graphics or measure-attached expressions (see Graphics).
In order to properly account for title pages that may differ in number between the score and parts, Finale manages the placement of single-page-attached graphics as follows:

When a page-attached graphic is deleted from either the score or part, it is removed from both.
Multiple page-attached graphics
When a multiple-page-attached graphic is added to either the score or part, it appears in both on corresponding pages. When a multiple-page-attached graphic is deleted from either the score or part, it is removed from both.
Measure-attached graphics in linked parts
When a measure-attached graphic is added to either the score or part, it appears in both. When a measure-attached graphic is deleted from either the score or part, it is removed from both.
The following properties of measure-attached graphics are permanently shared between the score and parts:
The following table lists properties of measure attached (and page-attached) graphics that are broken if changed in a part:
|
Property changed |
Link type broken |
|
Repositioning (nudge, drag, or H: V: values) |
Positioning |
|
Hide/Show setting |
Hide/Show |
Note: Fixed percent and horizontal and vertical scaling are independent between the part and score.
When a tuplet is added to either the score or part, it appears in both. When a tuplet is deleted from either the score or part, it is removed from both.
The following properties of tuplets are permanently shared between the score and parts:
The following table lists properties of tuplets that are broken if changed in a part:
|
Property changed |
Link type broken |
|
Repositioning (nudge, drag, or H: V: values) |
Positioning |
|
Bracket direction (Over/Under/Flip) |
Direction |
|
Editing the slope or hook length of a tuplet bracket |
Positioning |
|
Hide/Show setting |
Hide/Show |
You can use the F key to flip a tuplet to the other side of the staff. If you do so in the score, the tuplet also flips in all parts containing that tuplet (if it hasn’t been broken). Flipping the tuplet in a part breaks the link and does not apply to the score or other parts.
You can reverse the linking behavior while flipping tuplets using the Ctrl key. For example, select a tuplet in a part, hold down the Ctrl key and press F to flip the tuplet in both the score and part, retaining the link. Select a tuplet in the score, hold down the Ctrl key and press F to flip the tuplet in the score only, breaking the link to the part/all parts that contain that staff.
Smart shapes, such as slurs and hairpins behave differently than other types of linked items because their shape may require individual editing, but generally not their start and end point. The following describes how Finale handles Smart Shapes in linked parts.
The following general smart shape settings are permanently shared between the score and parts:
Note and Notehead-attached Smart Shapes
Note and Notehead-attached smart shapes including slurs, dashed curves, glissandi, bend hats, tab slides and others are treated identically. When a note or notehead-attached smart shape is added to either the score or part, it appears in both. When it is deleted from either the score or part, it is removed from both. The direction (above/below staff) is automatic (for slurs and dashed curves depending on the pitches on the staff), and may differ in the score than the part without user intervention.
The following properties of note and notehead-attached smart shapes are permanently shared between the score and parts:
The following table lists properties of note and notehead-attached smart shapes that are broken if changed in a part:
|
Property changed |
Link type broken |
|
Engraver Slur setting (On/Off/Automatic) |
Positioning |
|
Slur direction (Over/Under/Flip) |
Direction |
|
Position of primary and secondary handles |
Positioning |
|
Show/Hide setting |
Show/Hide |
Any time the contour of a slur is manually repositioned, its Engraver Slur qualities are disabled (see Engraver slurs), and repositioning a slur in a linked part is no exception. Therefore, when the contour of a slur is manually repositioned in a part, the link is broken as well as the slurs’ ability to automatically adjust to avoid notes, articulations, and so forth. Subsequent editing of notes in the score may cause collisions with slurs that have been edited in parts.
If a slur is flipped in a part, the arc and endpoint positioning links are also broken. Edits to the endpoint positioning and arc in the score will no longer apply to the flipped slur in the part.
You can use the F key to flip a slur to the other side of the staff. If you do so in the score, the slur also flips in all parts containing that slur (if it hasn’t been broken). Flipping the tuplet in a part breaks the link and does not apply to the score or other parts.
You can reverse the linking behavior while flipping slurs using the Ctrl key. For example, select a slur in a part, hold down the Ctrl key and press F to flip the slur in both the score and part, retaining the link. Select a slur in the score, hold down the Ctrl key and press F to flip the slur in the score only, breaking the link to the part/all parts that contain that staff.
Note: If you choose to Remove Manual Slur Adjustments in a part (e.g. select a slur handle and press Backspace), the positioning is restored and the Engraver Slur status is reactivated, but not the link to the score. To relink the slur to the score, right-click the slur in the part and choose Relink to Score (or choose Relink In All Parts for the slur in the score).
Smart shapes that are usually measure-attached include hairpins, ottavas, trill extensions, lines and brackets. Any change to the vertical positioning or contour of a measure-attached smart shape in a part breaks its positioning link. Horizontal stretching in a part does not break its link to the score.
The following properties of measure-attached smart shapes are shared between the score and parts:
The following table lists properties of trills, trill extensions, and ottavas that are broken if changed in a part:
|
Property changed |
Link type broken |
|
Vertical positioning |
Positioning |
|
Hairpin width (opening) |
Positioning |
|
Show/Hide setting |
Show/Hide |
When a repeat is added to either the score or part, it appears in both. When a repeat is deleted from either the score or part, it is removed from both.
The following general repeat settings are permanently shared between the score and parts:
The following table lists properties of text repeats and ending brackets that are broken if changed in a part:
|
Property changed |
Link type broken |
|
Repositioning (nudge, drag, or H: V: values) Includes Text Repeats and ending bracket front hook, back hook, inset for start of bracket and inset for end of bracket |
Positioning |
|
Show/Hide setting |
Show/Hide |
Text repeats are similar to expressions in that a single text repeat can be assigned to multiple staves (see Repeats (barlines and text indications)), which has some implications for linked parts.
When you first add a text repeat (Fine, To Coda, D.S. al Coda, etc), positioning changes to that item in the score apply to all parts. If a text repeat or bracket is repositioned in a part, the change does not affect other instances in the score or other parts, and future positioning changes to that text repeat in the score do not apply to that part. However, if a text repeat is repositioned in a part containing multiple instances of that text repeat, all instances in the part are broken (and all instances of that text repeat in the part continue to move uniformly).
Broken text repeats in parts can be relinked to the score at any time (see Relinking part items to the score).
The “Allow individual edits per staff” setting in the Text Repeat Assignment dialog box, Backward Repeat Bar Assignment dialog box, and Create Ending dialog box allows you to reposition, hide, or show an instance of a repeat marking without applying the same changes to other instances of that repeat marking on other instrument staves.
In general, ending bracket positioning is identical to repositioning of text repeats. Most positioning changes to an ending bracket in the score apply to the corresponding part, and positioning changes in the part breaks the positioning link. However, if the ending bracket is extended across the right barline in the score, the positioning link is automatically broken for that ending bracket in all parts. To extend an ending bracket across the right barline for all parts, each will need to be edited individually. (Note that this is the only type of score edit that automatically breaks the link to its part.
Show/hide setting for text repeats and ending brackets
The show/hide linking behavior for text repeats and ending brackets follows the same rules as repositioning and depends on the Allow Individual Edits per Staff setting. See Repositioning expressions above.
Staff Attributes in linked parts
When the Staff Attributes dialog box is opened in a part, only staves within the part are accessible. All of the settings are permanently shared between the score and parts with the exception of the Staff Name/Abbr. Staff Name positioning. If the Staff Name/Abbr. Staff Name is repositioned in the part, the link is broken - the change does not apply to the score or any other part. Future changes to the Staff Name/Abbr. Staff Name in the score for that staff do not apply to the part unless the Staff Name/Abbr. Staff Name is relinked (see Relinking part items to the score). (Staff Name in Parts is unchecked by default. Check this option in the Staff Attributes dialog box to show staff names in the score and parts.)
Groups are independent between the score and parts. Edits to a group in the score do not apply to the part and vise versa. They can have different names, brackets, and other attributes. (See Groups). When creating parts, the only groups that can be inherited by a part are the groups that appear in the Manage Parts dialog box.
When a staff style is added to the score, it appears in both the score and corresponding parts. When a staff style is added to a part, it appears in that part only. When a staff style is deleted from the score, it is also deleted from the corresponding part. Deleting a staff style in a part does not delete staff styles in the score or any other part. When a part is created from a staff that contains staff styles, all staff styles on the staff are copied to the part.
Staff styles can be used to create two representations of the same part. You can create a new part containing a copy of, for example, the bass clef baritone staff and apply a staff style that displays it in B flat treble clef. For steps, see To display a staff differently in one part than another.
Chords, fretboards, and lyrics in linked parts
When a chord symbol is added to either the score or part, it appears in both. When a chord symbol is deleted from either the score or part, it is removed from both.
Changes to the chord or fretboard definition in the score or part apply to both. The following table lists properties of chords and fretboards that are broken if changed in a part:
|
Property changed |
Link type broken |
|
Repositioning (nudge, drag, or H: V: values) Includes chord symbol and fretboard. |
Positioning |
|
Show/Hide setting |
Show/Hide |
Chords, Fretboards and Lyrics are new additions to the Staff Attributes dialog box and Staff Styles dialog box (See Staff styles). These are particularly useful as Staff Styles.
Hiding Chords/Fretboards:
If you would like to display chord symbols in linked parts, but don't want the chord symbols to appear on this staff in the score, create a Staff Styles (Staff styles) that hides chords and fretboards and apply it to the Score. (Remember that assigning a Staff Style to the score also assigns it to corresponding staves in parts, so you will need to remember to delete this Staff Style in parts.)
Hiding Lyrics
If you would like to use the vocal lines to create string parts, create a Staff Style (Staff styles) that hides lyrics and apply it to the parts whose lyrics you'd like to hide.
If you have a Lead Sheet, or a melody line and chord symbols, for example, that you would like to transpose for several instruments, use linked parts:
Let's say that you have a single staff melody line with chord symbols for a C transposing instrument such as Flute.
Clefs are permanently linked, but staves in parts can display a different clef with a Staff Style. (It may be necessary to force a clef in a Part and not the Score or vice versa when doing cue notes.) To add a Staff Style to a part to display a different clef:
Measure Numbers in linked parts
The visual appearance and frequency of measure numbers for both the score and parts is controlled by the Measure Number dialog box. Regardless of whether you are viewing the score or parts, changes to this dialog box apply to both.
The enclosure is the only attribute of a measure number that is permanently shared between the score and parts.
The following table lists properties of measure numbers that are broken if changed in a part:
|
Property changed |
Link type broken |
|
Repositioning (nudge, drag, or H: V: values) |
Positioning |
|
Hide/Show setting |
Hide/Show |
Whether a measure number is shown or hidden for a measure is first determined by settings for that measure number’s region in the Measure Number dialog box. Then, you can edit the show/hide setting for individual measure numbers within the region using Contextual Menus.
Using the Show/Hide commands in a Part will not affect the Score or other Parts.
If the measure number is defined to show according to the Measure Number Region in the Measure Numbers dialog box:
If the measure number is defined to not show according to the Measure Number Region in the Measure Numbers dialog box:
Page-attached Ossia measures in linked parts
Page-attached Ossia measures behave much like page-attached text. When a page-attached ossia measure is added to a single page, Finale adds it to the corresponding page of the score or part based on page number, and also takes into account title pages. Since the page number of the score will generally be far different than the page number of the part, page-attached ossia measures should only be used for the first page of music (if at all in documents containing linked parts). To attach an ossia measure to a measure that will adjust according to layout changes, use measure-attached Ossias. See Ossia.
The following table lists properties of page-attached ossia measures that are broken if changed in a part:
|
Property changed |
Link type broken |
|
Repositioning/Page Assignment for Ossia Measure |
Positioning |
|
Hide/Show setting |
Hide/Show |
Measure Attributes in linked parts
Every setting in the Measure Attributes dialog box is permanently linked between the score and parts except the following settings which are never linked:
Again, all other items are linked including the "Begin a New Staff System" setting which should be used for measures that will begin a new system for both the score and all parts. Use the Fit Measures dialog box or manual editing (see To move a measure to the previous (or next) system) to move measures in the score or part independently.
Since parts often bear many similarities to each other with regards to layout Finale allows you to apply page layout changes to any number of parts (or the score). System spacing, system margins, page size, page margins, page reduction and the addition/removal of blank pages can be applied to multiple parts at once. By default, changes to the system or page layout only apply to the part you are viewing. Also, Update Page Format settings apply to the appropriate Page Format for Score or Page Format for parts dialog box.
To apply page layout settings to multiple parts
If Automatic Music Spacing is turned on (Program Options-Edit), Finale applies automatic changes to the measure width and layout to both the score and part when you edit either. (As you enter notes, Finale’s automatic adjustments are applied to both the score and linked part). Manual changes made to music spacing, measure width, or system composition with the Measure Tool or Selection Tool apply to the part/score you are currently editing only.
You can apply music spacing to regions of measures for a single part or several parts at once.
To apply music spacing to a region of measures in more than one part:
Choose the Selection Tool.
Select a region of measures.
From the Utilities Menu, choose Music Spacing > Apply Music Spacing to Selected parts/Score. The Apply Music Spacing dialog box appears.
Choose the parts you want to apply music spacing changes to.
From the radio buttons at the bottom, choose the type of music spacing you would like to apply.
Click OK. The music spacing type is applied to the region of measures you selected in the selected parts.
When Automatic Music Spacing is on, your settings in Document Options-Music Spacing apply to all parts and the score. If Automatic Music Spacing is off, changes to the layout only apply to the part or score you are currently editing.
Note: All all manual changes to the horizontal placement of individual entries made within the Speedy Frame or with the Note Position Tool apply to both the score and linked part.
Multimeasure Rests in linked parts
When parts are created while setting up the score in, for example, the Setup Wizard, multimeasure rests are not created automatically. (If they were at this point, each part would be a single multimeasure rest.) When a linked part is created from an existing staff in the score (in the Manage Parts dialog box), Finale groups the silent measures together into a multimeasure rest, or block rest, as shown below (if Create Multimeasure Rests is checked in the Part Creation Preferences dialog box).

To create multimeasure rests for the selected parts/score (all measures):
Finale automatically breaks up block rests at key or time changes, repeat barlines or text repeats, any “real” whole rest (a whole rest you entered, not the default whole rest that appears in any measures left empty), or any measure you’ve explicitly designated to break such a multimeasure rest. See the Break a Multimeasure Rest option, in the Measure Attributes dialog box for more information.
Multimeasure rests do not appear in Scroll or Studio View. In fact, there is no visual cue that indicates where multimeasure rests appear in any view but Page View. If a note is added, in Scroll or Studio View, to a measure that is part of a multimeasure rest, Finale automatically breaks the multimeasure rest - each measure with notes displays in full in Page View (if Update Automatically is checked in Document Options-Multimeasure Rests, which is the default setting). Update Automatically is not checked in files converted from Finale 2006 or earlier.
With the Update Automatically setting checked, multimeasure rests only become smaller, not larger. (In other words, Finale never assumes you want to create or increase the duration of a multimeasure rest). You have the choice of automatically updating multimeasure rests to parts using the Measure Menu as described above, or applying them manually. To create a multimeasure rest manually, see To create a multimeasure rest.
Baseline Positioning in linked parts
Lyrics, chords, and expressions can all be adjusted vertically using positioning triangles. These positioning triangles are used to adjust the “baseline” which is the imaginary horizontal line to which these elements are attached (above or below the staff). Whether you are positioning chords, lyrics, or expressions there are four positioning triangles, each responsible for a specific range; score, staff, system, or next entry (for an example, see To adjust the vertical positioning of expressions, To set the baseline (vertical position) for lyrics graphically and Position Chords/Position Fretboards under the Chord Menu.
Adjusting baselines in the score:
Adjusting baselines in a part:
IMPORTANT NOTE: There is no visual cue that flags unlinked baselines in parts. There is also no visual cue in the score that indicates a baseline has been broken in one or more parts.
Enharmonic spelling is one of the few notation
elements whose link can be broken between the score and parts. Due to
instrument transposition, it is entirely possible a different harmonic
spelling will be required in the part than in the full score, and to
accommodate this, enharmonics share the standard linking behavior described
under Linked Parts.
Change a note to its enharmonic equivalent in the score and the change
applies to the corresponding part; change a note to its enharmonic equivalent
in a part, and the score remains unchanged - the link has been broken.
The notehead changes color to orange (in both the part and score) indicating
the enharmonic spelling has been broken. In no other way can a note/accidental
be broken, so if a note is orange its enharmonic spelling has been broken
in one or more parts. Once broken, future edits to the enharmonic spelling
of this note in the score do not apply to the corresponding part unless
the enharmonic spelling is relinked.
Time Signatures in linked parts
It is not uncommon for the appearance of a time signature to differ between the score and parts. For example, a single large time signature may be used for several score staves. And of course, a single time signature is required for each part. To accommodate this, Finale allows separate document settings for time signatures - one set for the score and one set for parts in Document Options - Time Signatures.
You can use Staff Styles to apply a different instrument transposition, clef, or other staff attribute to a part. See To display a staff differently in one part than another.
Relinking part items to the score
Any part item that has been broken can be “relinked” to the score. When you relink, all attributes of that item (positioning, show/hide setting, etc.) are reset to match the corresponding score item, and future changes the score item will apply its corresponding part item. To relink:
There is a special text insert designed specifically for use as the part name in linked parts. This text insert already exists in most new files, however, if you are opening a file created in Finale 2006 or earlier do the following to add part names to all of your parts:
Finale allows you to specify any combination of the score and/or parts for printing in the Print dialog box. (When Print is chosen from the File Menu, this dialog box automatically appears prior to displaying the Print dialog box.) In the score/parts list box, you can also specify the number of copies for each item selected. When multiple items are checked, upon printing, Finale automatically collates, batch printing each selection as if it were its own print job.
To print parts directly from the score
Finale is designed to allow you to easily print any number of parts from the main project document. To do so:
A page containing only the title, composer, and page text, and a note to “tacet” or “tacit” informs the player to rest for that entire movement/act of a musical/etc. Creating such a page in Finale is easy using linked parts. To create a tacet part:
1. The representation of the notation may differ between the score and parts to account for different transposition or enharmonic spelling.
2. The note assignment of note-attached or notehead-attached smart shapes are permanently linked and cannot be broken. See Smart Shapes in linked parts.
3. Changing the vertical positioning of markings in a part using baselines breaks that baseline link for the part, but not the manual positioning link. There is no visual cue that flags a broken baseline. See Baseline Positioning in linked parts.
![]()