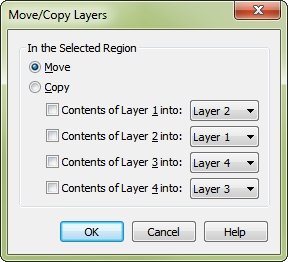
Move/Copy Layers dialog box

How to get there
- Choose the Selection tool
 .
.
- Select a region of measures.
- Choose Edit > Move/Copy Layers.
What it does
Note: If you set up these controls so that the contents of more than one layer get moved into the same other layer, PrintMusic will only move the highest-numbered layer’s contents. For example, if you indicate that you want the contents of Layers 2, 3, and 4 moved into Layer 1, only Layer 4’s music will actually be moved.
The Move/Copy Layers command provides a way to move music from one layer to another. You can even swap the music between layers—if, for example, you mistakenly entered several stems-down notes in Layer 1, which you intended to use only for stems-up (upper) voices.
- Move • Copy. Choose Move to convert notes in one layer to another. Choose Copy to convert notes in one layer to another and leave the original notes in place. When Copy is chosen, notes in the new layer are superimposed on the original notes.
- Contents of Layer [#] into: Layer 1 • Layer 2 • Layer 3 • Layer 4. Using these controls, you can specify how you want to move the selected music among the four transparent staff layers. Select the first two checkboxes, for example, and set up the drop-down menus as shown above, to swap the contents of Layers 1 and 2.
Be careful, however. If there’s already music in the layer you choose from the drop-down menu, it will be replaced by the music you’re transferring. (PrintMusic will warn you if you’re about to lose music that’s already in the destination layer.)
- OK • Cancel. Click OK (or press ENTER) to make the transfer and return to the score. Click Cancel to tell PrintMusic to leave the layers as they were. You return to the score.
Tip: To display and work with layers independently, choose the layer, and then choose View > Show Active Layer Only.


